
WaiterOne KDS manual
Practical instructions for setting up your kitchen display and using it during service.
About this manual#
WaiterOne KDS receives kitchen orders from your WaiterOne system on an iPad or iPhone. Kitchen staff can follow tickets, mark items done, manage preparation, and show order progress on a separate browser screen. Products, prices, and order routing are managed in WaiterOne.
This manual describes the current KDS interface with Open, History, All Day, Prep & Stock, and Settings. Availability depends on your installed versions of KDS, WaiterOne, and Remote. Older screens may use Prepare, Service, and Close or may not include Prep & Stock and label features. Ask support if your screen differs. English button names are used here as reference labels; the app may display their translations.
Use the setup chapters if you manage the system. During service, start with Working with tickets. For a quick staff briefing, use the service checklist.
Screenshots use fictional demo data and the English interface. The isolated KDS demo shows Starting because its local order receiver was unavailable during capture. Verify your own setup with a test order. Select any screenshot to open it at full size.
Quick start#
- Open KDS on the kitchen device and keep it connected to the same local network as WaiterOne.
- Allow Local Network access when requested. Keep KDS open in the foreground during service.
- Configure the KDS destination in WaiterOne and send a test order, following Connect to WaiterOne.
- In KDS, select Open. Check the table or order number, quantities, courses, and comments.
- Tap Start when preparation begins. Tap an item as it is completed.
- At the agreed handover point, tap Service to alert connected staff devices. If your team uses paper service slips, also check the output from the default ticket printer.
- Tap Ready to move the ticket to History. If this was a mistake, open History and tap Reopen.
- If your kitchen records production or prints labels, follow Prep & Stock and test the product, staff, connection, and printer setup before use.
For a workflow where staff explicitly start preparation, leave Settings > Status Board > Only show preparing orders off. In the current interface, enabling it also hides the ticket's Start/Prep button.
Before you begin#
- An iPad or iPhone with a KDS version suitable for your WaiterOne installation. Confirm device and operating-system requirements for the version you install.
- The main WaiterOne device and a working local network. Include Remote devices in your setup test if staff use them.
- Local Network permission for the apps that communicate with each other. If previously denied, enable KDS access in the device's iOS or iPadOS settings.
- Power for the kitchen device and a position where staff can read and reach it without obstructing work.
- Optional: a supported network ticket or label printer, and a browser device for the Order Status Board.
Use a trusted staff network. A guest network may prevent devices from reaching each other even when they show the same Wi-Fi name. Ask your network administrator to check device isolation if communication fails. Coordinate address changes with whoever manages your network.
KDS is a kitchen workflow tool. Completing a kitchen ticket does not settle the customer's bill. Continue to manage sales, payment, and accounting records in WaiterOne.
Connect to WaiterOne#
Find the kitchen display#
Automatic discovery requires versions of both WaiterOne and KDS that include KDS search. If the search button is unavailable or your KDS does not appear, use the manual-address instructions below. Keep both devices on the same local network, allow Local Network access for both apps, and leave KDS open in the foreground.
- Launch KDS on the kitchen device and leave it open.
- On the main WaiterOne device, open Data > Printers. Add or select the destination for this kitchen display.
- Set a recognizable Name, choose WaiterOne KDS under Type printer, and keep Copies at 1.
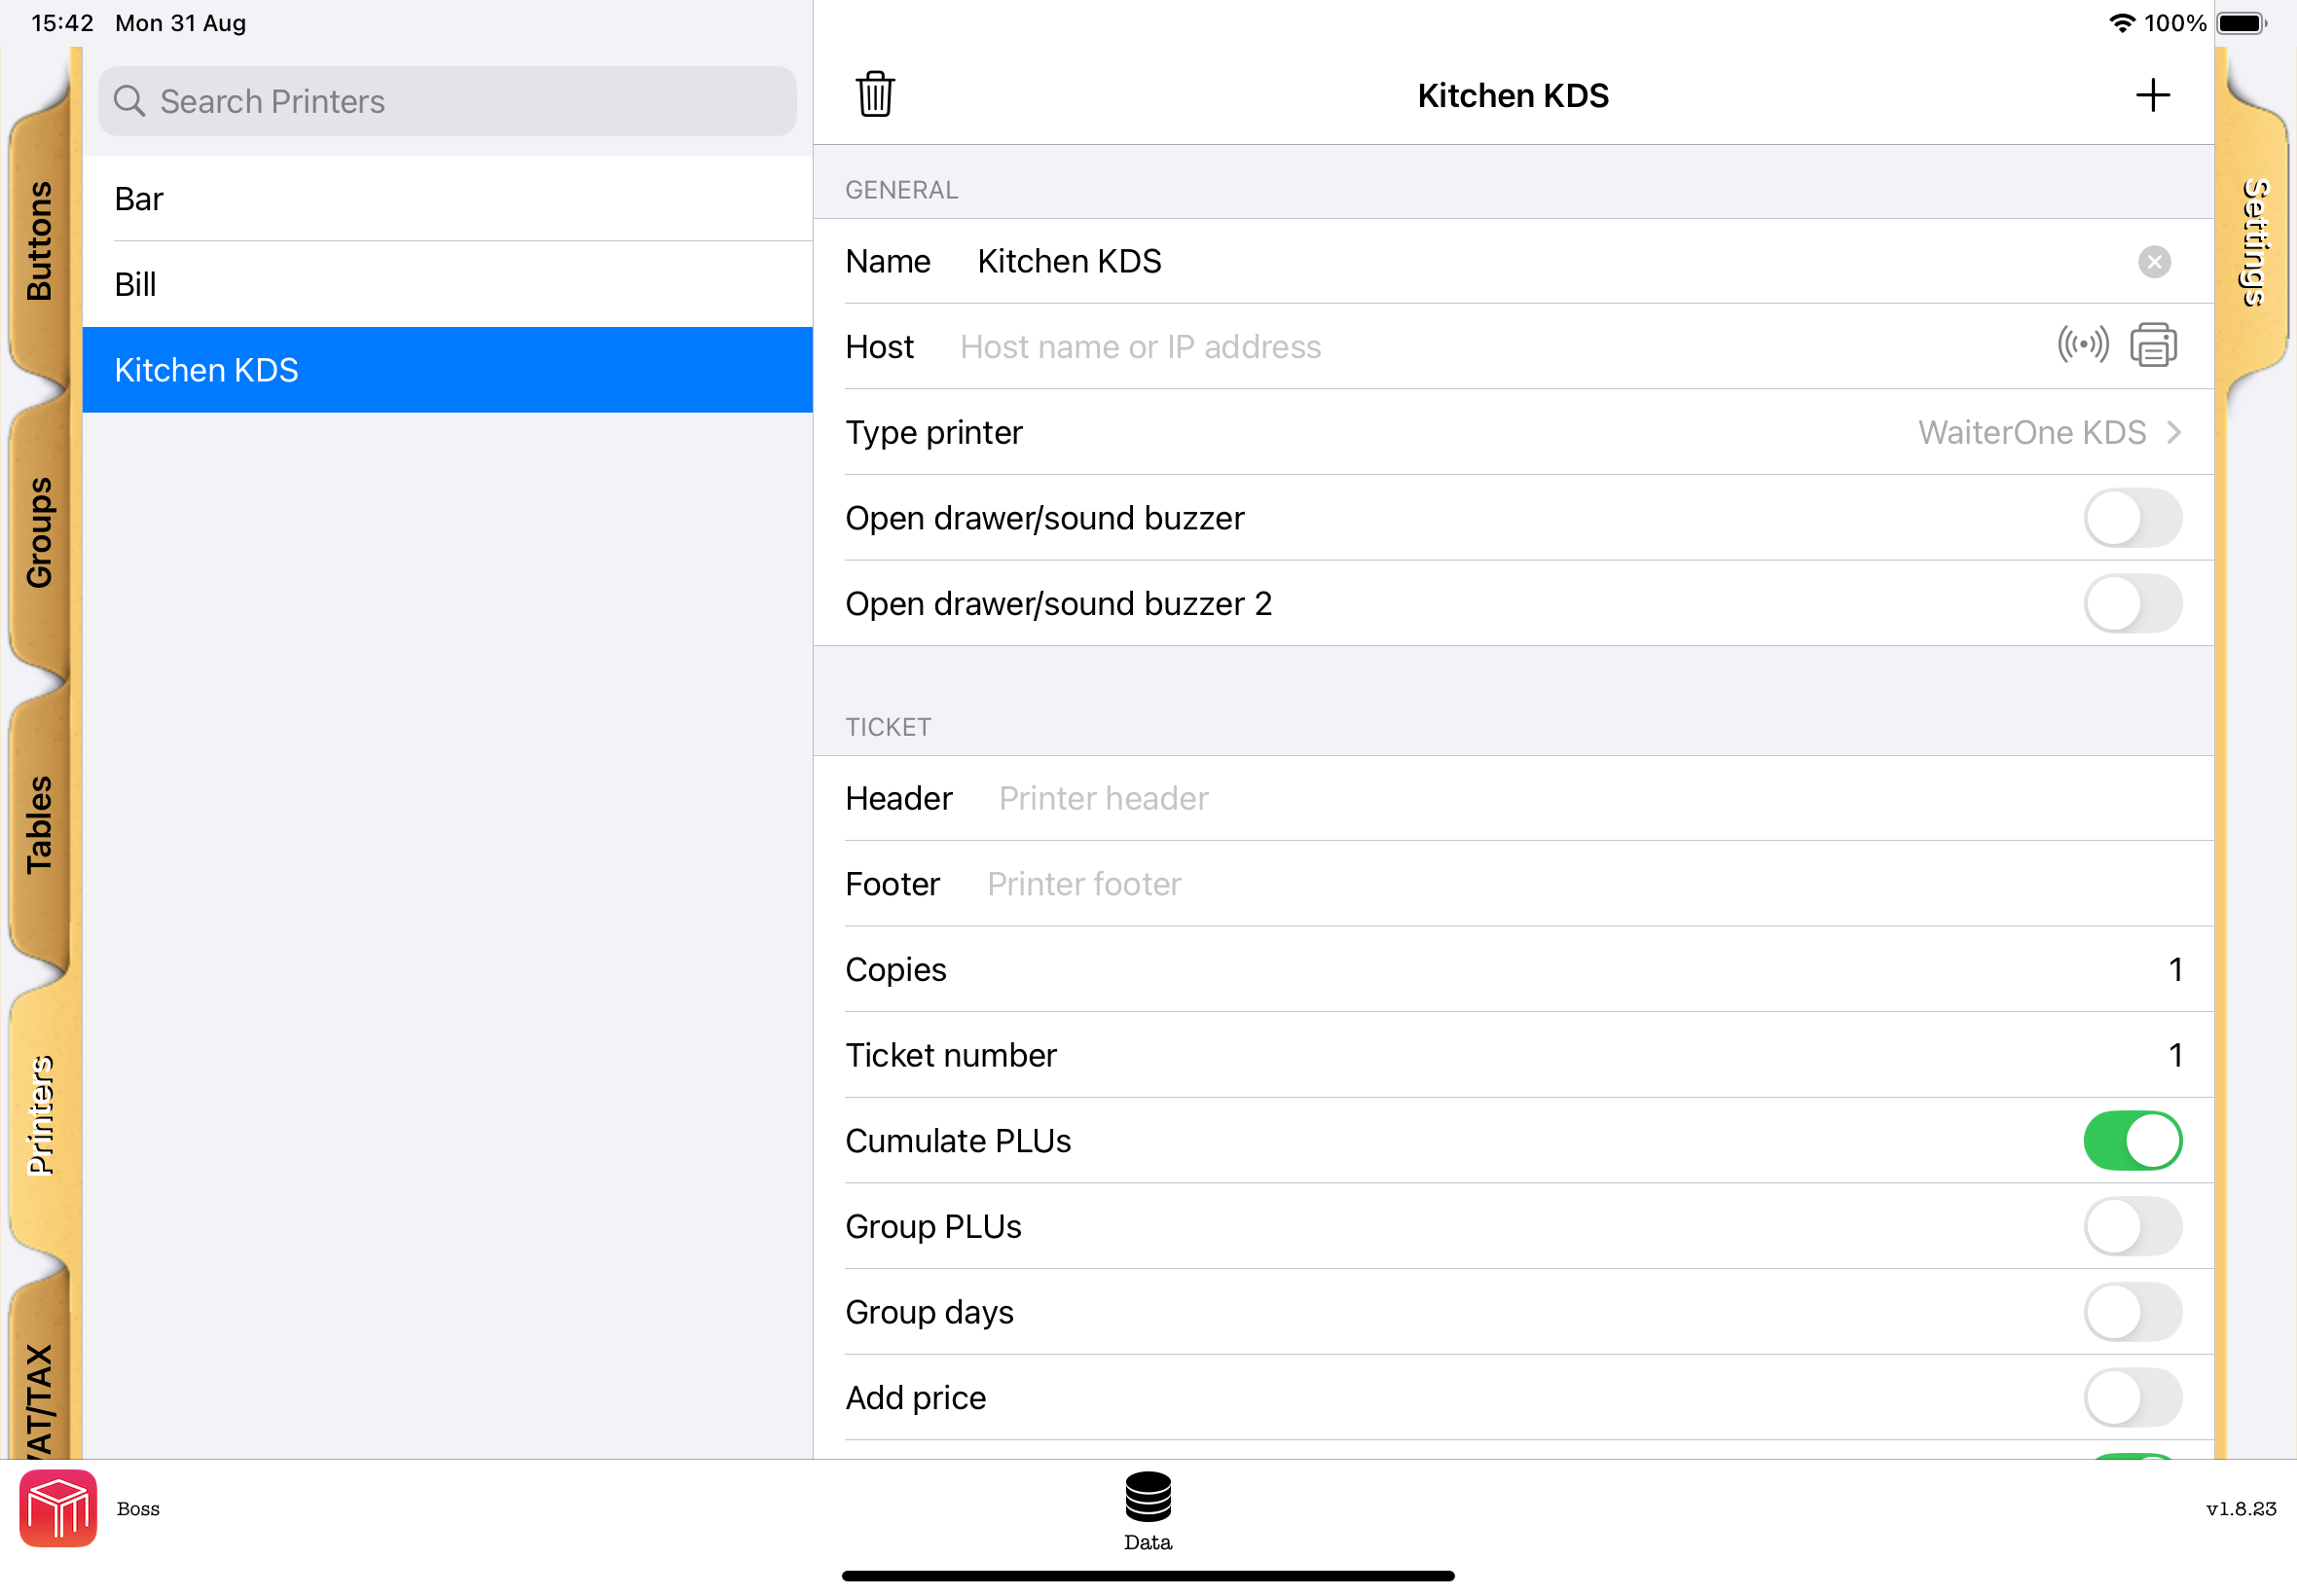
If the search button is missing on an existing KDS record, open Type printer, select WaiterOne KDS again even if it is already checked, and return to the record. The current interface may need that refresh after switching from a regular printer.
- Tap the radio-wave search button beside Host. Its accessibility label is Search KDS screens. Keep KDS open while the search runs, which takes up to eight seconds.
- In Choose a KDS screen, select the intended screen. Each result shows the service name and hostname. Several screens can have similar names, so check the hostname before selecting.
- WaiterOne fills in and saves Host automatically. It saves a hostname rather than requiring you to copy the device's IP address. Leave the selected value unchanged. The search does not change Name, Type printer, or product routing.
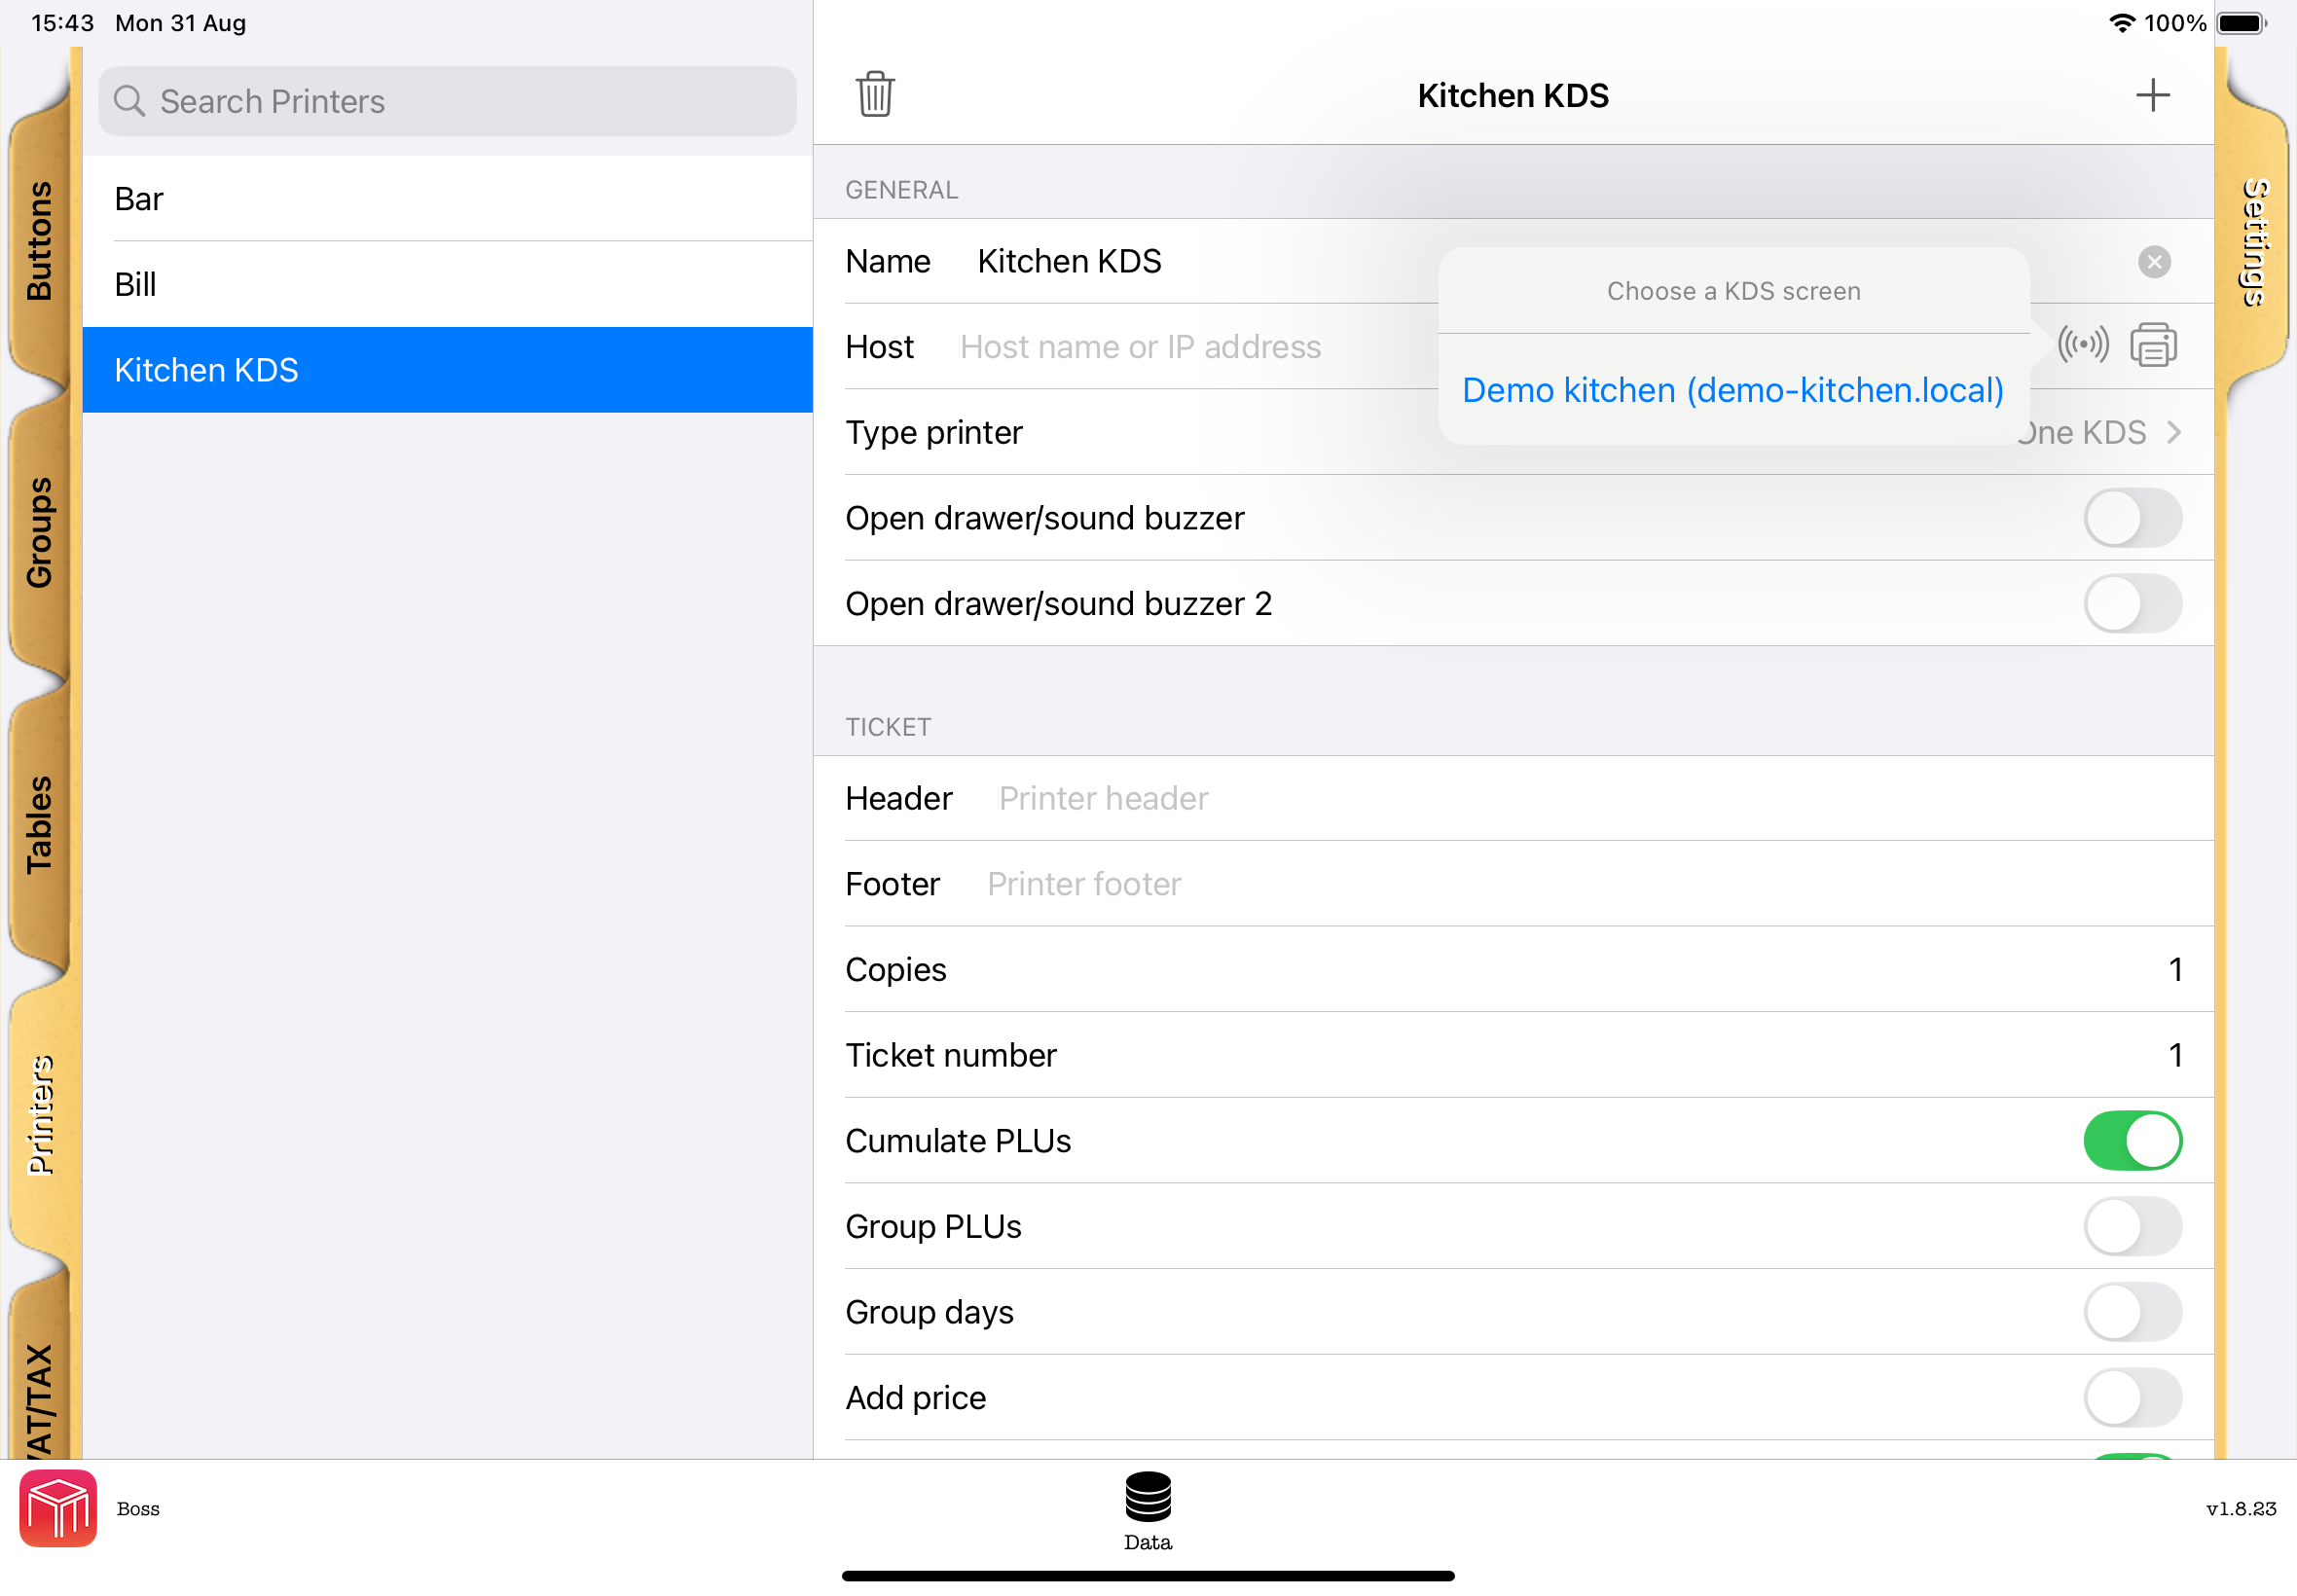
- Leave and reopen the printer record to check the saved Host. Tap the printer icon beside Host and confirm that KDS receives one Test product.
- Route the required product groups through Data > Groups > Printer. Products under Data > Buttons can use Inherit printer from group, or their own Printer selection when inheritance is off. Send a small test order containing the routed products.
- Check the quantities, course, table or order number, and comments on KDS. Test an order from Remote too if you use it.
Cancelling the search, finding no screens, or a failed search leaves the existing Host unchanged. If No KDS screens found appears, check that both apps support discovery, KDS remains open, both devices allow Local Network access, and the network permits communication between them. Then search again or enter the address manually.
Discovery helps you find a destination; it does not authenticate it or prove that orders arrive. Always select the intended screen and complete the test order. The optional Order Status Board does not need to be enabled for KDS discovery.
Enter the address manually#
- On the KDS device, open the device's Settings > Wi-Fi, tap the information button beside the connected network, and note its IP address.
- Return to KDS and leave it open.
- In WaiterOne's Data > Printers, open the kitchen-display destination, enter that IP address in Host, choose WaiterOne KDS under Type printer, and keep Copies at 1.
- Finish editing, reopen the record to check the saved address, and use the printer icon beside Host to send a test. Then verify product routing and send a small routed order as described above.
Manual entry remains available for older app versions and networks where Bonjour discovery is blocked. A guest network or device isolation may also block order delivery, so entering an address does not replace checking network access.
Although this destination is configured under Printers in WaiterOne, it sends orders to the kitchen screen. Printers configured inside KDS are separate: they print paper tickets or labels from KDS.
For a network administrator: incoming KDS orders use TCP port 1112. The generic printer Port field does not select the KDS receiving port. Do not confuse it with the service printer's port 9100 or the board's web address.
For several kitchen stations, configure and test each destination separately. Check which products each station should receive. Do not assume that completing an item on one display completes it on every other display.
If the device address changes#
A manually entered IP address can change when the router assigns a new one. Compare the current KDS address with Host in WaiterOne, update it when necessary, and send another test. Your network administrator can arrange a reserved address to make a manual setup more stable.
If Host was filled by discovery and orders stop arriving after a network change, search again and select the intended screen, then test it. Do not replace a discovered hostname merely because it looks different from an IP address. Never copy an example address from a manual into your live setup.
Prep & Stock#
Set up products, staff, and the connection#
Use compatible versions of WaiterOne, KDS, and Remote. On the main iPad, open Data > Buttons, select the product, then open Settings > Stock control. Turn on Track stock and Show in kitchen prep, and check the stock unit. Only products selected for kitchen prep appear in KDS.
You can also set Quantity per container and Shelf life (hours). Container quantities use the product's stock unit. Enter only a shelf life approved by your kitchen. Staff must review and turn on the suggested use-by date before printing. Leave a field blank or enter zero to clear its default. Changing a default does not change existing batches or labels.
Give authorized kitchen staff Receive deliveries permission in WaiterOne. A manager can also record production. Enable Remote socket communication, keep WaiterOne open, and connect both devices to the same local network.
In KDS, open Prep & Stock, then Connection & staff. Tap Find main iPad, select the correct main, enter Your staff passcode, tap Done, and then Connect. KDS downloads the connection code and handles the network port. Use Use text keyboard for a passcode containing letters or symbols. Passcodes are cleared when KDS goes into the background.
If discovery finds nothing, check Local Network permission and Wi-Fi, or enter the main's address manually. Selecting a result fills the address without connecting or moving pending entries. Use Pair a different main only when intentionally changing the main iPad or stock database. Existing production remains associated with its original main.
This connection is for Prep & Stock. The WaiterOne destination that sends orders to the kitchen screen is configured separately under Connect to WaiterOne.
Record production#
- Select a product in Prep & Stock and enter the amount made in the displayed stock unit.
- Tap Record quantity made, or Record and prepare labels when labels are also needed.
- Wait for confirmation from the main iPad. KDS and connected Remotes then receive the confirmed availability.
- Open Activity to review the saved or pending entry.
Recording ten adds ten to the available quantity; it does not set the quantity to ten. Availability already includes order reservations from the main iPad, so it may differ from a physical count.
If confirmation is delayed, keep the original entry. Check its state and retry that entry when appropriate. Do not add the same production manually while its result is uncertain. KDS does not automatically submit pending entries after restarting or reconnecting. Printing and reprinting never add stock.
Print preparation labels#
After the main confirms the batch, review its label screen. Choose Quantity per container when each container has a known amount, then set Number of labels from 1 to 100. Batch quantity and container quantity are separate. For example, ten portions with two portions in each container can have five labels. Label differently filled containers separately. A selection cannot cover more than the recorded batch.
To show a use-by date, review the kitchen-approved date and time and turn on Include a use-by date. A saved shelf-life default is only a suggestion and does not enable the date automatically. KDS provides no food-specific shelf-life rule. A use-by date must follow the original preparation time.
Check the preview and selected printer, then tap Print labels. Labels show the product, original preparation details, batch reference and quantity. They also show the original staff name when available, the optional container amount and any selected use-by date.
From Activity, reopen a confirmed batch to print it again. Reprinting preserves the original preparation details and saved use-by date. It does not renew an expired date or increase stock. A confirmed batch can be printed while the main is offline if it still belongs to the paired main and stock database.
Print customer-order item labels#
Touch and hold Service on a ticket and choose Print item labels. A normal tap still performs the Service action. VoiceOver also offers the label action.
Choose an item, check its modifiers and destination, and select a label count up to its ordered quantity, with a maximum of 100 at a time. Each label represents one item. Items with zero or negative quantities cannot be selected. If the order changed, close and reopen the label screen to review its current details.
Printing does not start preparation, mark an order Ready, or change stock. History orders can also be reprinted. These order labels do not supply ingredients, allergens, nutrition, or other retail-packaging information.
Read the kitchen screen#
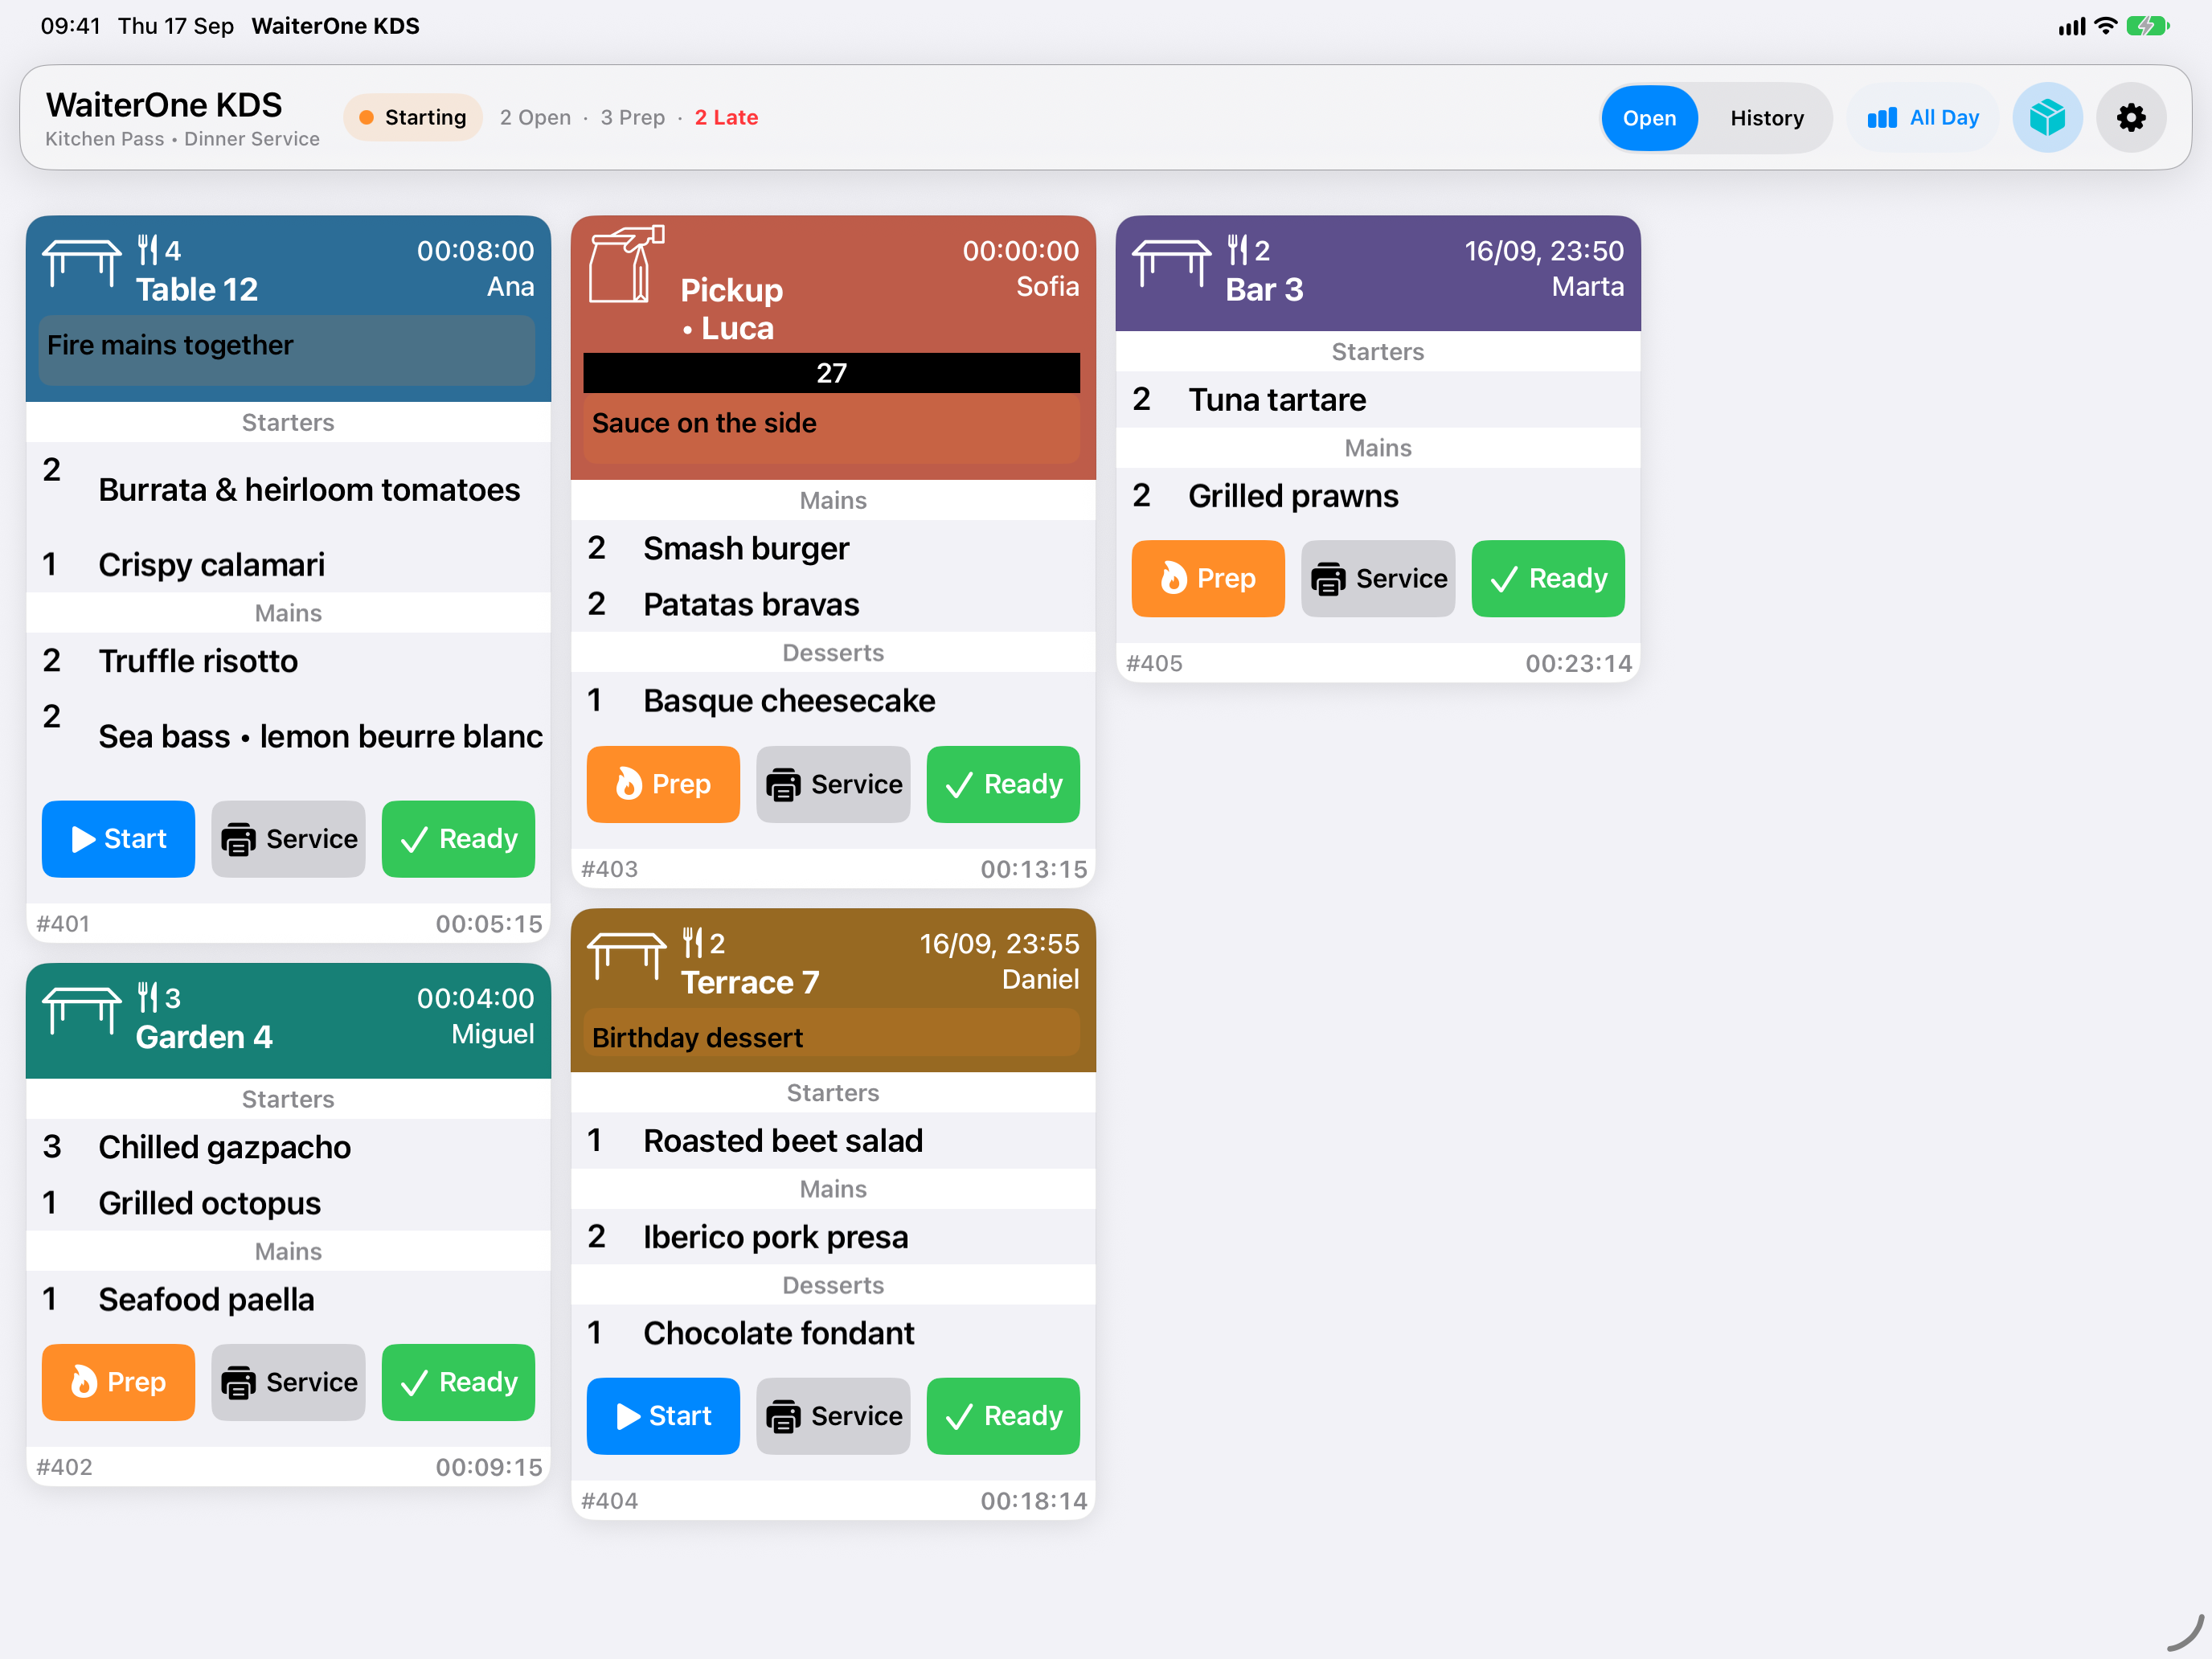
| Control or information | What it means |
|---|---|
| Open | Active tickets, including tickets already in preparation. |
| History | Completed tickets retained on this KDS device. |
| All Day | Item totals grouped by course for the selected list. In Open, these are the remaining items. |
| Prep & Stock box button | Kitchen production, confirmed availability, activity, and preparation labels when supported by the connected versions. |
| Settings | Display options, workflow, Status Board, printers, and diagnostics. |
| Open counter | Active tickets not yet in preparation. |
| Prep counter | Active tickets in preparation. |
| Late counter | Active tickets at least 15 minutes old, including either of the above categories. |
| Connection indicator | Whether the local order listener is available. Confirm the full connection with a test order. |
The Open and Prep counters together describe the active queue. Do not add Late again: it overlaps them. Counts also describe the active queue when you are viewing History. Late is an attention aid, not a promised preparation time, and is recalculated when the queue display updates. Ticket age is measured from the order time received with the ticket, not from when you tap Start, and continues to be shown in History.
A ticket can show its table or customer name, ticket and queue numbers, waiter, guest count, order time, courses, and comments, depending on what WaiterOne sends. Read modifiers and comments before preparation. A missing detail may need correcting in the originating order.
Scroll horizontally through the ticket area to see the rest of the queue. Long tickets may need vertical scrolling inside the ticket. Always check all courses and comments before marking the whole ticket ready.
Work with tickets#
Start and pause preparation#
Tap Start on an active ticket. Its button changes to Prep, indicating preparation. Tapping Prep returns it to the open preparation state. The ticket remains in the Open list either way.
Starting preparation does not mark its items done. Follow your kitchen's process for who starts tickets and who completes them.
Send a ticket to service#
Tap Service to alert connected staff devices and attempt a slip on the default ticket printer. This does not move the ticket to History and does not mark its items done. See Ticket and label printers before using it during service.
The service notification can be sent even when the printer is missing, disabled, or unable to print. A notification is not proof that a paper slip was produced. Check the printer and coordinate with staff before retrying.
Mark the ticket ready#
Tap Ready when the ticket has reached your team's completion point. It leaves Open and appears in History. If the Order Status Board is running, the action marks the order finished there.
Ready acts on the whole ticket. It does not require every item to be checked first. Confirm that all required work is complete before using it.
Reopen a ticket#
Select History, find the ticket, and tap Reopen. Return to Open to continue working. Its existing item checkmarks and preparation state are retained, so review them and adjust anything that needs doing again. Reopening does not create a new sale.
Mark items and read courses#
Tap a product line to toggle its done state. Completed lines are shown with a checkmark and strike-through. Tap again to undo the mark. A line with a quantity greater than one is handled as a line, not one individual unit at a time.
Checkmarks are retained when you switch between Open and History. Marking every line done does not automatically complete the ticket; use Ready separately.
Courses organize the meal sequence. Read course headings, modifiers, and order comments together. Modifiers appear in orange; negative quantities or voided lines appear in red. Read the text and quantity as well as the color. Mark the product line rather than treating a comment as a separate dish. If an order changes in WaiterOne, check the updated ticket before continuing.
When Print only undone items is enabled for your service printer, checked items are excluded from the service slip. Agree whether staff should print before or after marking items done.
Use the All Day summary#
Select Open, then tap All Day. On iPad it shows or hides a summary panel; on iPhone it opens a separate list that you close with Done. The display setting is also available under Settings > Display > All Day summary. In Open, the summary totals the remaining items from active tickets and groups them by course.
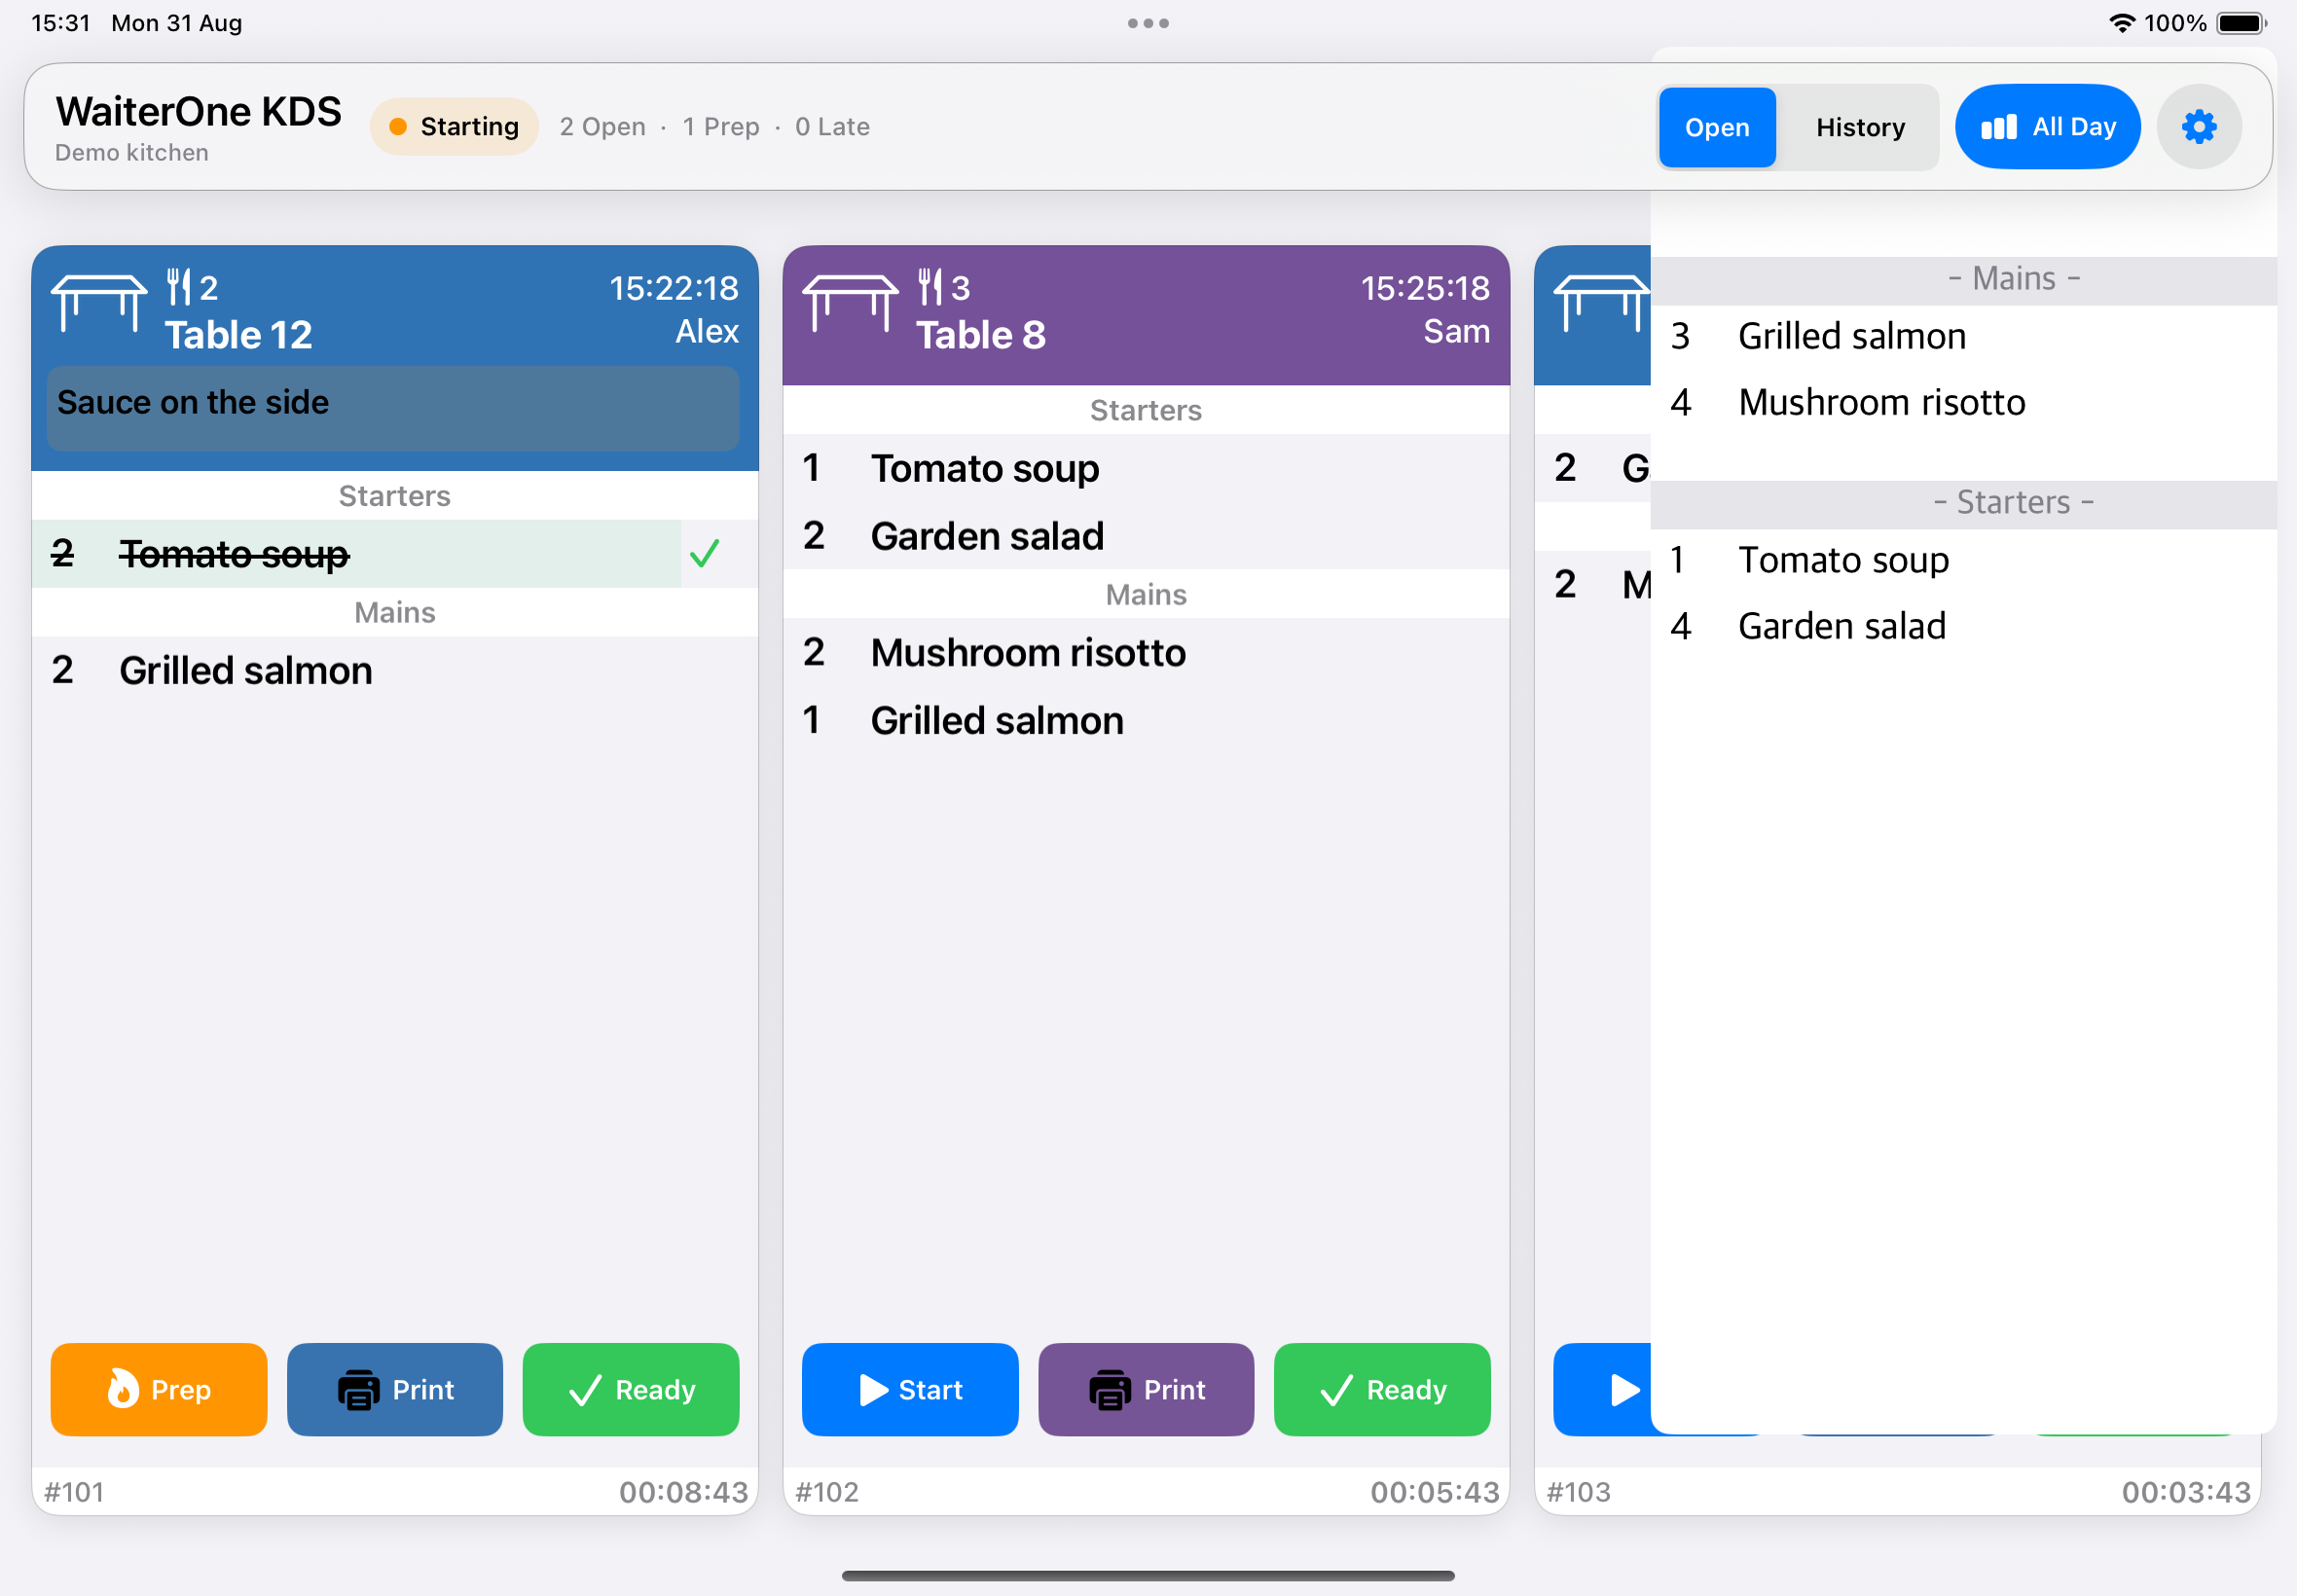
For example, two uncompleted burger lines in the same course contribute to that course's burger total. The same product in another course appears separately. Checking a line removes its quantity from the remaining total; undoing the mark adds it back. Completed tickets do not contribute to the Open summary.
In History, the summary instead includes all lines on the retained completed tickets, including checked items. It has no date filter and is not restricted to today. Return to Open for the current production totals.
On iPad, tapping a summary row briefly highlights matching visible product lines; it does not complete them. On iPhone, close and reopen All Day to refresh the separate list after new activity.
Use All Day to plan batches, then return to the individual tickets for table allocation, modifiers, comments, and handover. It is not a sales report or a replacement for reading each ticket.
History and cleanup#
History keeps completed tickets available for review and reopening. You can also choose Settings > Workflow > Completed orders. Open orders returns to the active queue.
To remove completed history from this KDS, open Settings > Workflow > Delete completed orders and review the confirmation. Cancel if you are unsure.
Deletion permanently removes the completed tickets and their item details from this KDS. They can no longer be reopened here. Do not use deletion to troubleshoot a connection problem, and do not clear history until your team has finished checking it.
This cleanup is separate from WaiterOne's sales and accounting history. Avoid deleting the app as a troubleshooting step, because local KDS information may be lost.
Display and accessibility#
Under Settings > Display, turn Waiter colors on to use the staff color supplied by WaiterOne. Turn it off to use assigned ticket colors. Colors help distinguish tickets; do not infer preparation status from the ticket background alone. Read the action labels and checkmarks too.
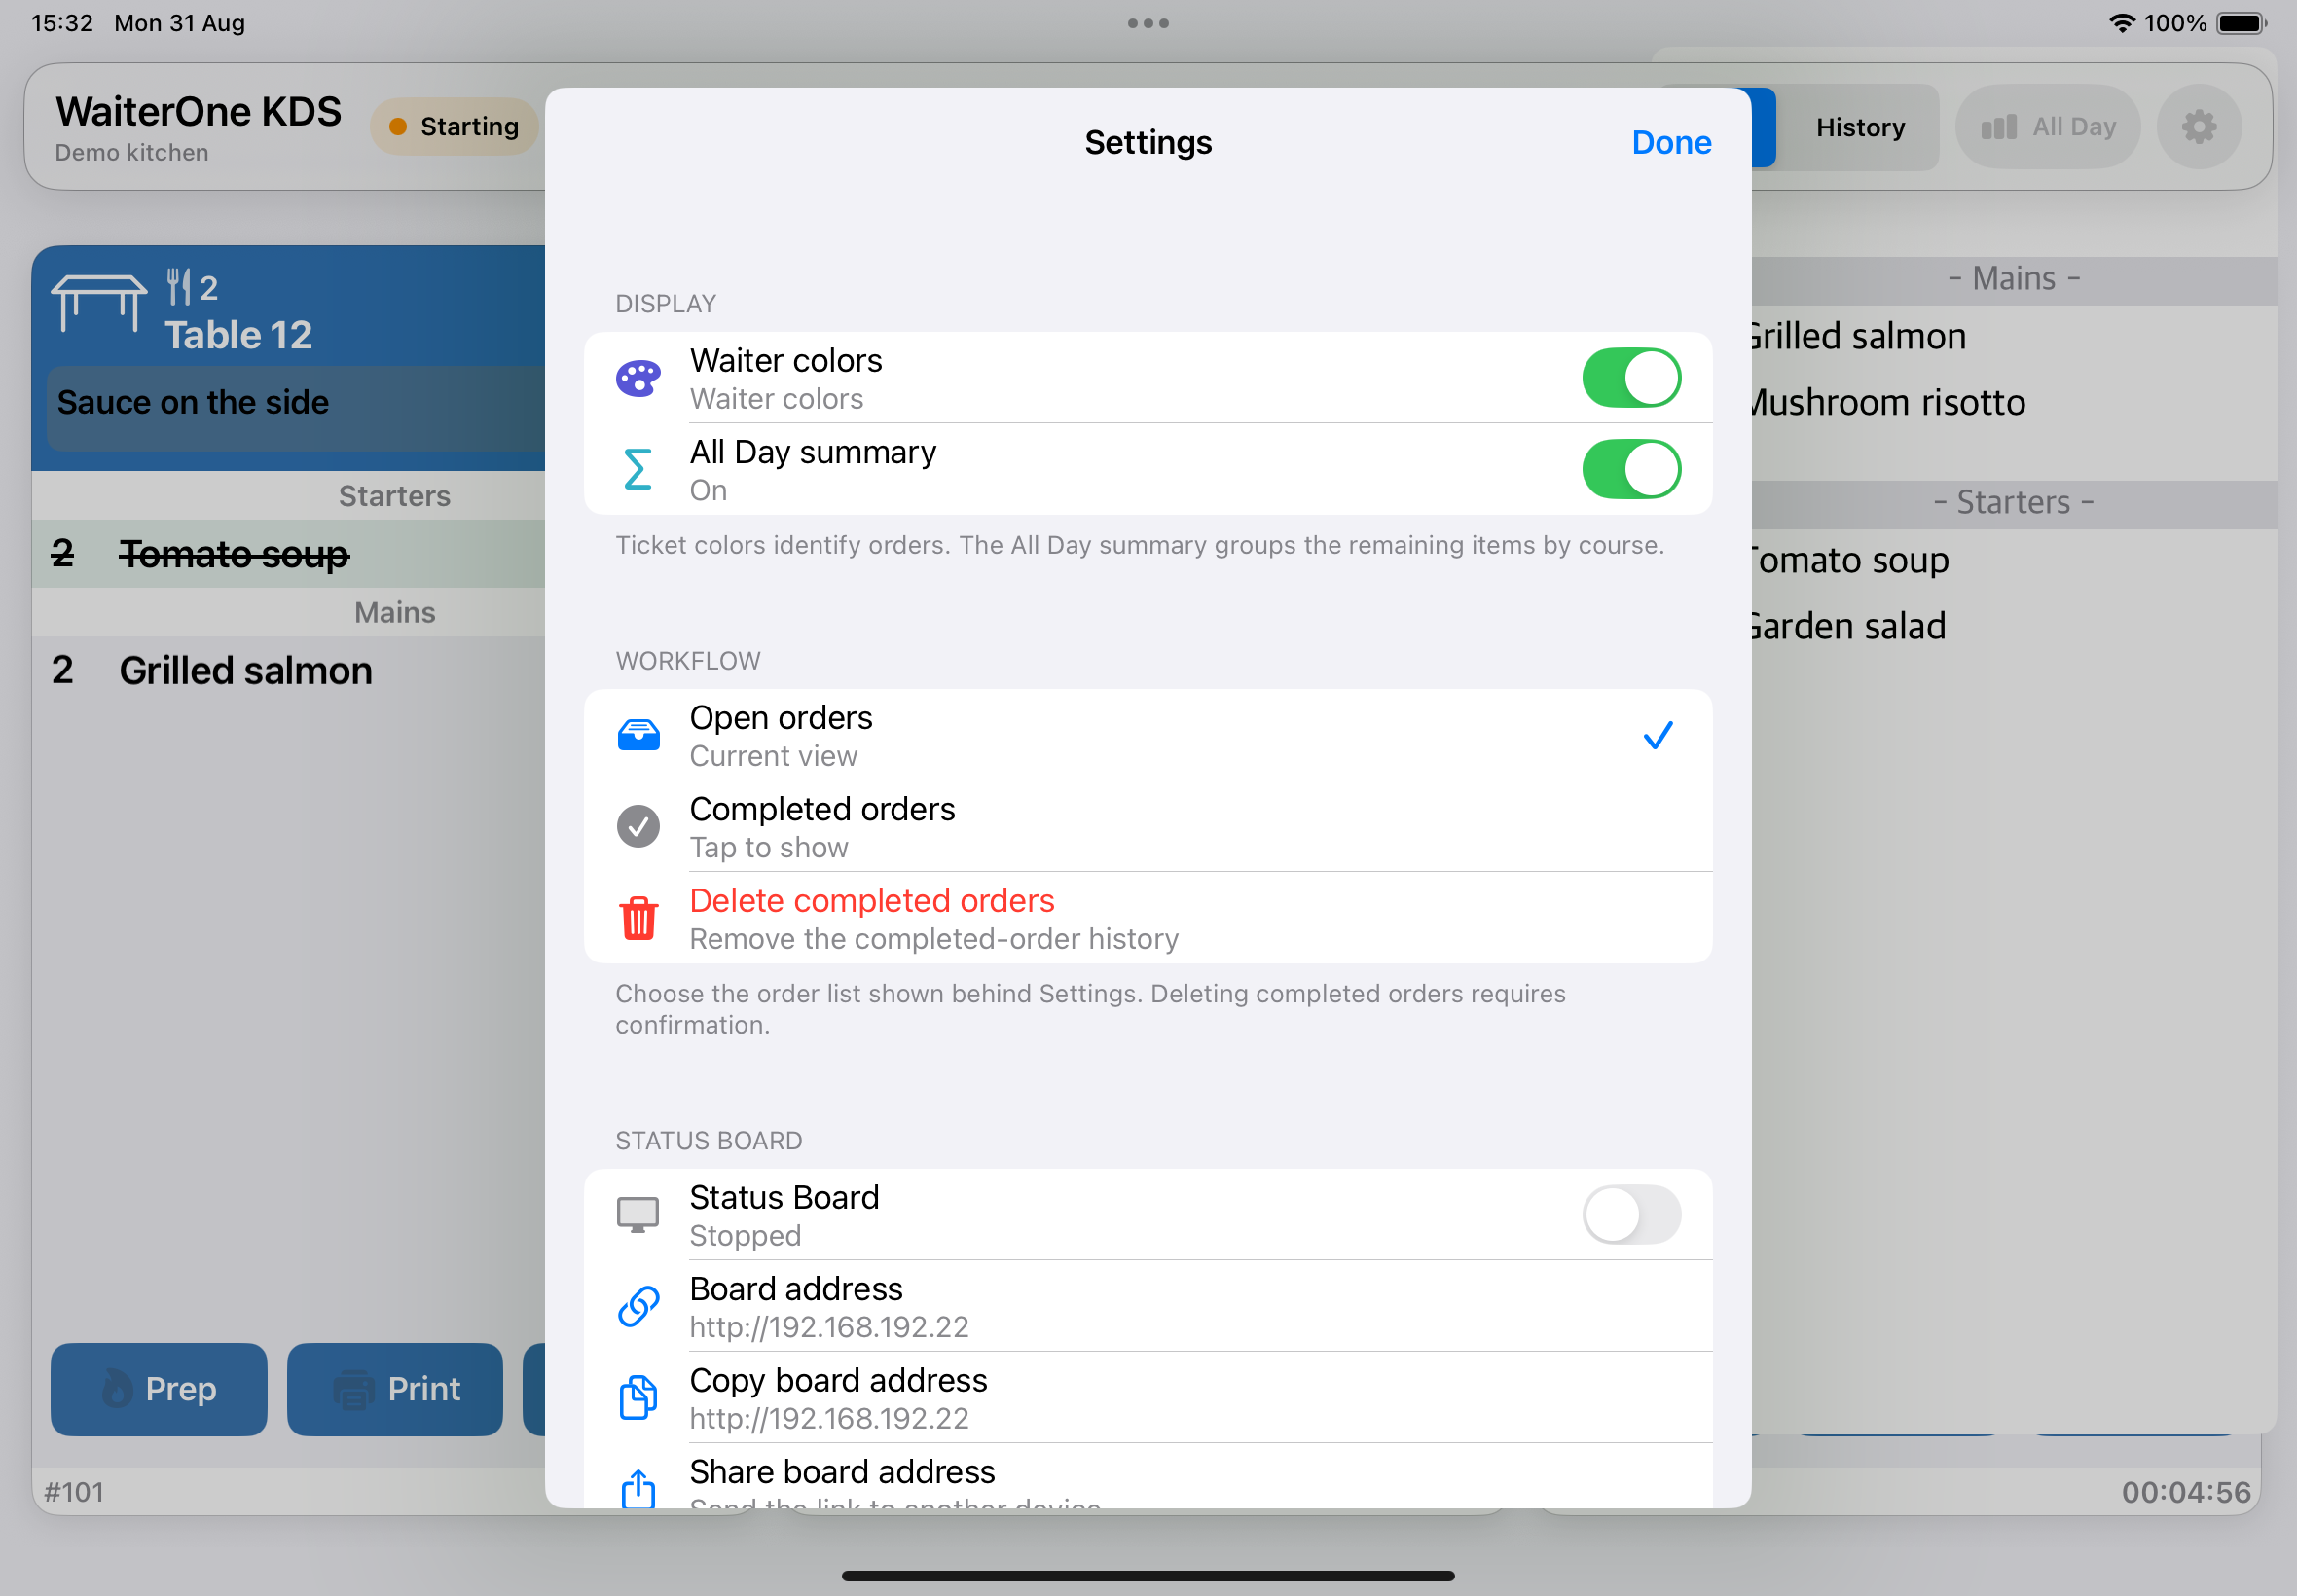
The All Day switch controls the production summary. Ticket layout adapts to the available screen space and device orientation. Choose a viewing position and text size that the whole team can read, and check long tickets after changing them.
Swipe one column at a time#
Turn on Settings > Display > Swipe by column to advance one ticket column with a left swipe or return one column with a right swipe. Turn it off to return to free scrolling. This setting works with stacked tickets and in both Open and History.
Stack tickets to save space#
Turn on Settings > Display > Stack tickets to place shorter open tickets above one another within each column. This uses the empty space below short tickets so more orders can fit on screen. The setting is on by default in versions that include it.
Read down each column, then continue with the next column on the right. Scroll horizontally to see more columns.
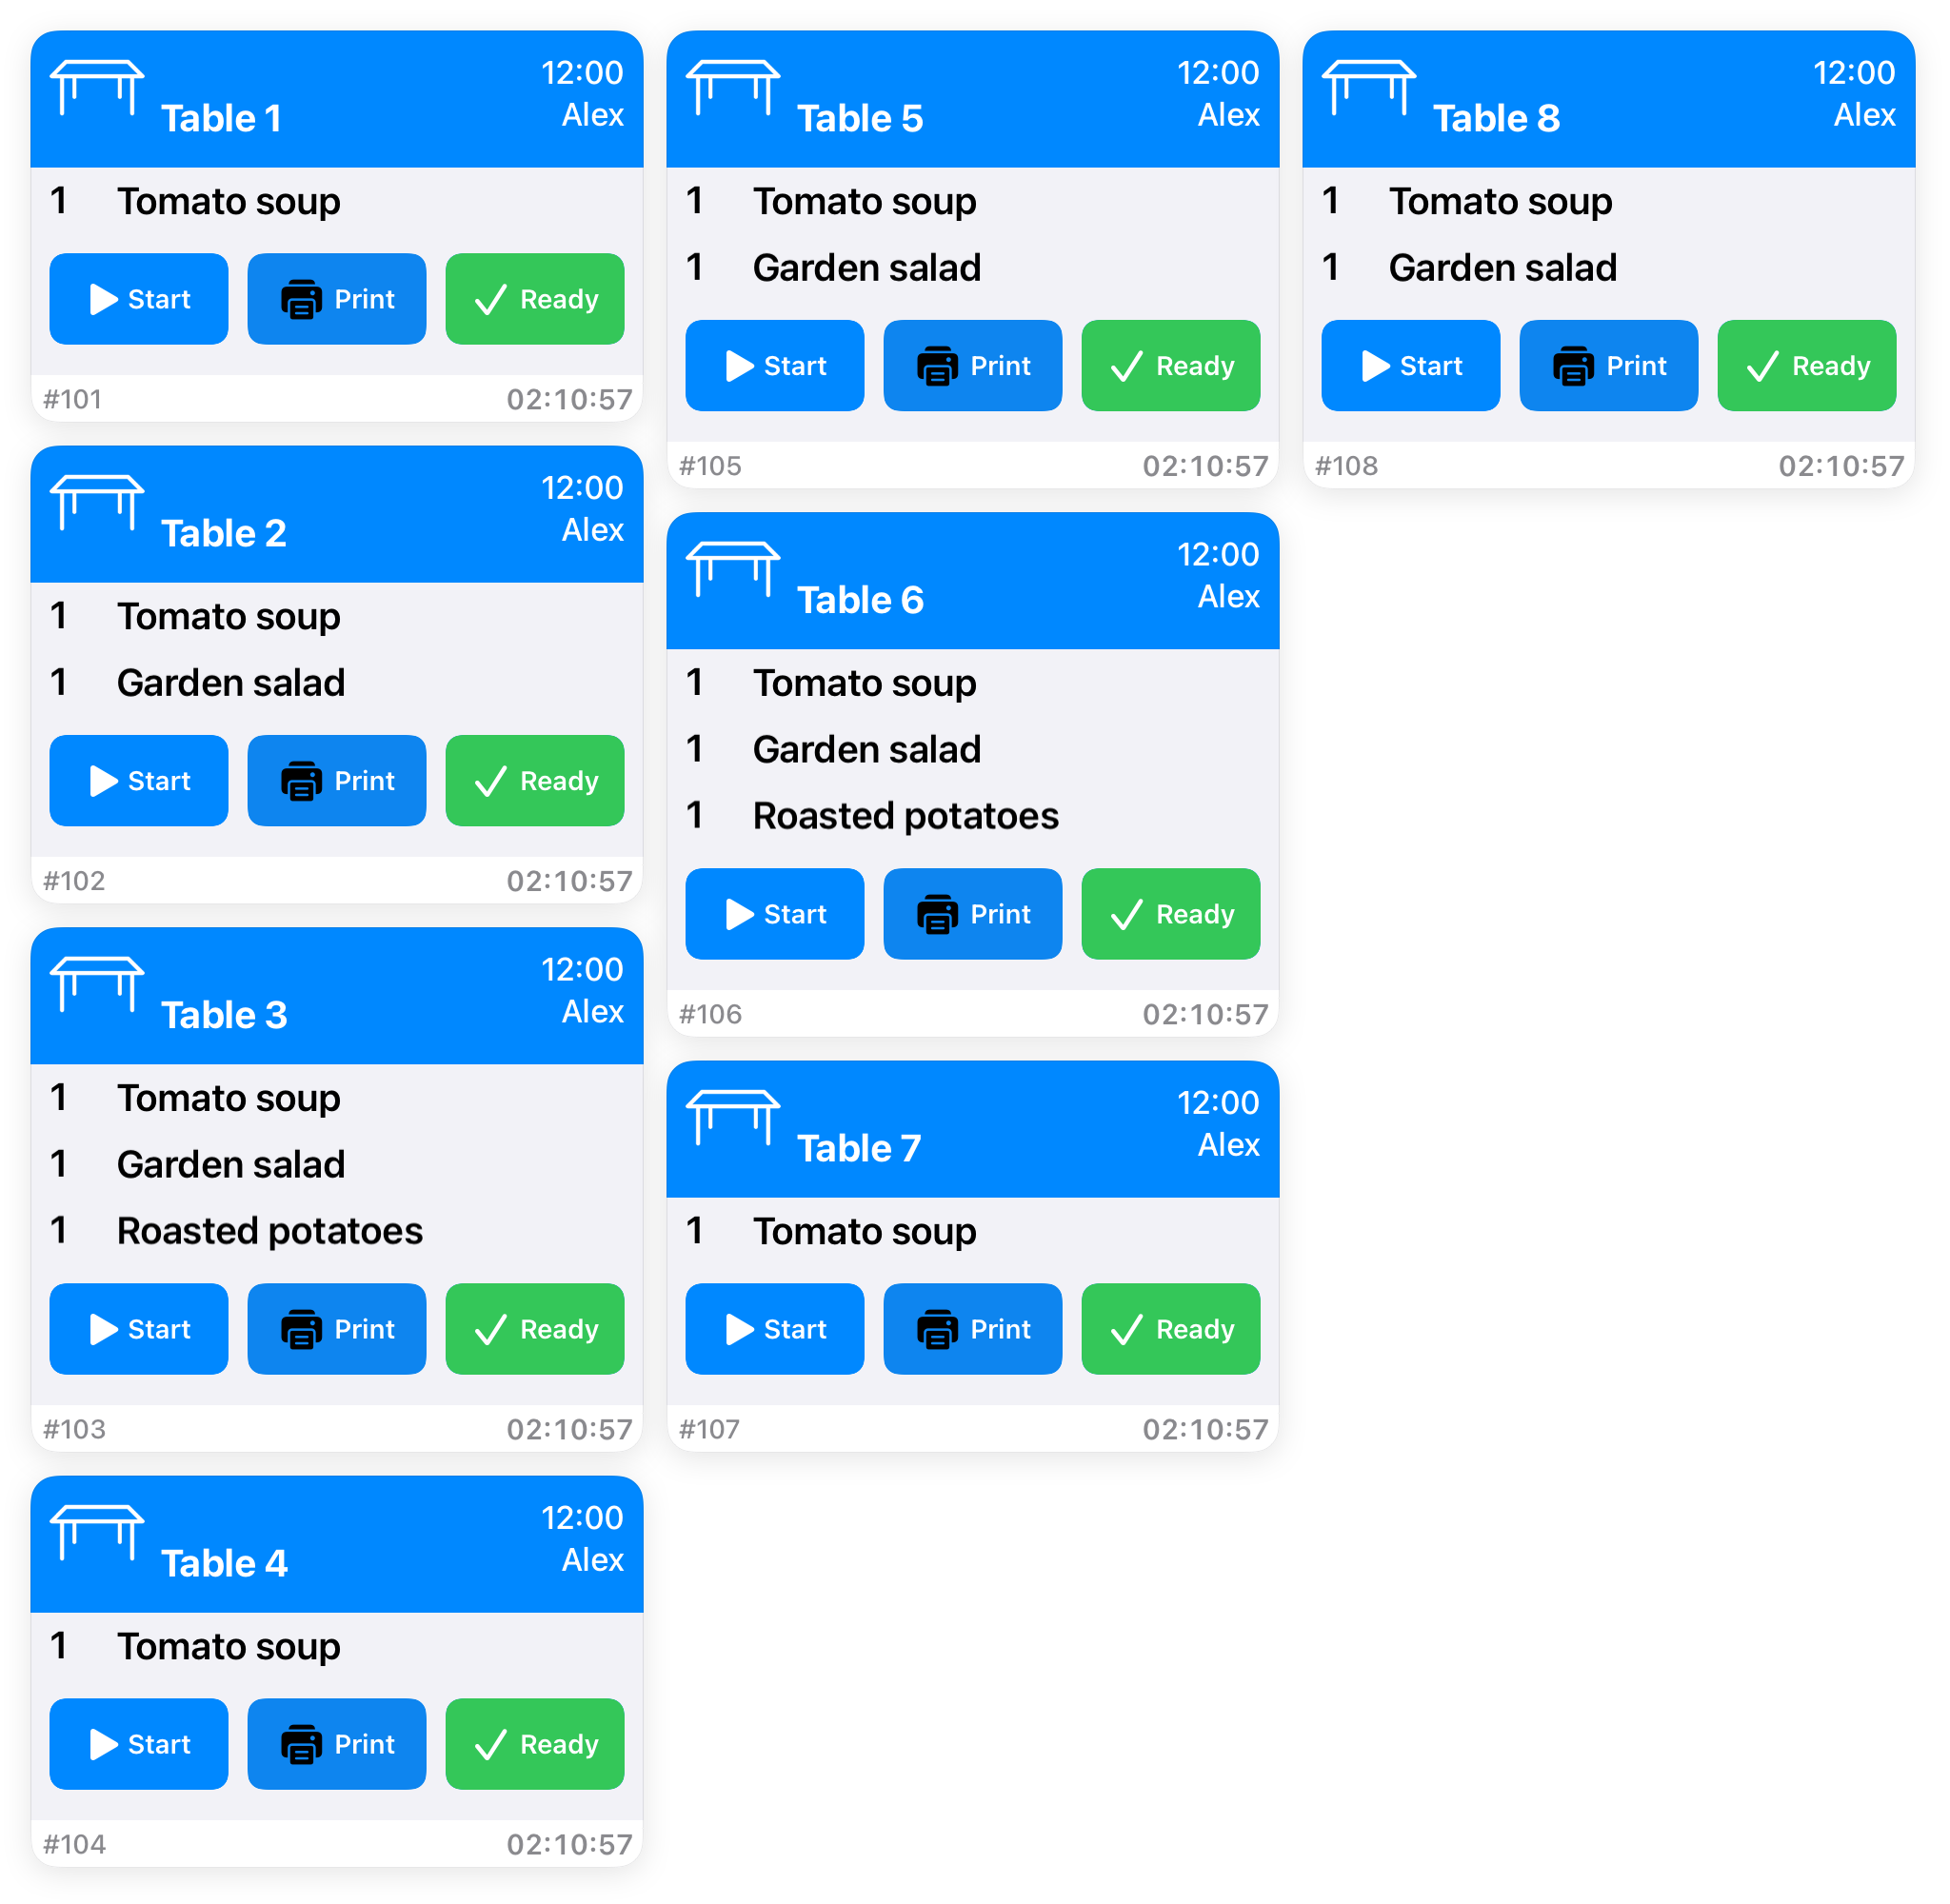
Turn Stack tickets off if you prefer one full-height ticket per column. Stacking applies to Open; History keeps the full-height layout. Long tickets may still need vertical scrolling inside the ticket.
Rearrange open tickets#
In versions that support ticket rearrangement, you can move open tickets into the order your kitchen needs, like arranging printed tickets.
- Select Open.
- Touch and hold the header at the top of the ticket you want to move. With a mouse or trackpad, click and hold the header.
- Drag the ticket to the desired position, within the same column or into another column, then release it.
Rearranging works with Stack tickets on or off. The sequence is saved on this KDS and remains when you return from Settings or History, or reopen the app. New tickets and tickets reopened from History join the end of the arranged queue.
History keeps its normal order and cannot be rearranged. Moving a ticket changes its position on this KDS; its preparation and completion state stay the same.
Accessibility#
The main kitchen, summary, and settings screens support larger text and VoiceOver. Use the device's accessibility settings as needed. With VoiceOver, select the control, listen to its label and hint, and activate it using the normal VoiceOver gesture.
To rearrange with VoiceOver, select the table or destination label in an open ticket's header. Choose Move ticket earlier or Move ticket later from its available actions to move it one position. Repeat as needed. These actions save the same arrangement as dragging.
Ticket and label printers#
Find and test a printer#
- Connect and power on the printer on the same reachable local network as KDS. Load paper and close the cover.
- Open Settings > Printers.
- Tap + or Find nearby printers. The search looks for Epson, Star, and Bonjour printers on the network and takes up to eight seconds.
- Select the printer. Review its name, host, port, and command type. Discovery suggests a mode; it does not certify compatibility.
- If necessary, use Search Again, Add printer manually, or Enter Printer Manually and enter the printer's own address.
- Use Test print. Check the actual paper for readable text, correct width, accents, feeding, and cutting where supported.
- Turn on Enabled, choose Default ticket printer if this is the printer for ticket slips, and tap Save. Reopen the saved profile to check it.
- Send a controlled service slip from a test ticket before using the printer in live service.
Discovery and printing use the local network. Bluetooth and USB are not searched or supported by this setup. Use the command mode appropriate to the printer's actual model and configuration:
- ESC/POS
- Epson ePOS SDK
- Star Raster Mode
- StarPRNT Command Mode
- Star Line Mode
- Star Dot Impact
These choices do not mean every Epson or Star model is compatible. Verify your own printer. Epson and Star modes use port 9100 in this setup. For ESC/POS, use the network port configured on the printer, normally 9100.
Printer options#
| Option | Use |
|---|---|
| Name | A recognizable label, such as Kitchen pass. |
| Host | The printer's IP address or hostname, not the KDS device address. |
| Port | The printer's network port. |
| Type | The command mode matching the printer. |
| Enabled | Makes the profile available for service printing. |
| Default ticket printer | Selects the printer used when the ticket's Service action attempts a slip. Service does not print to all saved profiles. |
| Label printer | Selects the destination for preparation and customer-order labels. There is one selected label destination. |
| Copies | Number of copies for real service slips. |
| Timeout | How long KDS waits before reporting a communication problem. |
| Print only undone items | Excludes checked product lines. If nothing remains, no service slip is printed. |
Test print sends one diagnostic receipt containing printer details and sample characters, without products or order details. It always uses one copy and does not change the Copies setting. A successful test still needs a visual paper check.
Assign the ticket and label routes#
The same ordinary ticket printer can handle tickets and labels, or you can assign the roles to separate printers. Keep Enabled on, select Default ticket printer and/or Label printer, then tap Save. Use Test print for the ticket route and Test label for the label route. Check the actual paper, readability, width, feed, and cut.
Disabling or deleting the label printer does not silently send labels to another printer. The printer's Copies setting does not multiply label copies. With two printers, the ticket printer can continue while a sticky-label printer waits for a label to be removed.
Use normal thermal ticket paper in a normal receipt printer. Adhesive rolls require the correct sticky-label printer and approved media. Choosing a model does not by itself establish compatibility with every printer or paper size.
Sticky-label printer presets#
KDS includes network presets for Star TSP143IV SK (80 mm labels), Epson TM-L100 (80 mm labels), and Epson TM-L90 LFC 68* (80 mm labels). Match the full model and its approved continuous linerless or liner-free media. An ordinary TSP143IV or generic TM-L90 is not interchangeable with the named sticky-label variant. These presets do not support fixed-size die-cut, gap-sensing, or black-mark label setups.
Keep paper-removal handling enabled as required by the selected model. Remove each label before the next one prints. If removal is not detected within two minutes, the remaining copies stop. The last label can remain at the outlet, so remove it before another job. Test your exact printer, media, firmware, and product names before daily service.
Epson text output cannot represent every writing system. Unsupported characters produce an error instead of altered text. A compatible Star raster route renders Unicode labels. Always check the printed result because the on-screen preview does not certify the physical printer.
If a print fails#
Read the message, then check power, paper, cover, network, host, port, mode, and the enabled default profile. An interrupted or timed-out job may already have printed. Check the physical output before retrying to avoid duplicate slips. KDS does not automatically resend an uncertain print. Do not change the ticket's Ready state merely to fix a printer problem.
Sent to printer describes delivery to the printer connection. Confirm that the expected tickets or labels printed and are readable before using them. After an error, timeout, or restart, check the paper before choosing Print again because some labels may already have printed. A label failure does not reverse a confirmed stock addition. Keep the original batch and retry only its labels.
An updated main iPad can show label and production problems in Control Center, along with recovery when the condition clears. Review the corresponding entry in KDS. If KDS reports a storage problem, resolve it before trying to print again.
Order Status Board#
The Order Status Board is a browser view for displaying progress away from the kitchen screen. It is hosted by the KDS device.
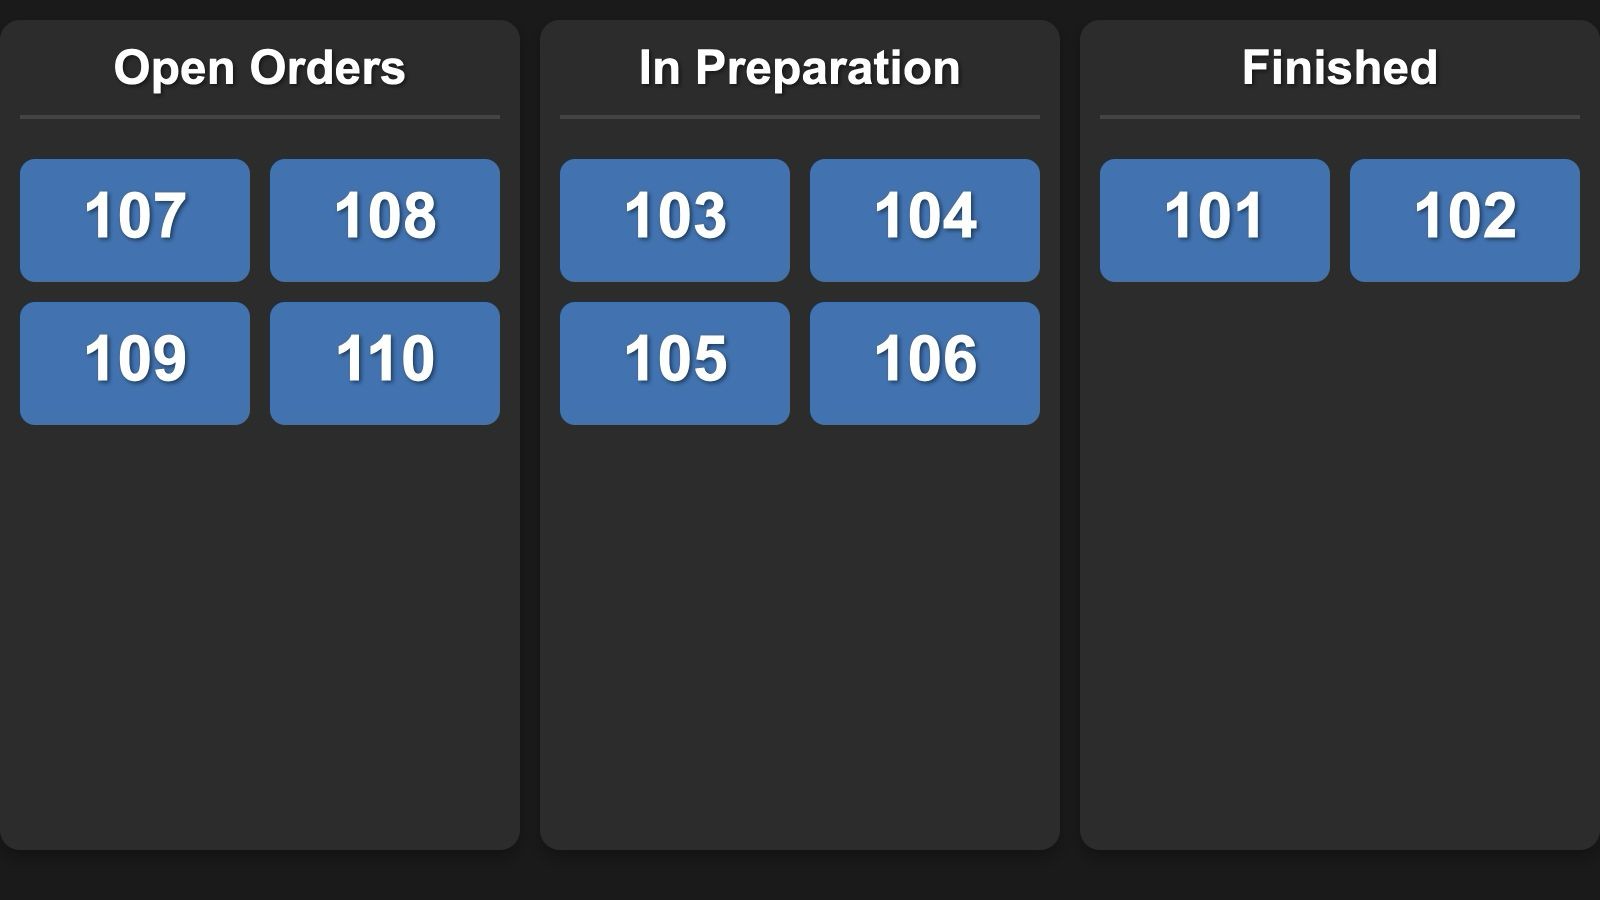
- Open Settings > Status Board and switch Status Board on.
- Read Board address, or use Copy board address or Share board address.
- On a browser device on the same reachable local network, open that exact address, including http://. It is a local address, not a public website.
- Keep KDS open and the browser connected. Send a test ticket through Start and Ready and watch the result on the board.
- Check the display from the position where customers or staff will read it. If sound is wanted, interact with the browser page once and check its volume.
The columns are Open Orders, In Preparation, and Finished, translated according to the browser language where supported. Updates normally appear on the next refresh, approximately every ten seconds. Finished cards are normally removed from that browser after about three minutes. This is a live display, not a durable history; use KDS History for review.
Board options#
- Only show preparing orders hides the Open Orders column. In the current KDS interface it also hides Start/Prep on kitchen tickets. Leave it off when staff need to start preparation explicitly. Test the whole workflow before enabling it; do not rely on it to start preparation for you.
- Monochrome tickets changes the board's card colors.
- Hide customer names suppresses the name field on the board. Check the actual screen before placing it in view of customers.
The board is intended for a trusted local network and does not provide a sign-in screen. Hiding names is a display option, not access control. Do not expose its address through router port forwarding. Use only the information appropriate for the intended audience.
The board page currently loads a required script from the internet. A fresh browser may therefore need internet access even though order data comes from the local KDS. Do not assume the board will work fully offline. After a KDS restart, a list refresh, or reopening a ticket, verify the displayed status before relying on it for customer collection.
Troubleshooting#
No orders arrive#
- Keep KDS open and select Open rather than History.
- Check Local Network permission, Wi-Fi connection, and whether the devices can communicate on that network.
- In WaiterOne, search for the KDS again if Host was filled by discovery. For manual setup, compare the device's current IP address with Host. Confirm the WaiterOne KDS printer type and product routing.
- Send a controlled test from the main app and, if applicable, Remote.
- Open Settings > Diagnostics & About and check Connection, Last order received, and Run diagnostics.
The connection indicator and Core checks passed describe local checks. They do not prove that WaiterOne is routing orders correctly or that a printer has produced a receipt. Last order received reflects the most recent stored order time and is not a connection heartbeat.
If service is disrupted, use your team's agreed fallback and reconcile missing orders before resending them. Avoid repeatedly resending live orders without checking for duplicates.
A ticket or item seems missing#
Check History for a ticket marked Ready, scroll through long tickets and the queue, and check the course and product routing. A checked item disappears from All Day's remaining totals but is still on its ticket. Reopen or uncheck only after confirming the work still needs doing.
Start is missing#
Check Only show preparing orders in Status Board settings. Turn it off if your team needs the separate Start/Prep step.
The board is blank or stops updating#
Check that Status Board is on, KDS remains open, the browser uses the current Board address with http://, and both devices can reach each other. Confirm internet access for the board's required script. A connection-loss message means the board cannot refresh; do not treat its remaining cards as current until the connection recovers.
There is no paper slip#
Follow the printer checks in Ticket and label printers. Confirm a saved, enabled default ticket profile and review Print only undone items. A service notification can arrive without a paper slip being printed.
Read the changelog#
Open Settings > Diagnostics & About > Changelog to read the release history included with your installed KDS app. It is available without an internet connection. The release notes are currently in English. If this option is missing, your installed version does not include the Changelog screen.
Service checklist#
Before opening#
- Power and position the KDS, open the app, and check the active queue.
- Send one controlled test order and check table, quantities, courses, and comments.
- Test Remote, the default ticket printer, label printing, and the Status Board if used.
- If you use Prep & Stock, confirm one authorized staff connection and a controlled production entry before service.
- Agree who taps Start, marks items, prints slips, and taps Ready.
During service#
- Read comments and modifiers on individual tickets.
- Use All Day for batching and the tickets for allocation.
- Confirm completion before Ready; use History to recover mistakes.
- Check uncertain prints and communication failures before retrying.
After service#
- Reconcile outstanding tickets with the team.
- Review completed history before deciding whether to delete it.
- Record any connection or printing problem for the next shift or support.
Get help#
Contact support@waiterone.net.
Include your KDS version and build from Settings > Diagnostics & About > Version, device model, iOS or iPadOS version, WaiterOne version, what you expected, what happened, and whether a test from the main app or Remote succeeds. For printing, include the printer model, selected command mode, and exact error message.
Use a test order to demonstrate the problem where possible. Remove customer and staff details from screenshots, and never send passwords or payment-card details.
For the main POS instructions, see the WaiterOne manual.