Welcome to WaiterOne
Before diving into the setup, here is a quick look at what WaiterOne can do for your venue:
| Core Feature | How It Helps Your Business |
|---|---|
| Tableside Ordering | Staff use iPhones/iPods (WaiterOne Remote) to send orders directly to the kitchen from the table. |
| Smart Modifiers | Automatically prompts staff to ask for steak temperatures or drink add-ons, reducing mistakes. |
| Offline Reliability | The main iPad acts as your local server. If your internet goes down, your POS stays up. |
| Cloud Analytics | The WaiterOne Dashboard lets you track live sales, inventory, and reports from anywhere in the world. |
| Flexible Pricing | Set up Happy Hour prices, VIP discounts, or open-priced daily market specials effortlessly. |
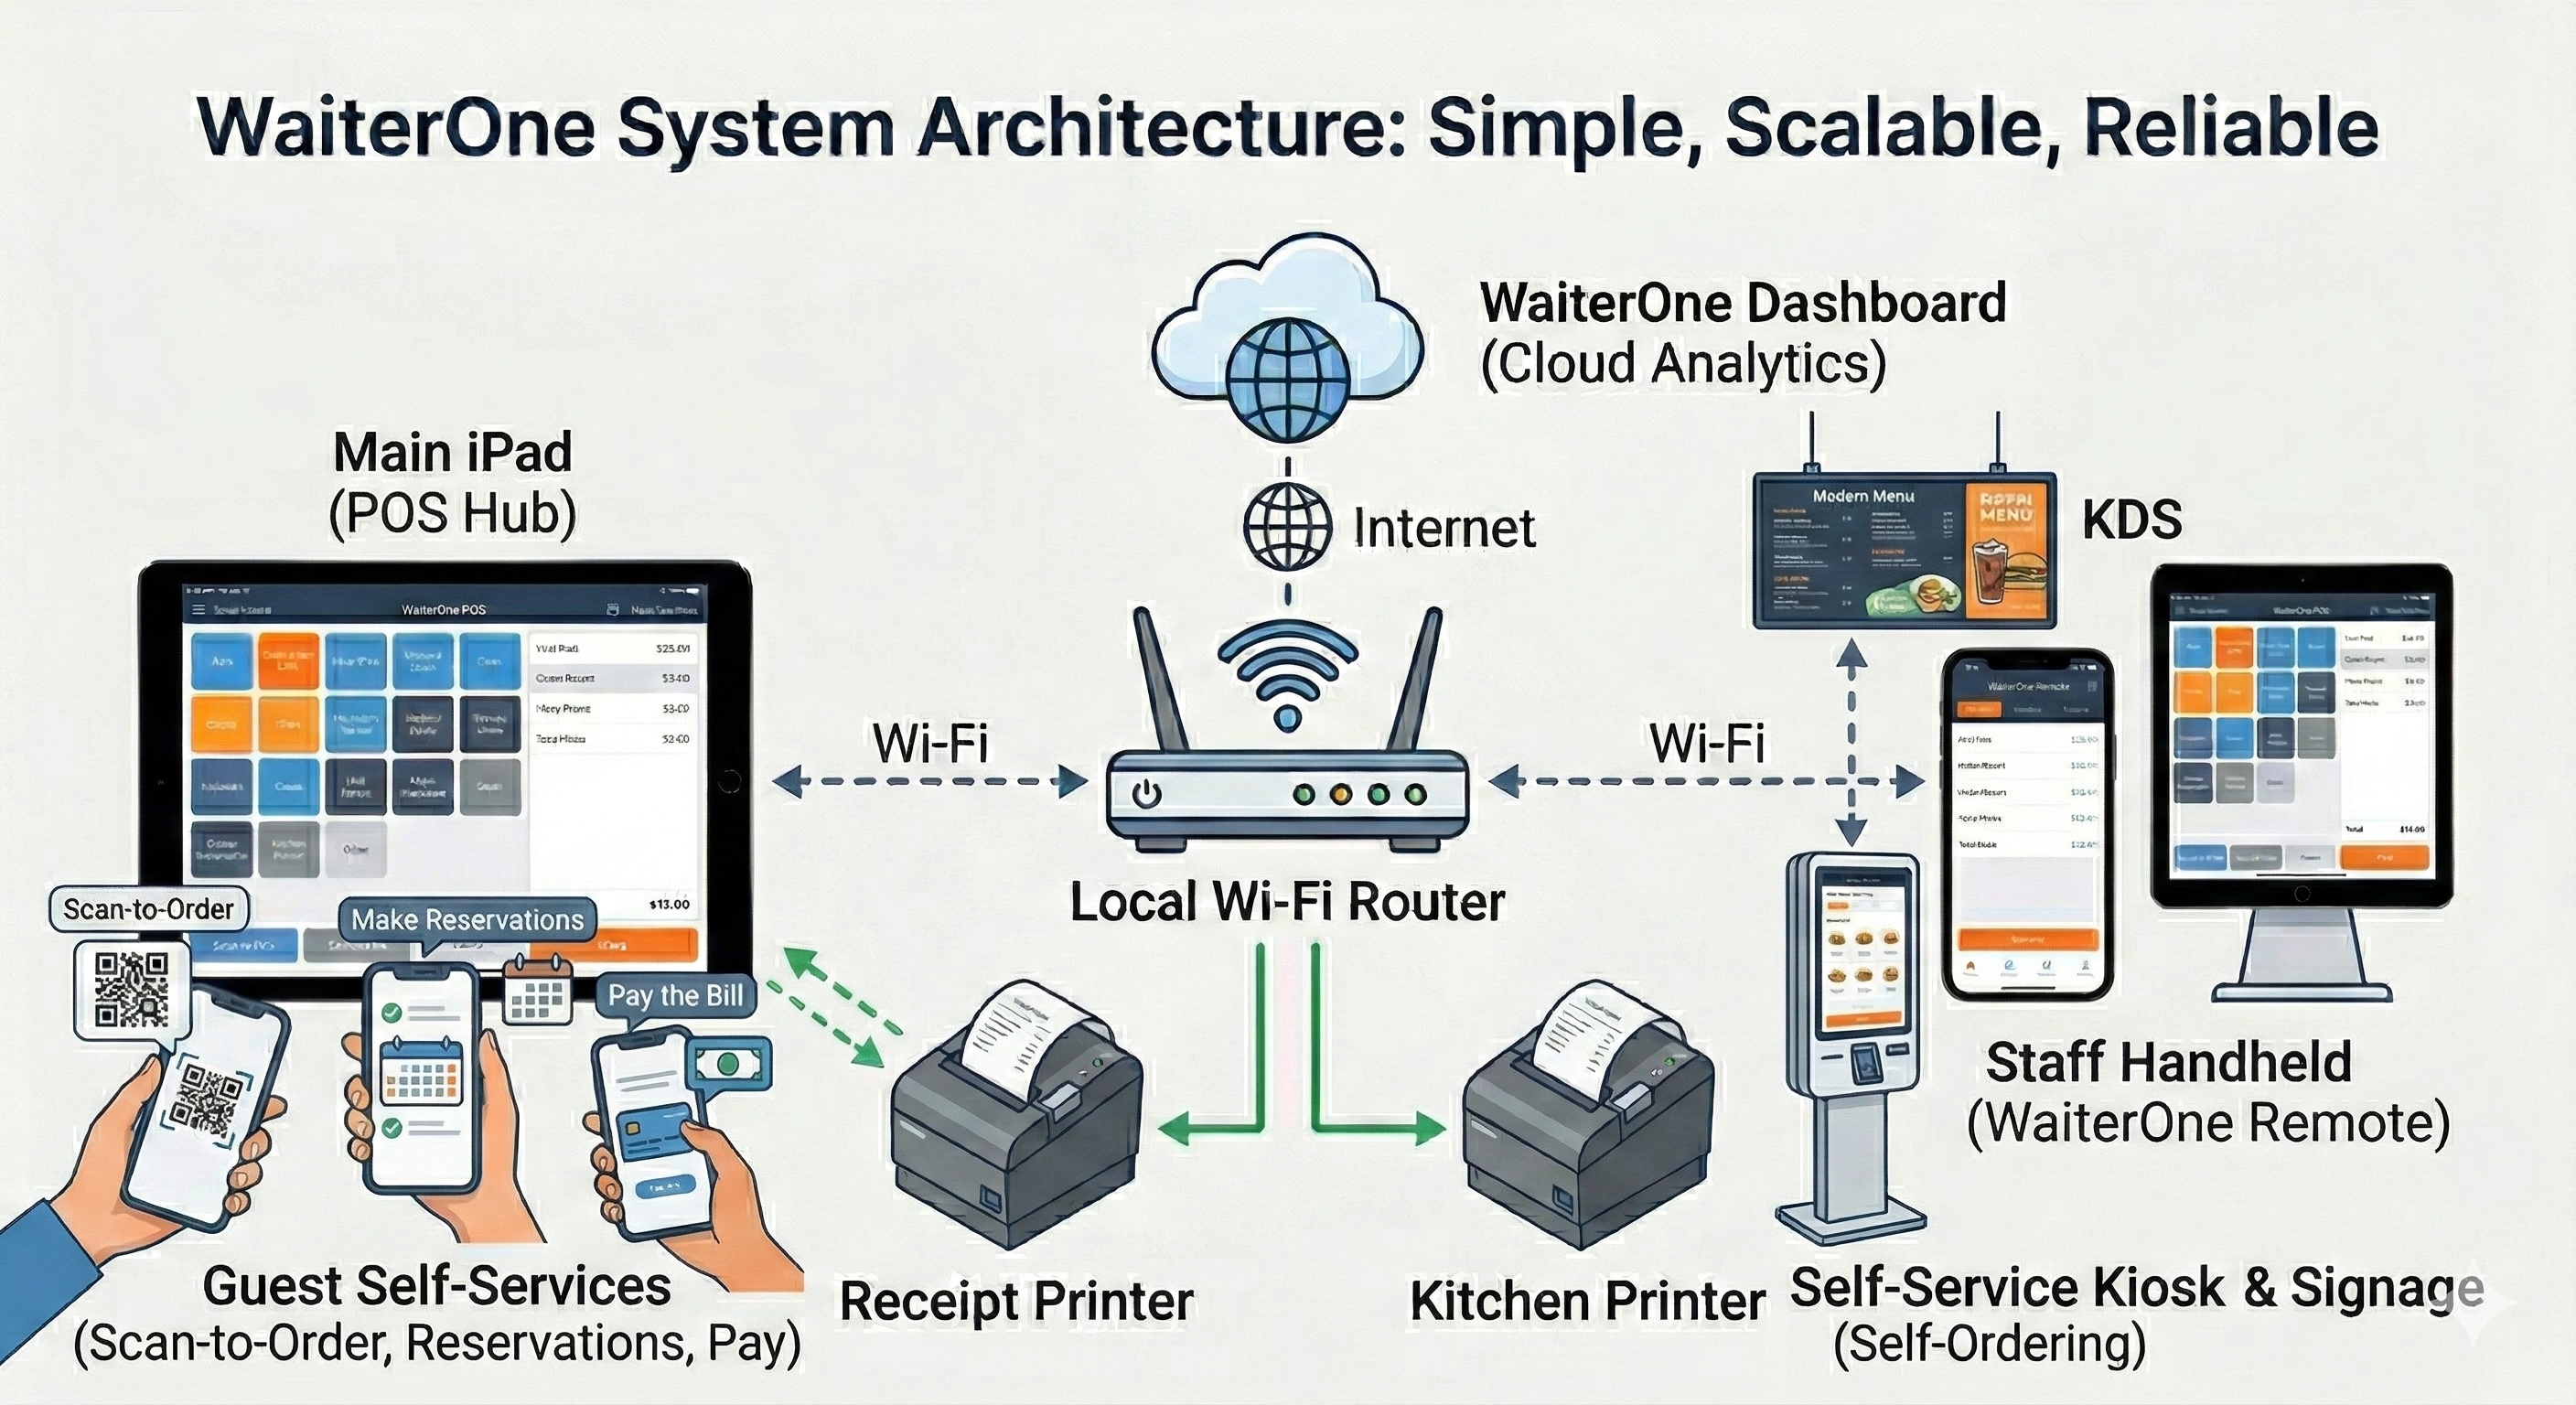
System Architecture Overview
Understanding how WaiterOne connects is the first step. The system is incredibly scalable, allowing you to add KDS screens, self-service kiosks, and digital signage all on the same local network.
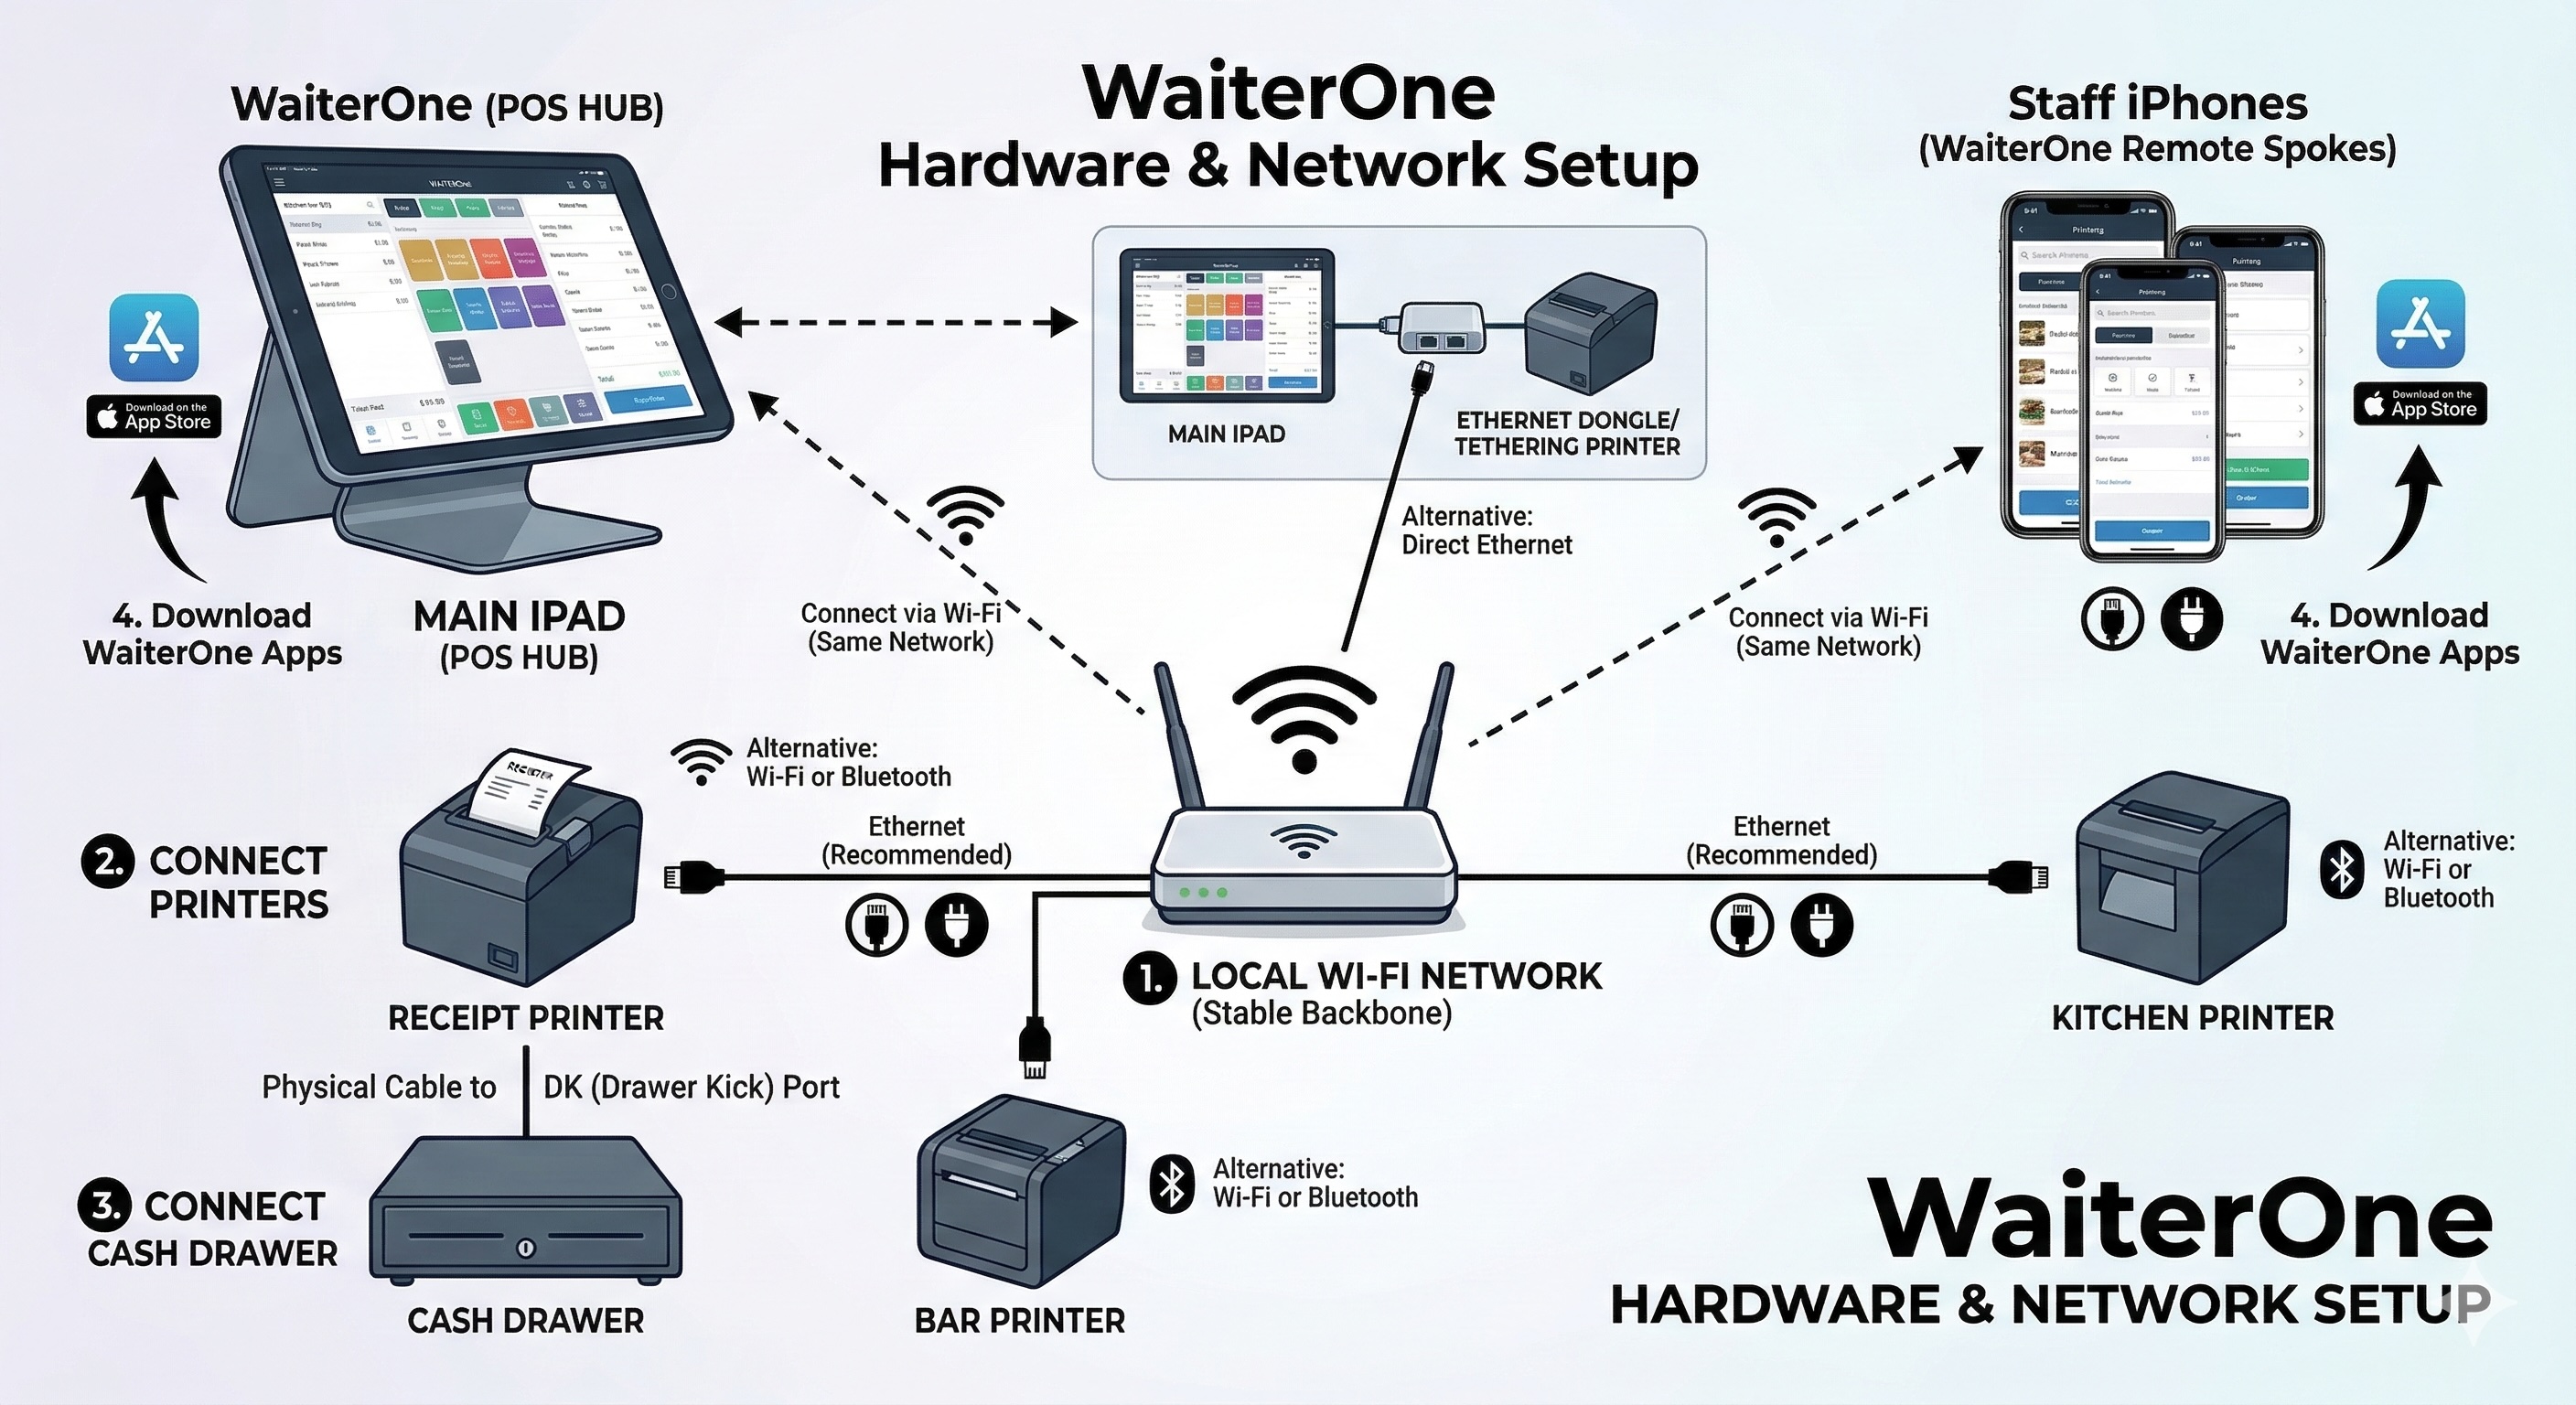
1. Hardware & Network Setup
For WaiterOne to operate perfectly, your local network must be stable. The main iPad acts as the "Hub," while printers and staff iPhones act as the "Spokes."
- Connect to Wi-Fi: Ensure your main iPad and all remote devices are connected to the exact same local Wi-Fi network. You can also connect your main iPad directly via Ethernet if you use a dongle or a supported printer with network tethering.
- Connect Printers: Plug your receipt, kitchen, and bar printers directly into your Wi-Fi router using an Ethernet cable. You can also connect compatible printers via Wi-Fi or Bluetooth.
- Connect the Cash Drawer: Plug your cash drawer into the receipt printer’s DK (Drawer Kick) port.
- Download the Apps: Install WaiterOne on your main iPad and WaiterOne Remote on your staff devices from the App Store.
2. Setting Up Your Back Office (Main iPad)
To access the main menu in WaiterOne, simply click on the logo in the lower-left corner of the app. Depending on your WaiterOne version and your user rights, different menu items will be available or activated.
All major configuration happens directly on your main iPad under the Settings or Data tabs.
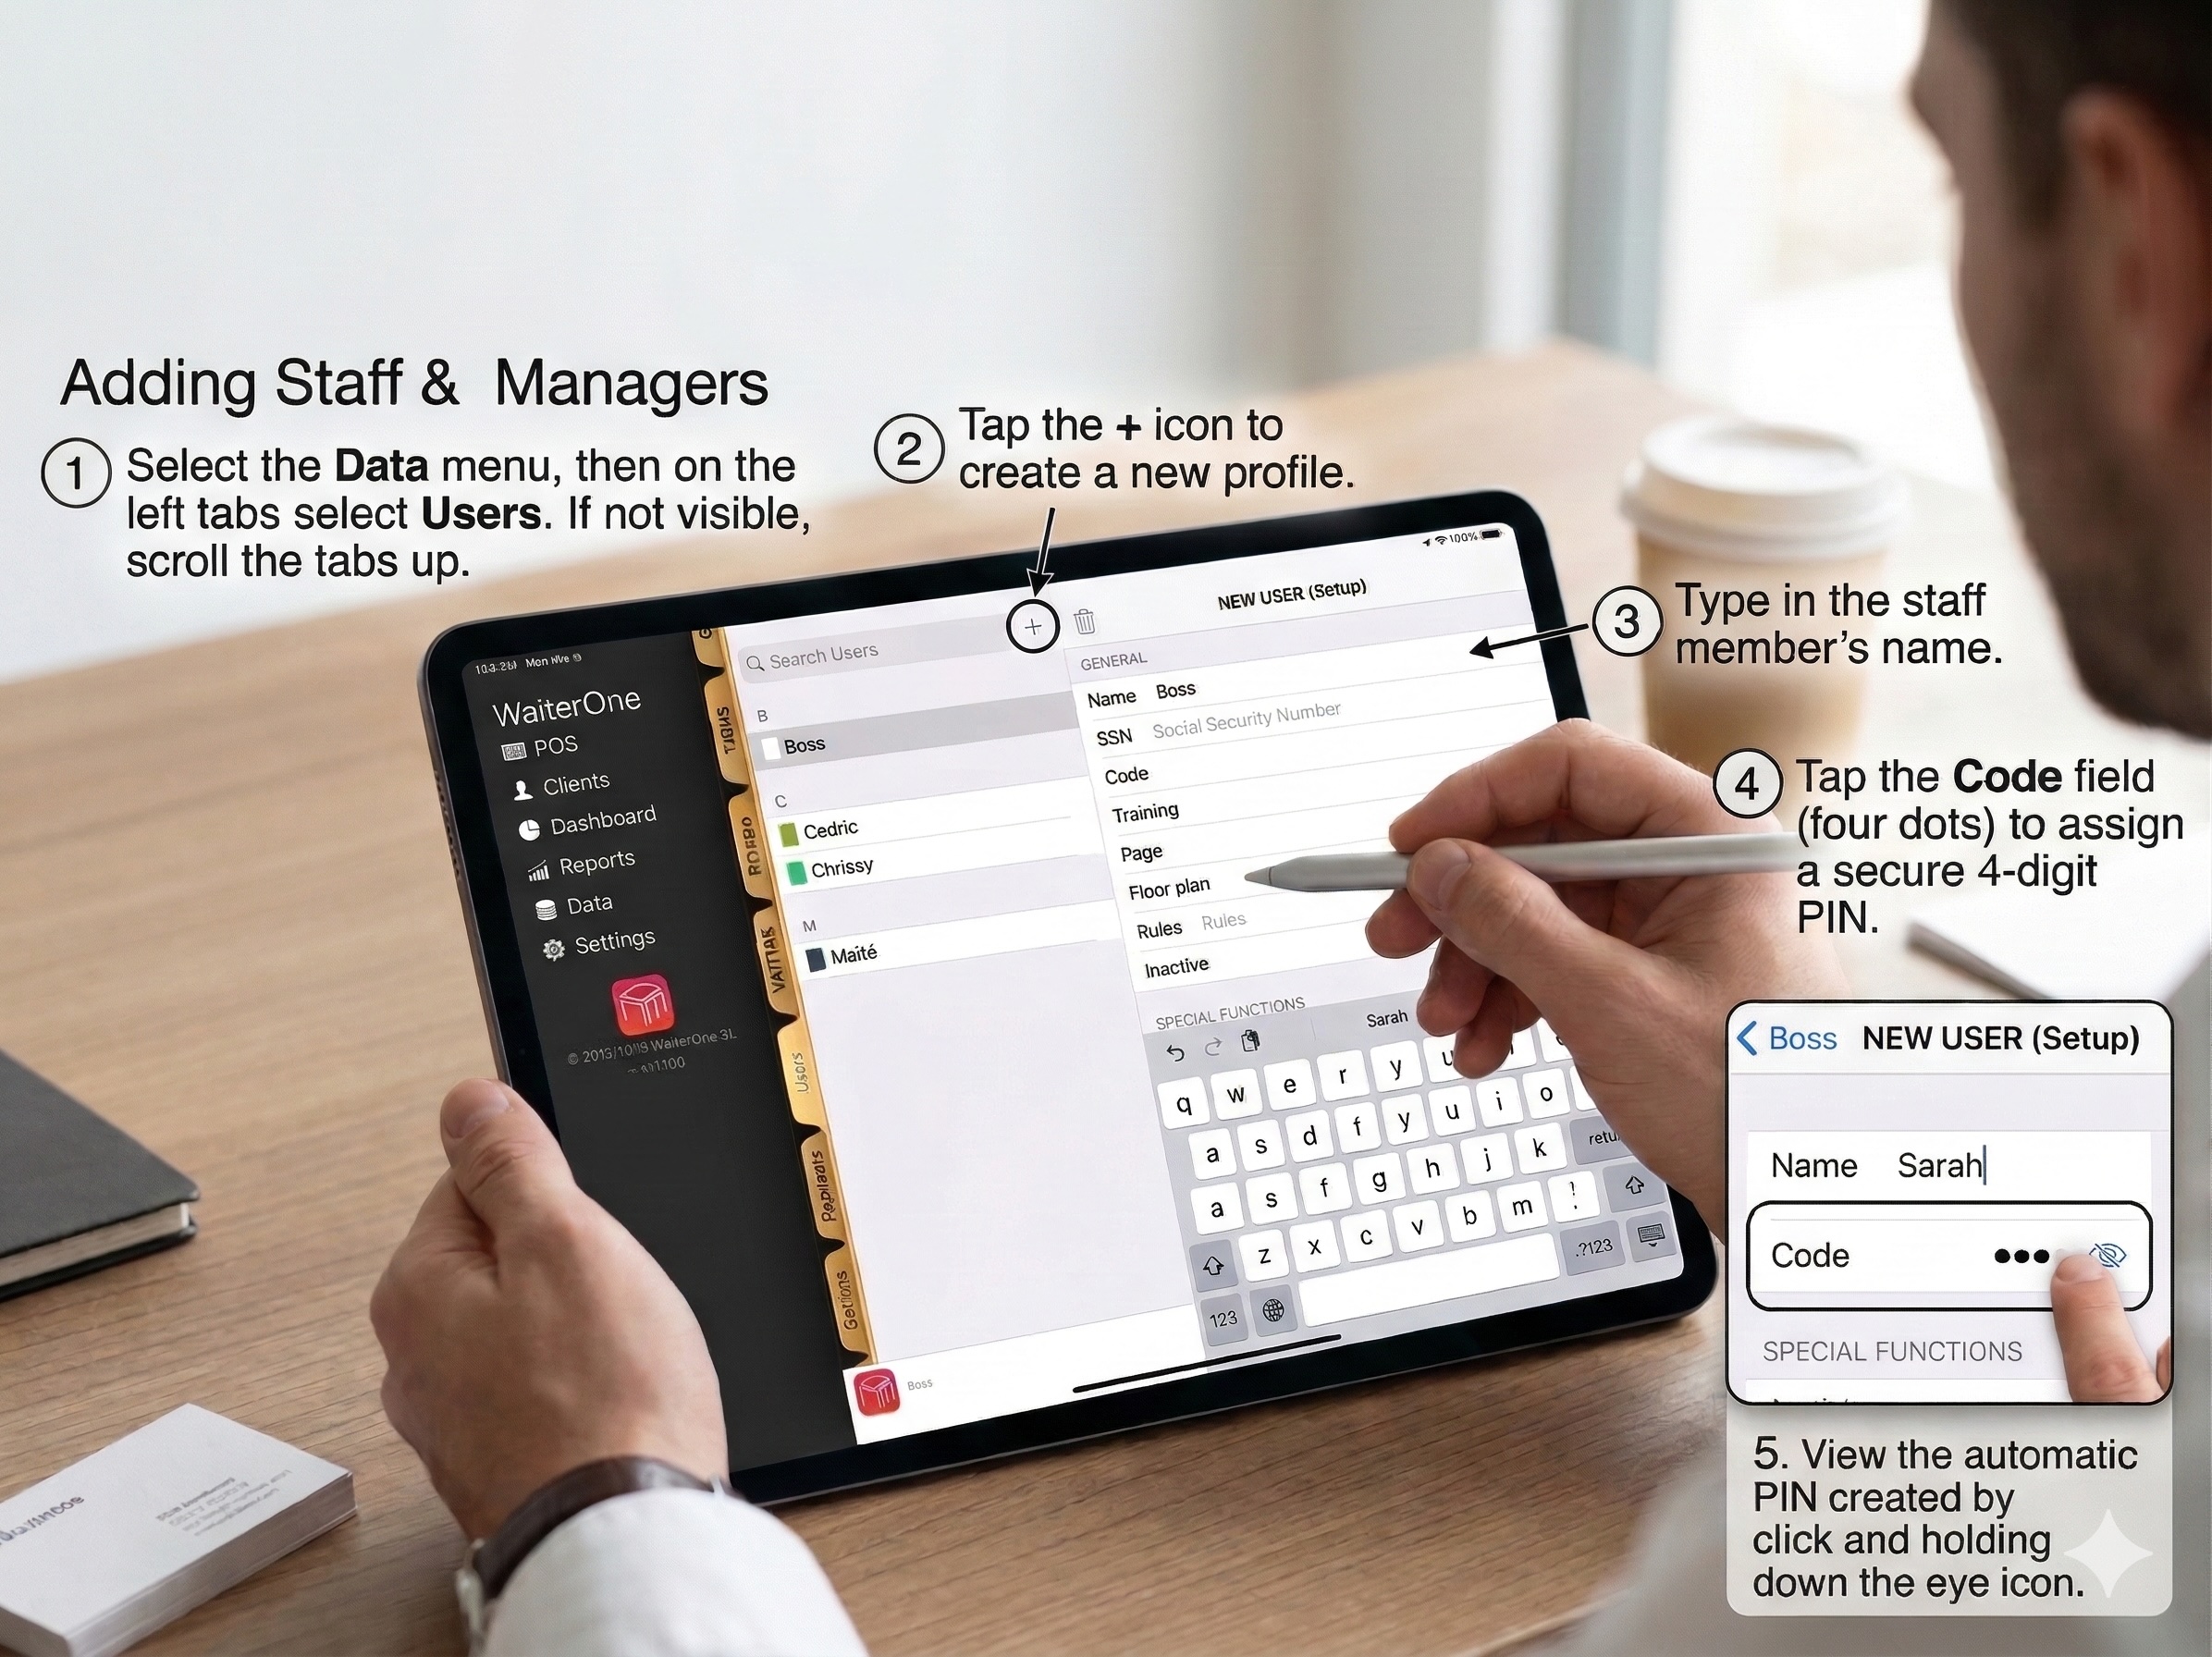
Adding Staff & Managers
- Select the Data menu, then on the left tabs select Users. If not visible, scroll the tabs up.
- Tap the + icon to create a new profile.
- Type in the staff member's name.
- Tap the Code field (four dots) to assign a secure 4-digit PIN. You can also view the automatic PIN created by clicking and holding down the eye icon.
User Permissions & Roles
You can customize what each user is allowed to do by toggling specific security settings on their profile:
| Setting | Permission Details |
|---|---|
| Boss | Grants complete control over the entire POS system and settings. |
| Consult Sales | Allows the user to view the dashboard and sales results. |
| Retour/Void | Enables the user to cancel or void items from a ticket. |
| On the House | Permits the user to give items away for free. |
| Drawer [1 & 2] | Gives the user the ability to pop open the primary or secondary cash register drawer. |
| Close / Delete Table | Allows the user to finalize or completely remove a table tab. |
| Training | Extremely useful for new hires! Enabling this toggle lets the user practice taking orders and printing real dockets, but completely exempts their sales from your daily totals. |
Manager Login with Face ID or Touch ID
The login keypad can use the biometric security available on the iPad. The key to the left of 0 automatically shows the correct Face ID or Touch ID symbol when biometric manager login is available.
- On the Unlock WaiterOne screen, tap the Face ID or Touch ID key.
- Authenticate using the iPad's camera or fingerprint sensor.
- If more than one manager account is available, select the manager who is logging in.
PIN login remains available: Staff and managers can always enter their user code on the keypad. If no biometric key appears, confirm that Face ID or Touch ID is configured in the iPad's Settings and that WaiterOne has an active manager account.
Safely Resetting Data
Reset actions are available under Settings > Data > Reset. Because reset actions permanently remove information, WaiterOne shows a final confirmation screen before continuing.
- Read the warning and locate the confirmation number shown on screen.
- Enter that number with the keypad inside the confirmation screen. The iPad keyboard is not required.
- Alternatively, tap the Face ID or Touch ID key when it is available and authenticate on the iPad.
- The red reset button becomes available only after the number or biometric confirmation is accepted.
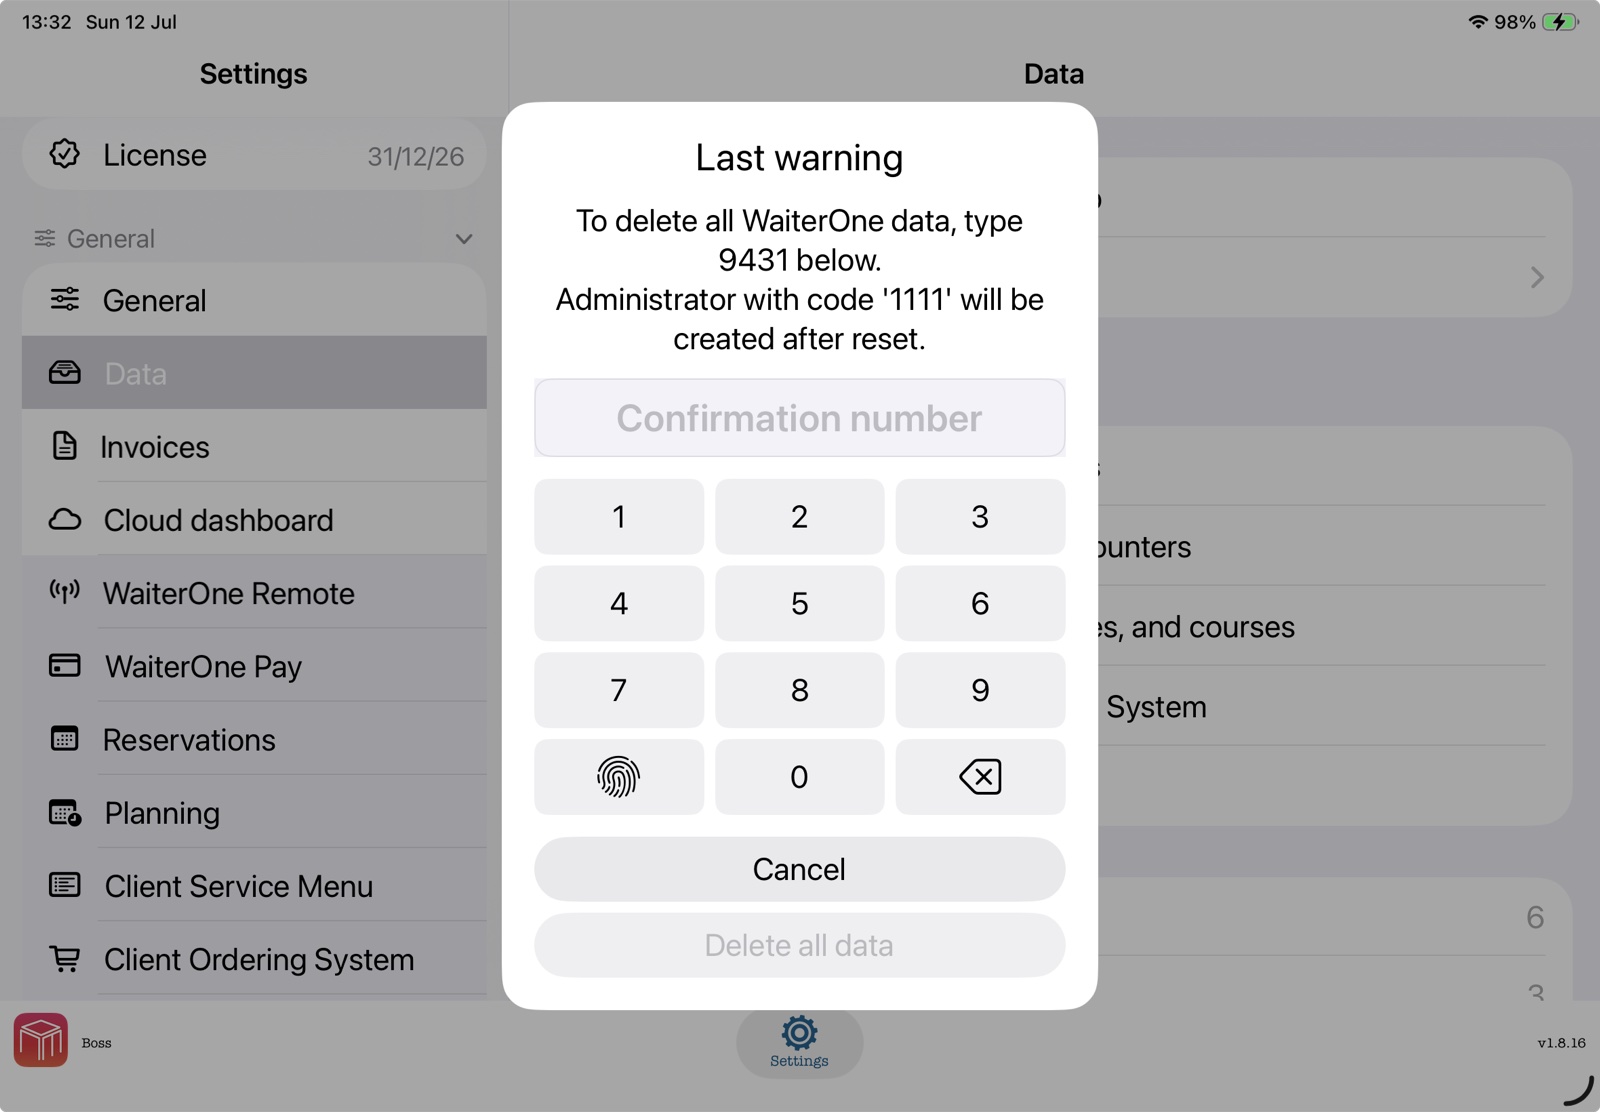
Make a backup first: Reset actions cannot be undone. A complete data reset
removes all WaiterOne data and creates a new administrator with code 1111. Change this
default code immediately after signing in again.
Time Clock (Work In / Work Out / Break)
WaiterOne can track staff hours seamlessly from the PIN screen. When a staff member starts the day, goes on a break, returns from a break, or finishes the shift, the Shift Clock shows the next available action for that user.
| Action | How it works |
|---|---|
| Start shift | The staff member enters their PIN and taps Work in. WaiterOne starts counting worked time. |
| Pause / Break | Open the Shift Clock and tap the break or pause action. The shift stays open, but break time is tracked separately from worked time. |
| Resume work | After the break, return to the Shift Clock and tap the available work/resume action to continue the same shift. |
| Stop shift | At the end of the shift, tap Work out. WaiterOne stores the clock-out time and total worked time. |
Disable per user: Go to Data > Users, open the staff member, and turn off the user's time clock / shift clock option. That user can then log in normally without being asked to work in, work out, or register breaks.
Disable for all users: Go to Settings > General > Attendance and turn off Ask for time registration at login. Staff can still use Time Registration manually; the per-user Attendance required setting is hidden while this global option is off.
Connecting Printers
WaiterOne supports unlimited printers with no extra fees.
By default, 3 virtual printers are automatically configured (e.g., for the bar, for the kitchen, for the receipt). This doesn't mean you must have 3 physical printers; rather, it allows for different types of tickets and settings to be printed. When using different virtual printers, their own numbering sequence will be kept.
- Go to Data > Printers.
- Tap Add or select an existing virtual printer.
- Change the Type Printer accordingly.
- Change the Host to connect your printer:
- Ethernet/Wi-Fi: Enter the IP address of the printer.
- Bluetooth: Enter
BT: - Direct iPad Connection: Enter
USB:
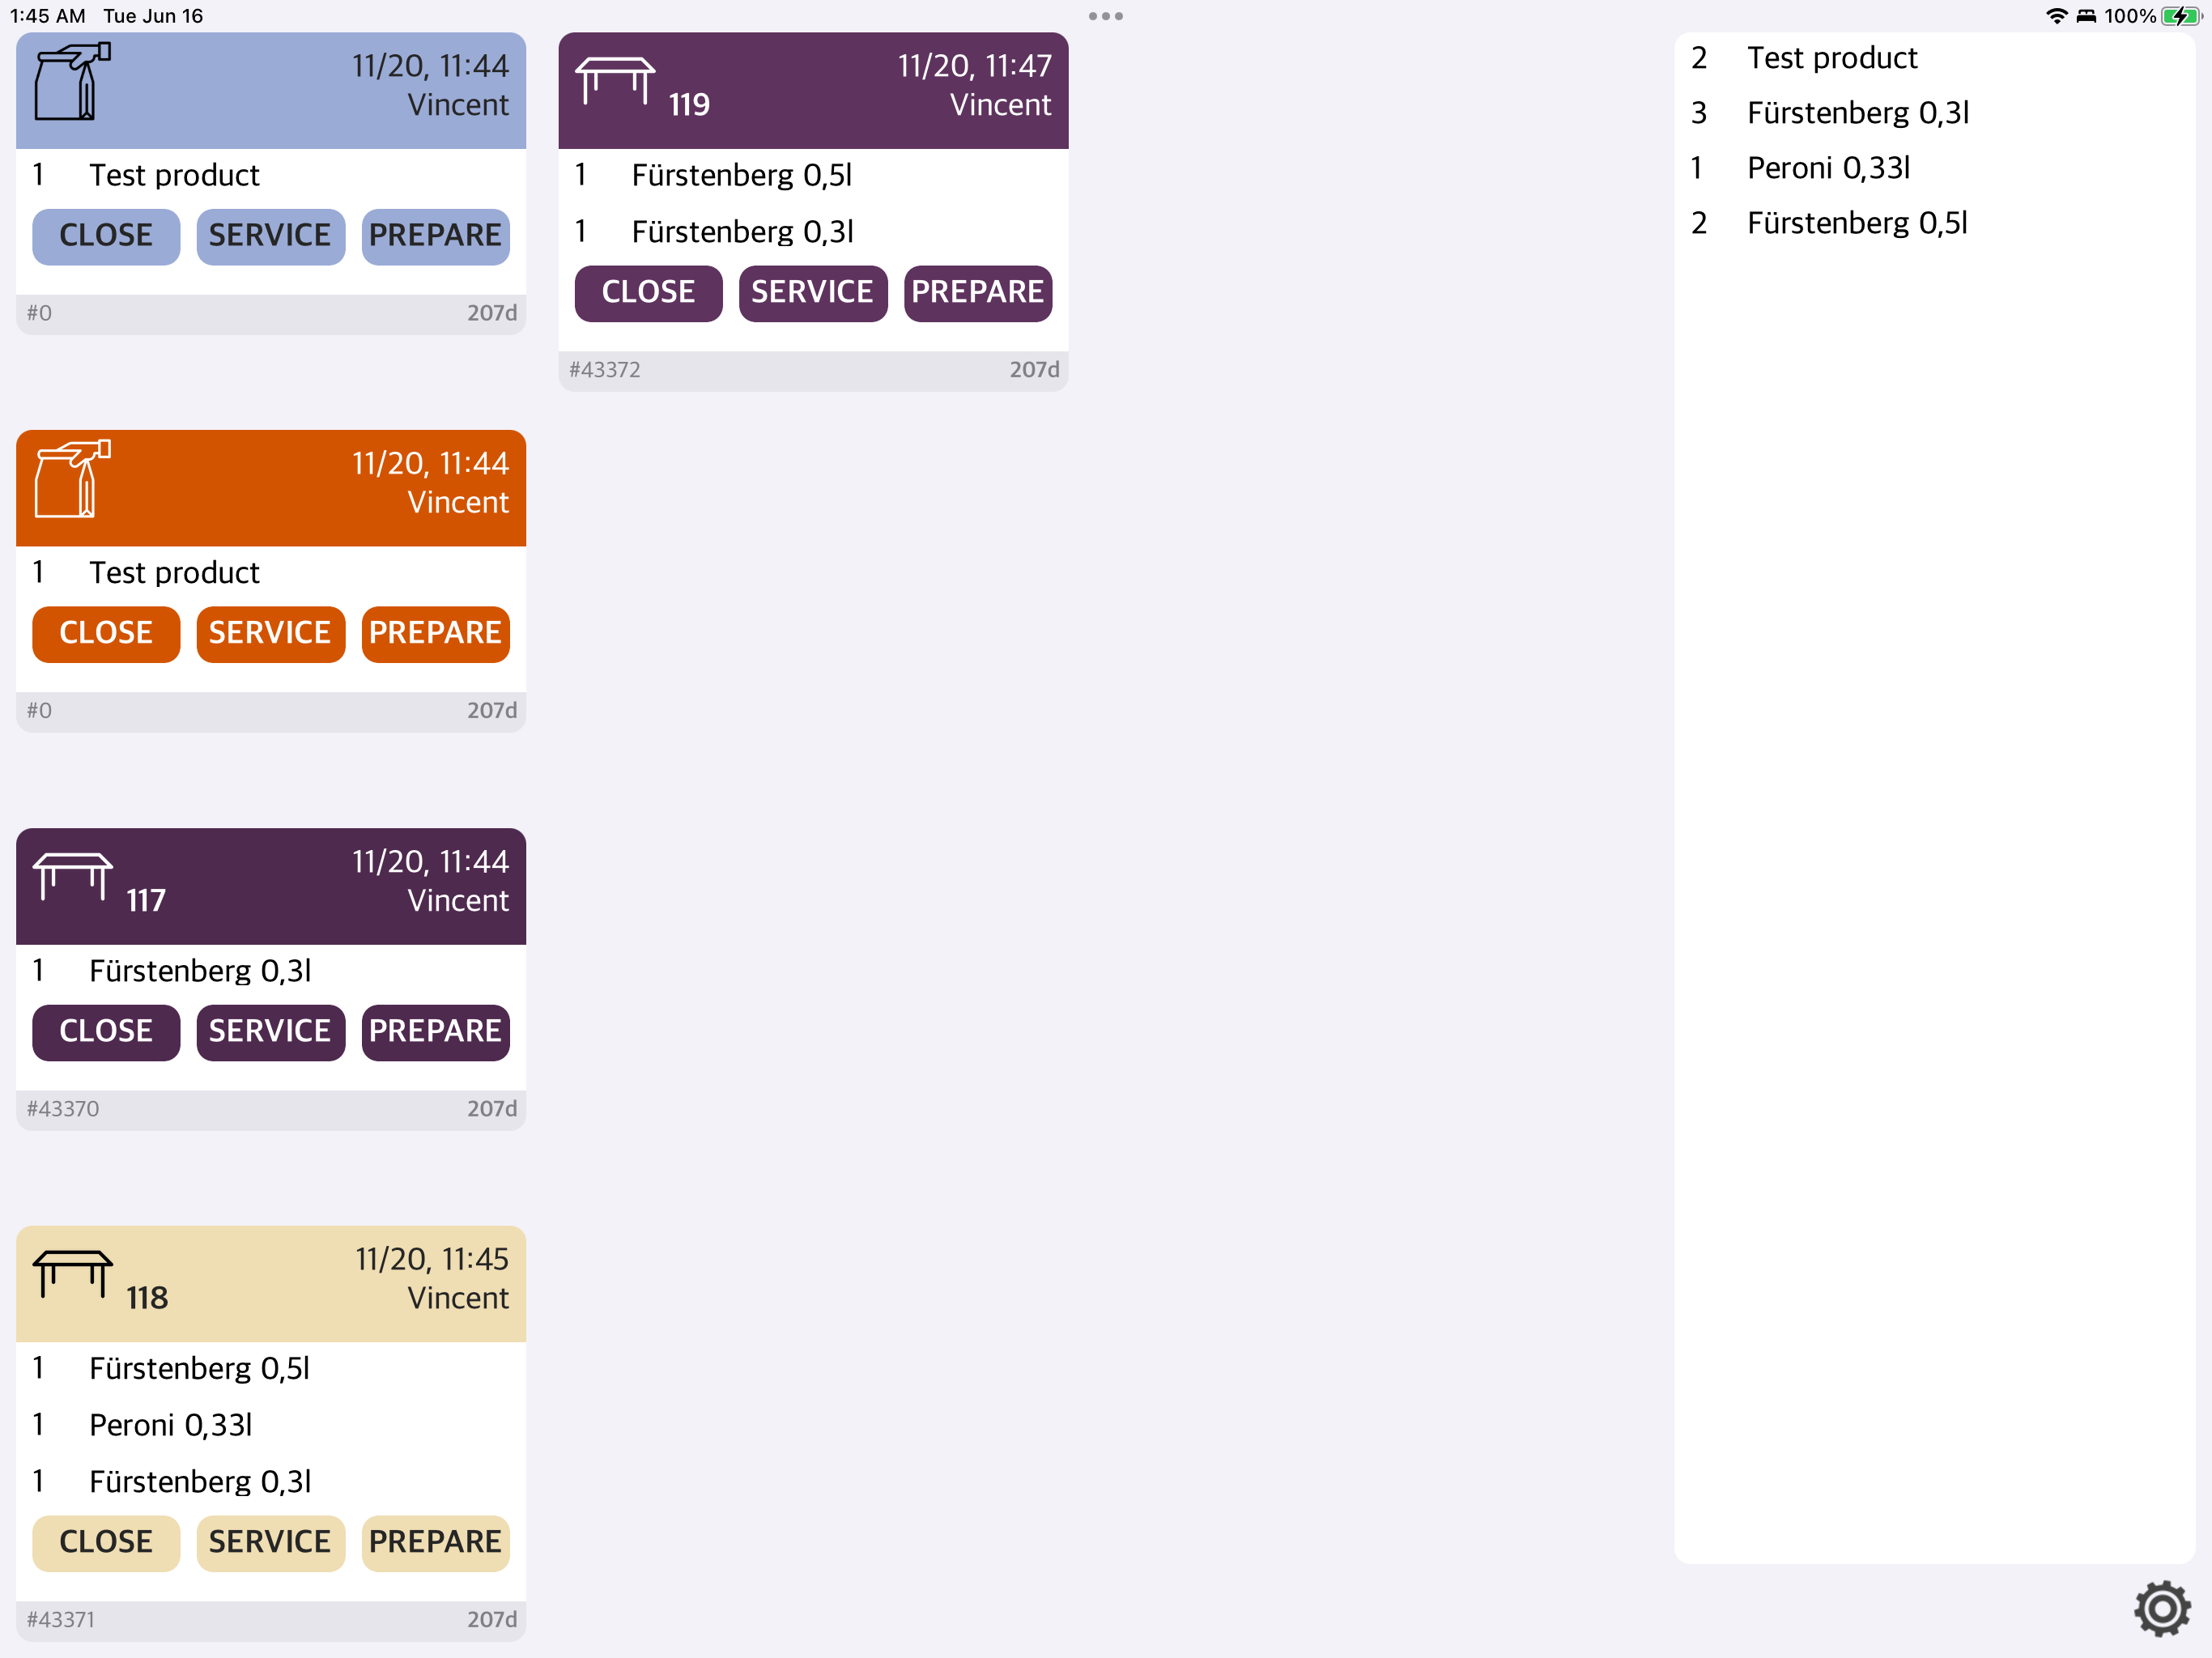
KDS (Kitchen Display System): A KDS can replace or complement kitchen and bar printers. Orders routed to a preparation station appear as digital tickets, and staff can use Prepare, Service, and Close instead of handling paper tickets.
Pro-Tip for Kitchen Printers: Need extra space at the top of your kitchen dockets so they can hang properly on a docket rail? Navigate to Data > Printers, select your kitchen printer, and add <br><br><br> to the ticket header text.
3. Building Your Menu
Products are organized by Pages and positioned on a grid.
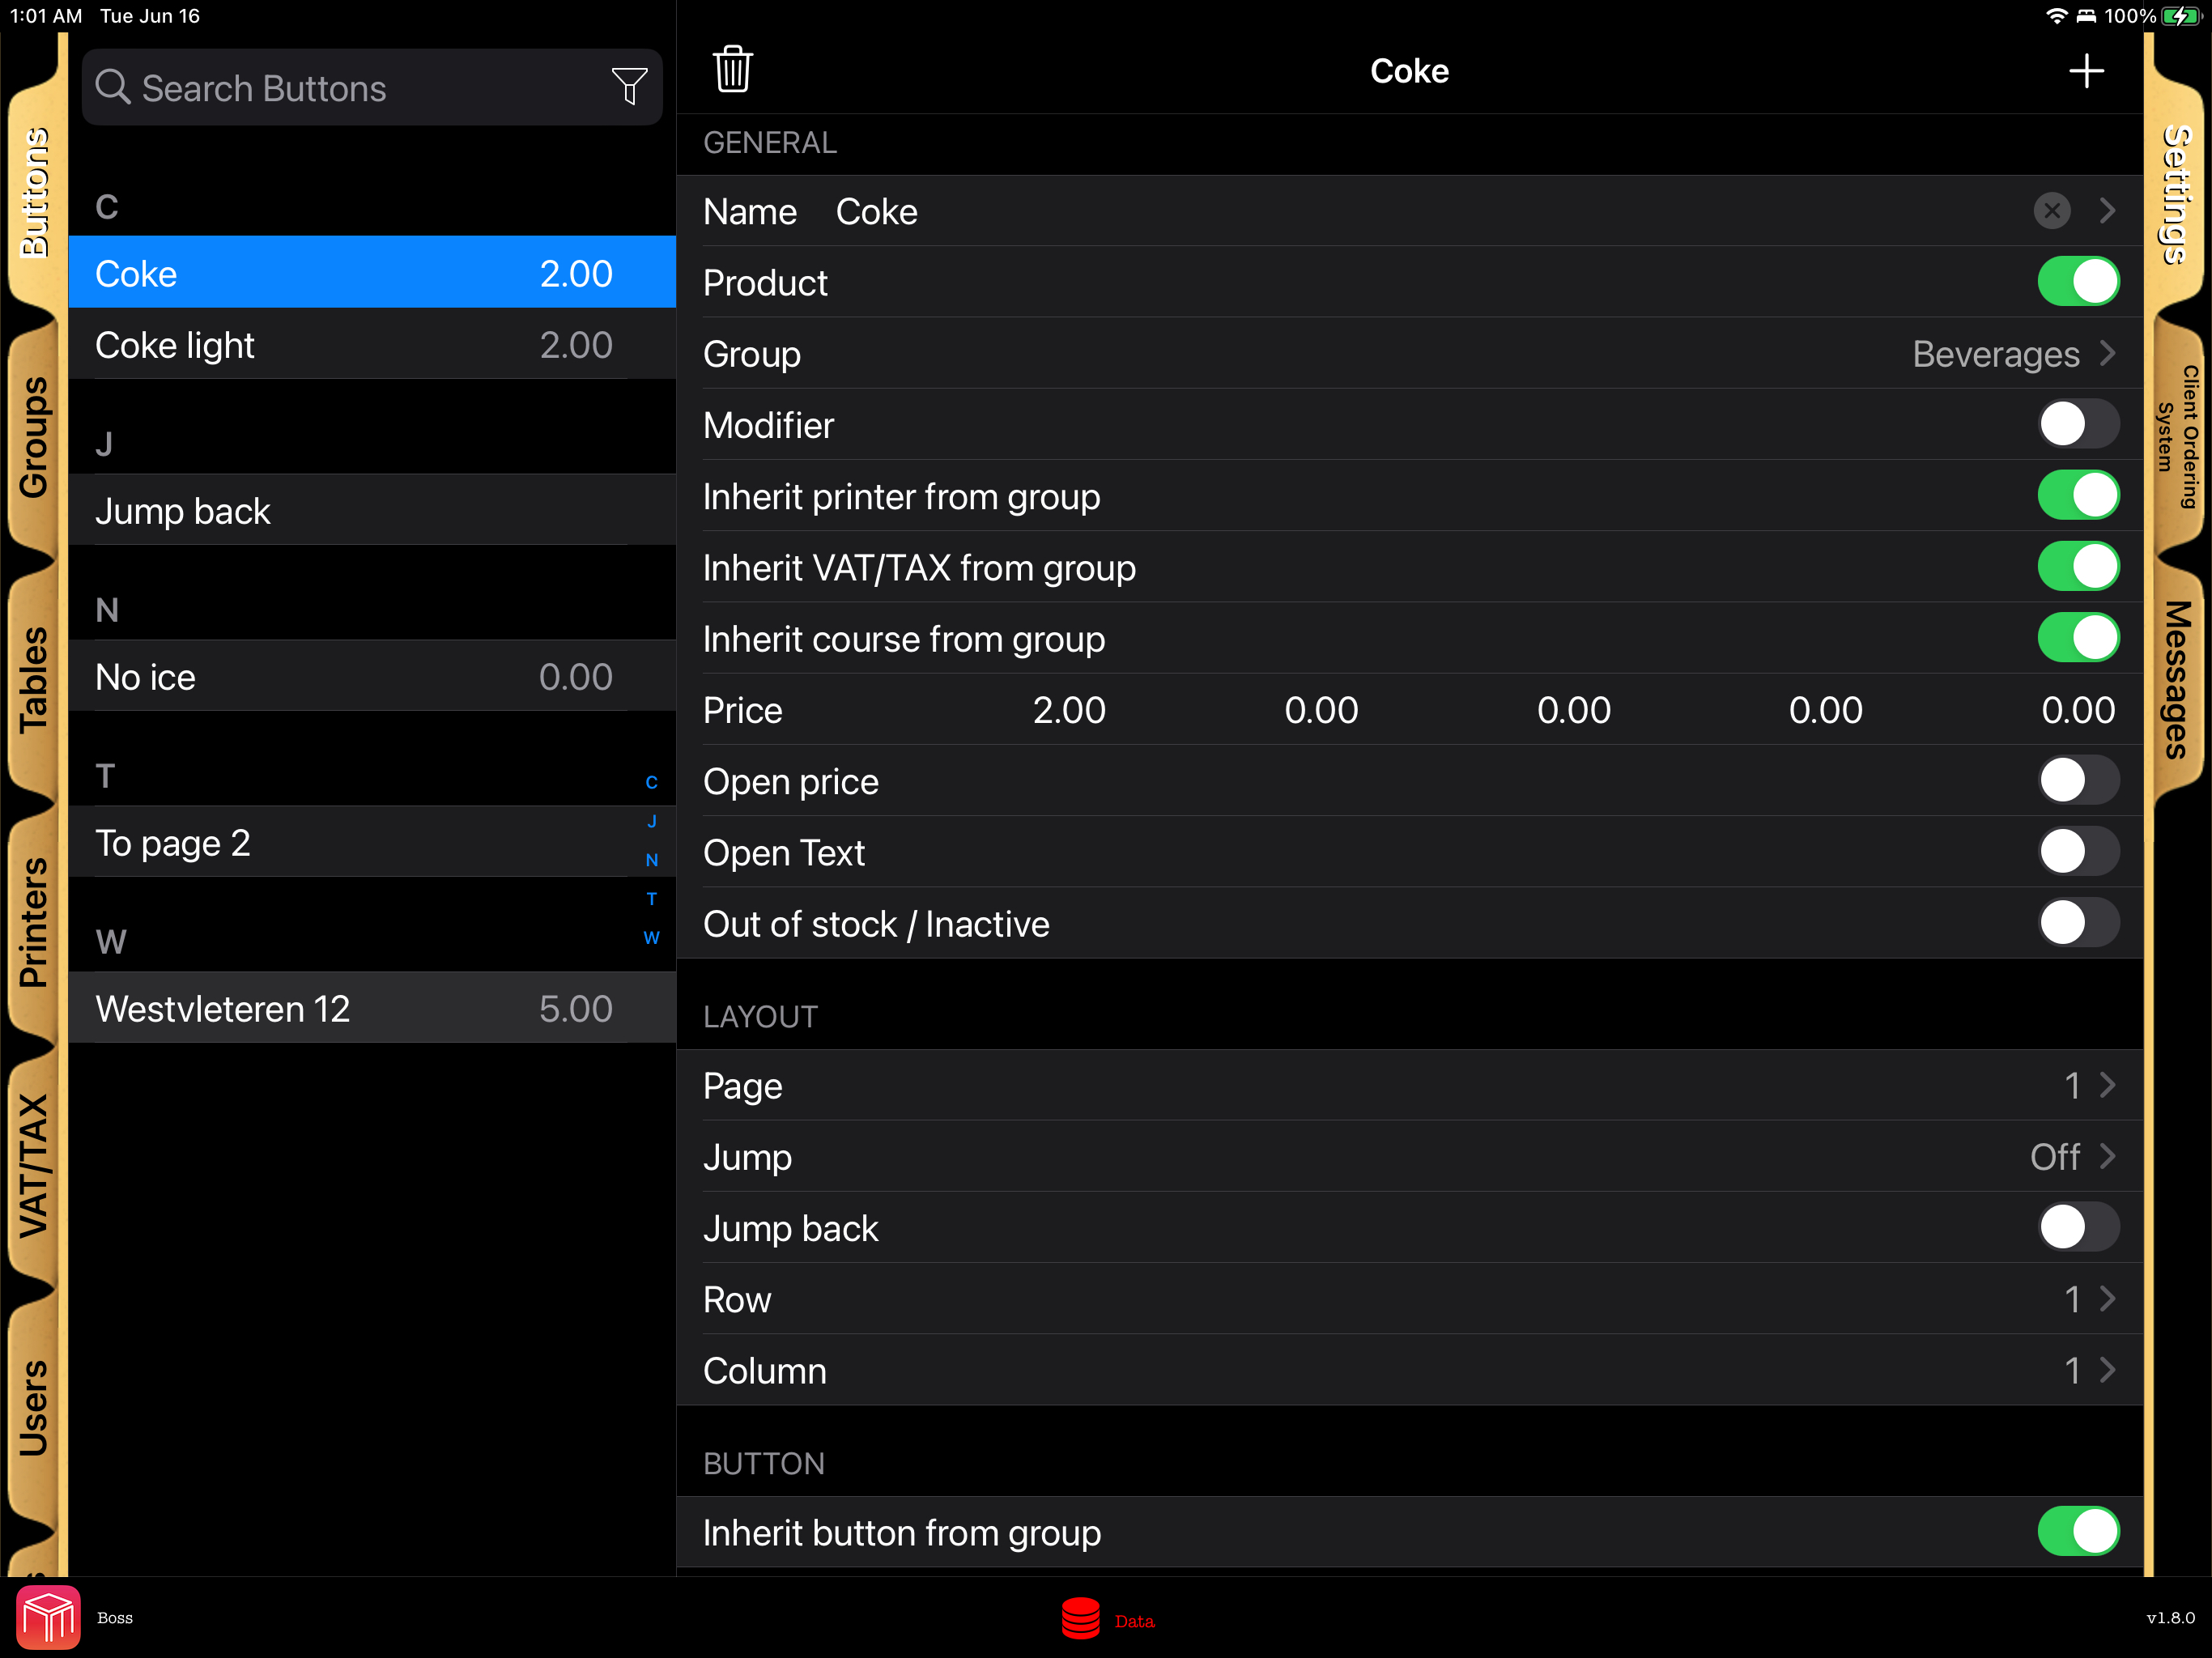
Understanding the hierarchy is key: in WaiterOne, we have Pages, Groups, and Buttons. Buttons belong to groups, and buttons are placed on pages. Crucially, buttons can inherit many settings directly from the group they belong to. For example, if a group is configured to print to the kitchen printer, any new button assigned to that group will automatically print to the kitchen as well.
- Create a Page: Set up a page like "Starters", "Mains", or "Drinks".
- Add Products: Enter the item name and assign it a row and column coordinate.
Alternative Methods: You can also add products quickly by double-clicking on an empty space on a Page in the main POS screen, or by managing them directly from the WaiterOne online dashboard (online back office).
- Set Pricing: Input your standard price. You can utilize up to 5 price levels (e.g.,
Standard, Happy Hour, Takeaway).
Misc & Custom Items: Toggle Open Price and Open Text if you want to create a generic button that prompts the staff to manually enter a custom name and price on the fly.
- Add Modifiers: Toggle the Modifier switch for add-ons (e.g., "Rare", "No Ice"). Modifiers must be attached to a standard product to be sold.
- Jump to Page: You can create buttons that jump to other pages to better organize your POS system. WaiterOne also remembers which page you came from, so you can configure buttons to automatically jump back after being selected (e.g., automatically returning to the alcoholic drinks page after choosing a soft drink mixer).
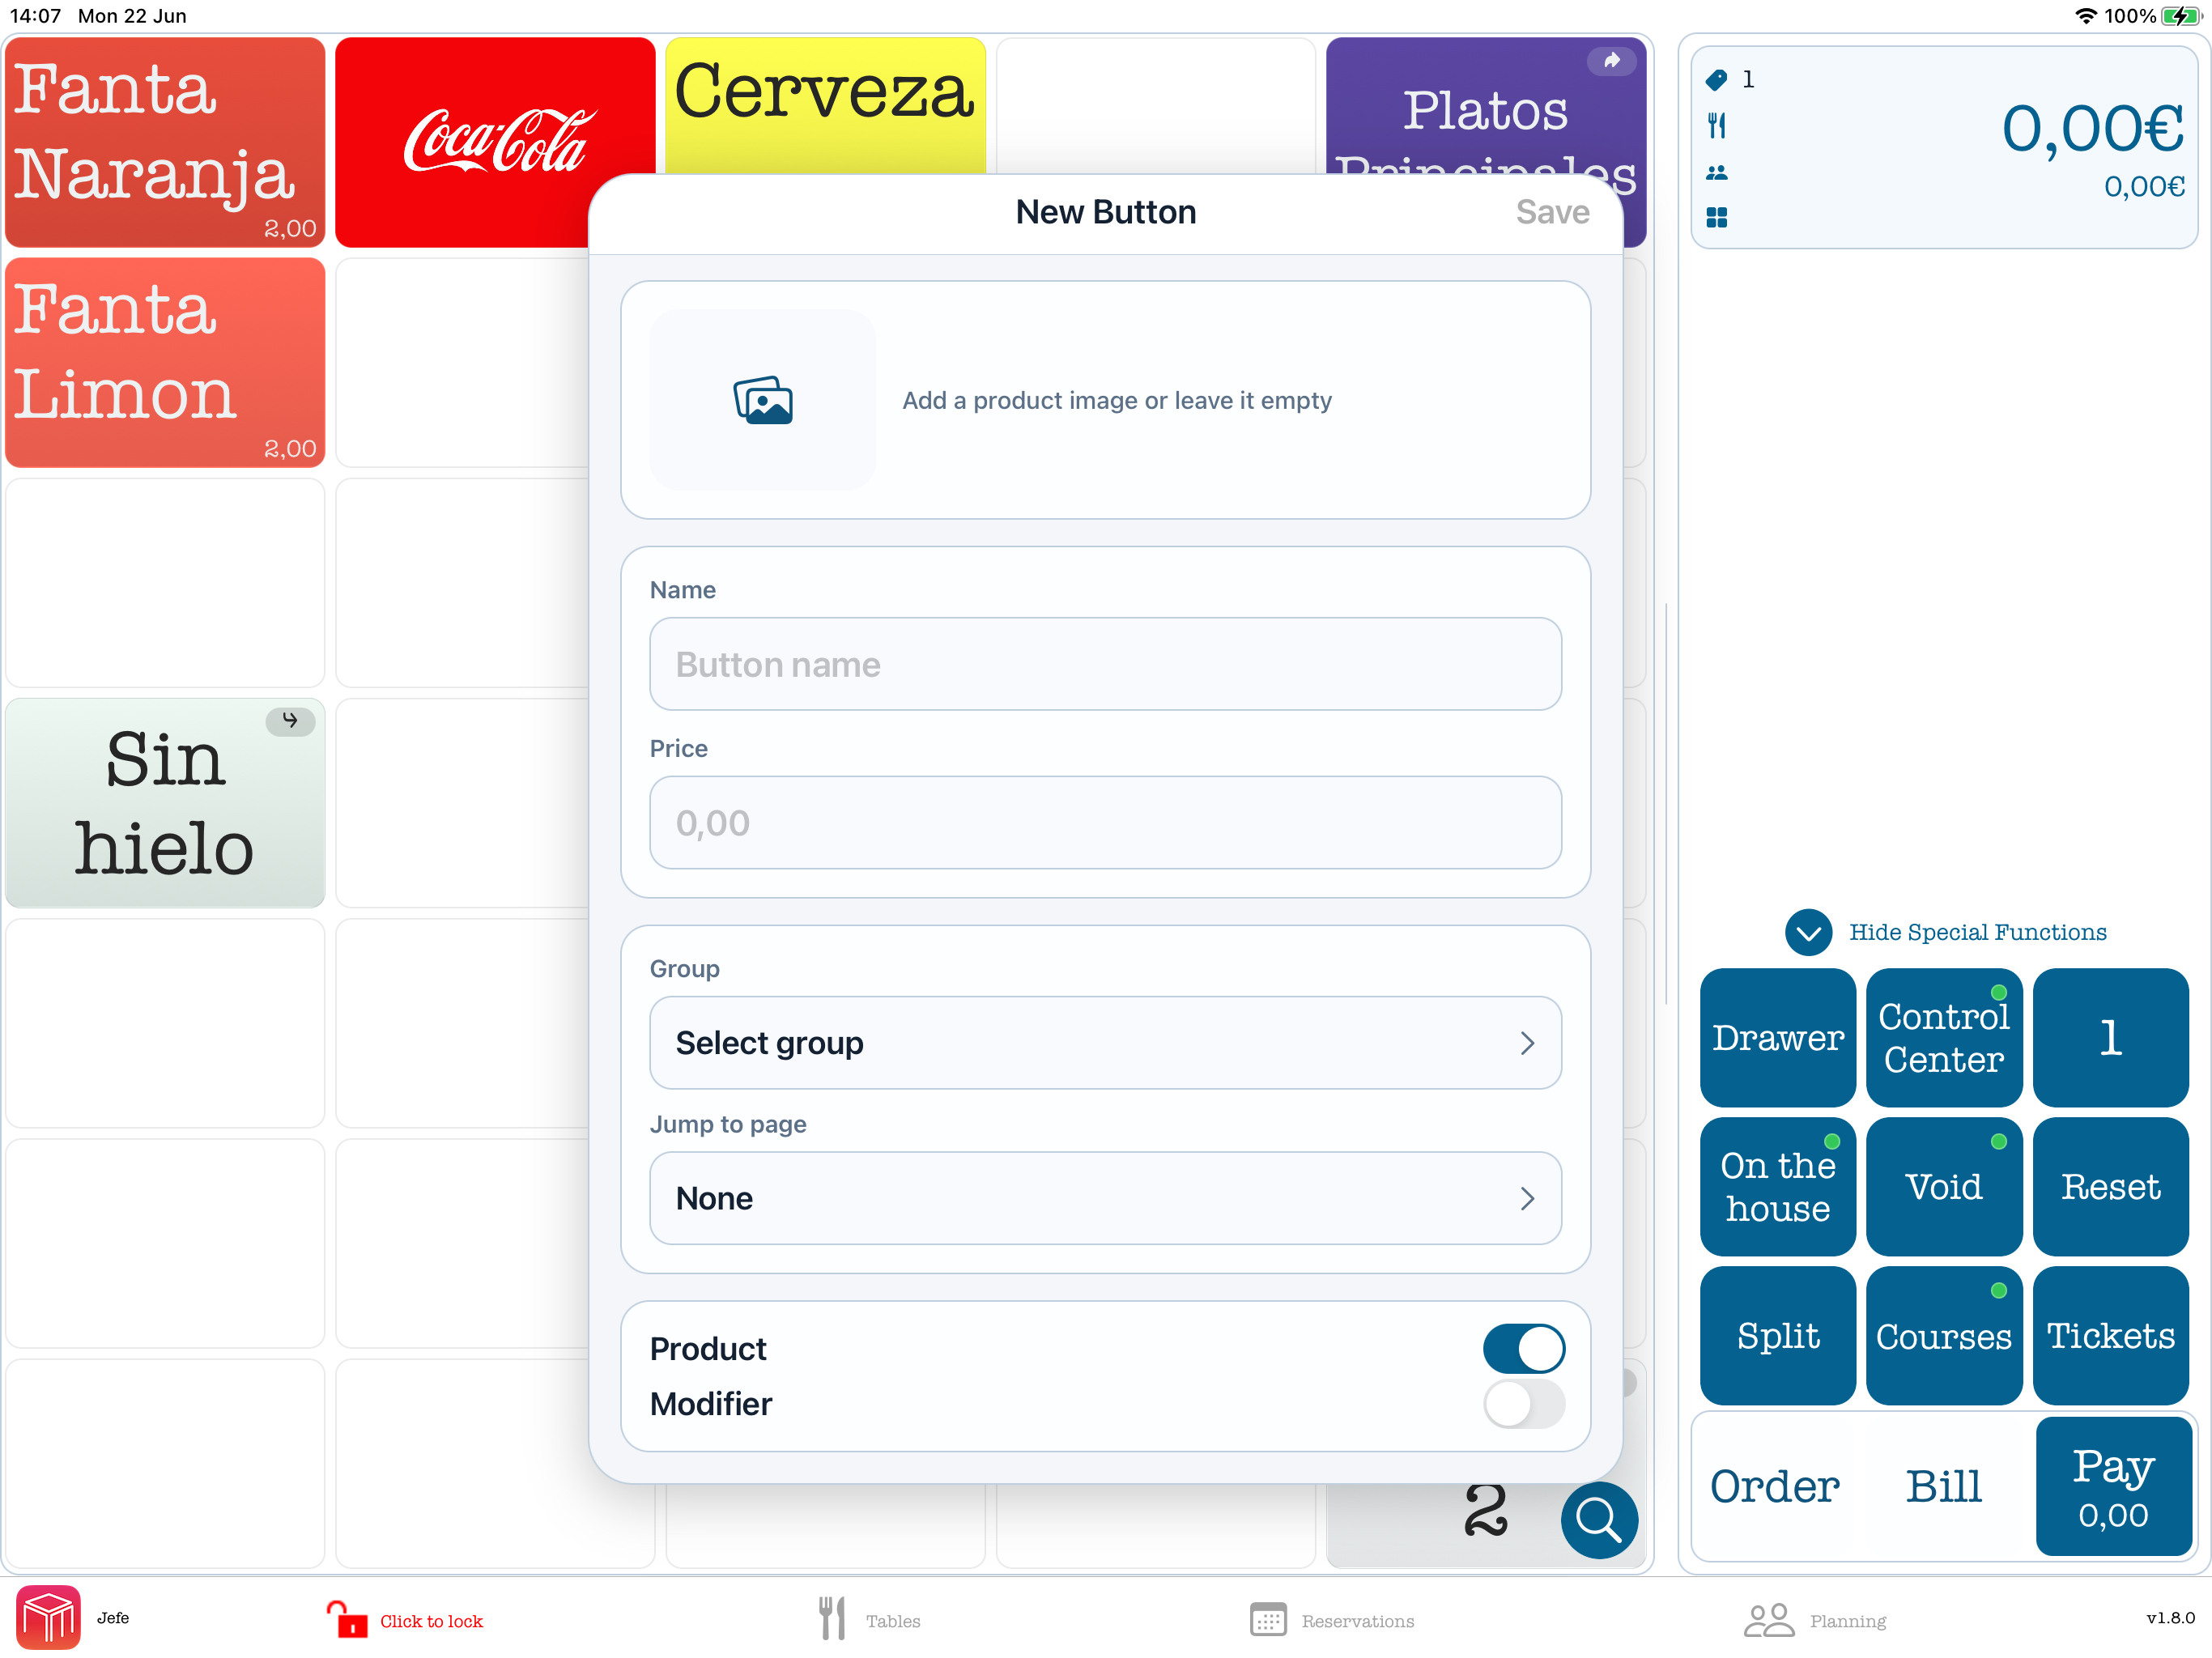
Quick Add from the POS screen: Double-click an empty space on a page to create a new product button directly on that spot. WaiterOne opens the New Button form so you can enter the name, price, group, image, and product/modifier type without calculating grid coordinates first.
CSV Import: Product CSV files can use commas or semicolons. To import a CSV, send the file to the iPad and open it with WaiterOne. To create the correct CSV layout, first export a sample file from Settings > Data > Export. During import, WaiterOne can create missing groups and pages; when a row has a group but no page, the group name is used as the page name. After the import, you can choose to add page jump and return buttons on the imported pages.
Organizing Buttons & Courses
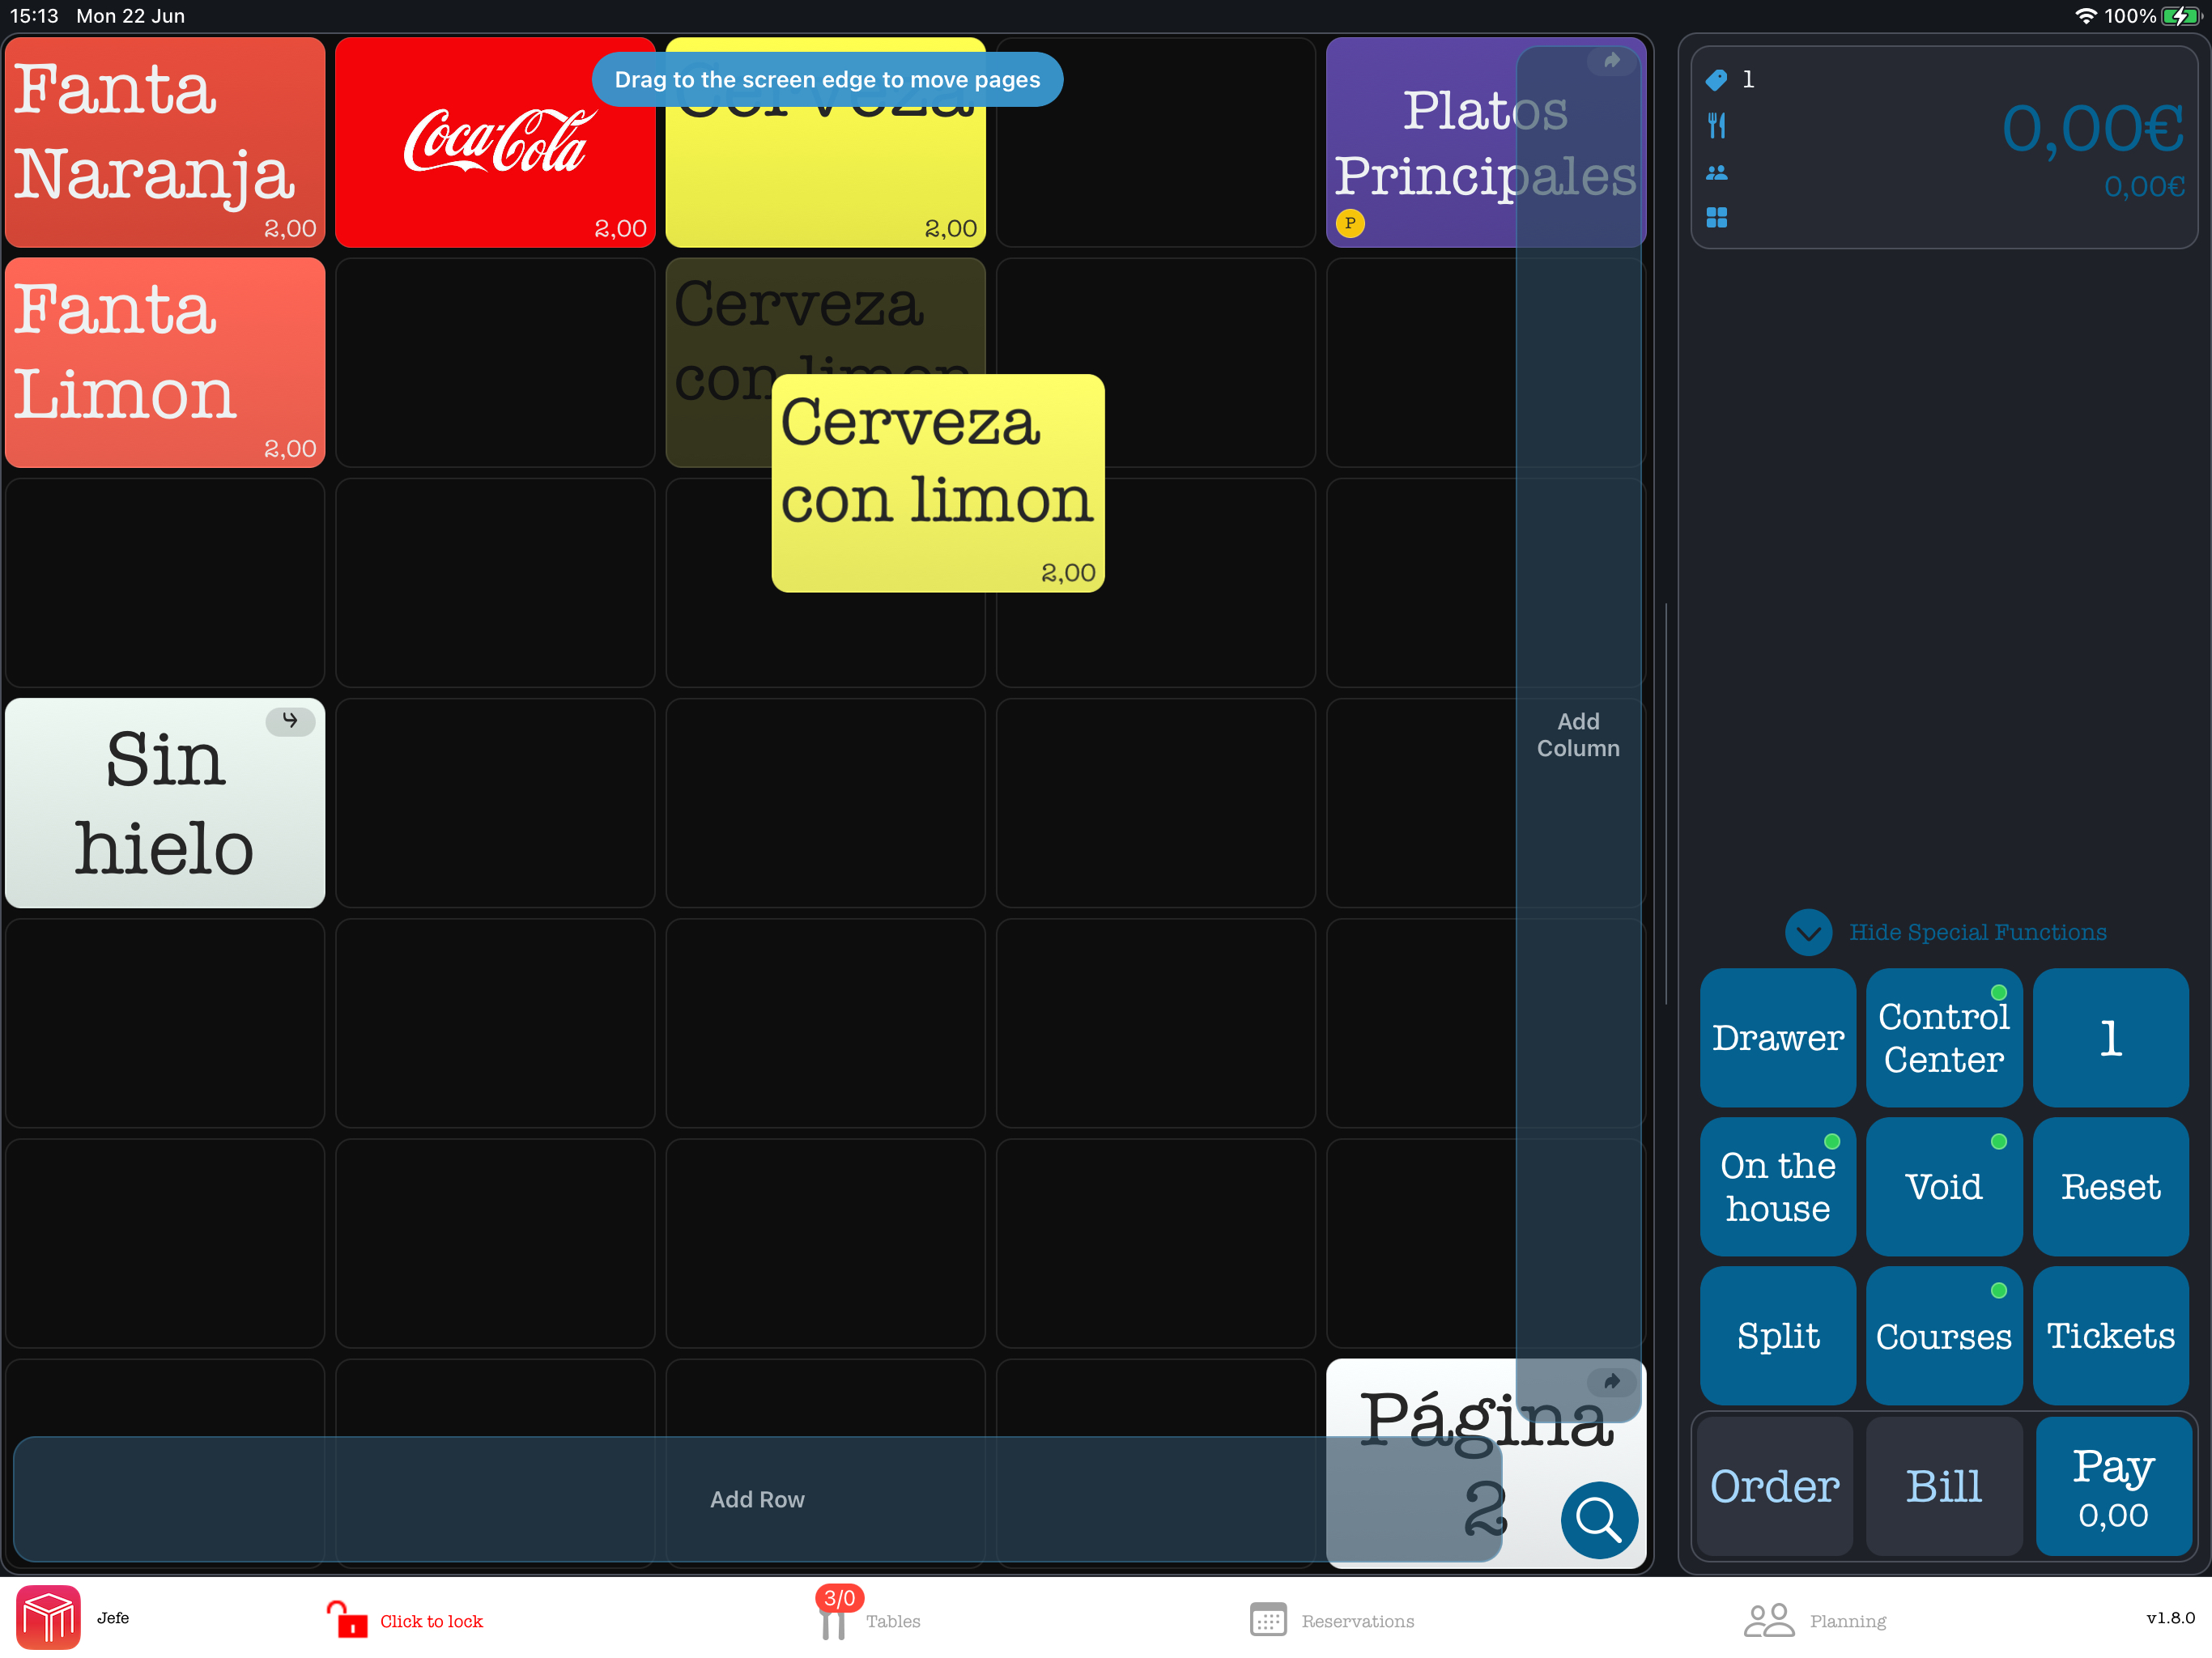
Drag & Drop Organization: In the main POS sales screen, you don't need to manually calculate row and column numbers to rearrange your layout. Touch and hold a button, then drag it to its new location on the grid. You can also stack several buttons on the same grid position when you want to group related items, or drag toward the edge of the page to add an extra row or column.
Kitchen Courses: Courses are a fantastic way to sort ordered products on your kitchen dockets. If you assign items to a "Course" (like Entrée or Main Dish) in the back office, WaiterOne will group them neatly under those specific headings on the printed kitchen ticket, regardless of what order the waitstaff tapped them in! Note: Ensure the Group PLU flag is enabled in your kitchen printer settings for courses to print correctly.
Cleaner button layout: Buttons can show small badges for jumps, modifiers, open price/text, and courses. If the screen becomes too busy, go to Settings > General > Buttons and enable Hide button badges. Prices are controlled separately with Add price on buttons.
4. Connecting WaiterOne Remote
To allow your staff to take orders on the floor, sync their iPhones or iPads (e.g., an iPad mini) to the main iPad.
- On the main iPad, go to Settings > WaiterOne Remote and turn on the server.
- Open the WaiterOne Remote app on the staff device.
- Go to Settings > Server within the remote app. The Host field should be filled in automatically, as the remote connects automatically.
- Tap Download. The menu buttons will instantly sync.
- Watch the small TX/RX activity dots on the main iPad and Remote. They appear only while Remote communication is enabled and blink when a request or reply is moving.
Troubleshooting Tips:
- During download, Remote may show statuses such as Contacting WaiterOne, Sent with Sockets, Trying P2P, Trying APN, or Waiting for response. These messages show which communication path is being tried.
- If Remote shows No response from WaiterOne, confirm the Remote server is still on in WaiterOne and that both devices are on the same local network.
- If the download fails, open your main iPad’s iOS Settings, scroll down to WaiterOne, and ensure the Local Network switch is turned ON.
- Set the WaiterOne location permission to Always on the main iPad. That way, the WaiterOne server keeps on running, even in the background.
- WaiterOne also uses the restaurant location for WeatherKit reports, reservations, planning, and license information. If needed, adjust it in Settings > Reservations > Restaurant location.
5. Creating Tables & Floorplans
Before you can take orders, you need to tell WaiterOne how your venue is laid out. There are two ways to do this: the "old school" way and the "new school" way. WaiterOne allows you to use either method or even mix both approaches.
The Old School Way (List/Number Based)
If you prefer speed and simplicity over visual layouts, you can just use table numbers.
- In the POS screen, click on the total in the upper right corner, and select and add table/clients as they come. Recent tables/clients appear at the top and also remain in the full list. Empty non-reservable tables/clients can be deleted from this list when the user has permission.
- Click on the Tables button and select a table. Tables are alphabetically ordered, and you can also work with floorplans from here.
The New School Way (Visual Floorplan)
For a modern, visual representation of your restaurant, you can design a custom floorplan.
- Go to Data > Floorplans.
- Tap Add to create a new room or area (e.g., "Main Dining", "Patio").
- Add your tables, defining their shape (round or square) and seating capacity. You can also add tables by tapping Edit and double-clicking on the exact spot where you want the new table to appear.
- Drag and drop the tables into position to match your venue's real-life layout.
- In the POS screen, staff can now tap the Floorplan tab to visually select tables.
Moving an Open Table to Another Table
If guests change tables after ordering, you can move their open order from the occupied table to another table. The destination can be on the same floorplan or on a different floorplan:
- Press and hold the occupied table, then start dragging it.
- If the destination is on another floorplan, move the table over the left or right floorplan arrow. Keep it there until the destination floorplan appears, then move it away from the arrow. Skip this step when the destination is on the current floorplan.
- Drag the table onto the destination table and release it.
- Review the confirmation and tap Move. If the destination already has an open order, WaiterOne merges the two tables.
Tip: This also works when one floorplan uses the table list and the other uses the visual floorplan.
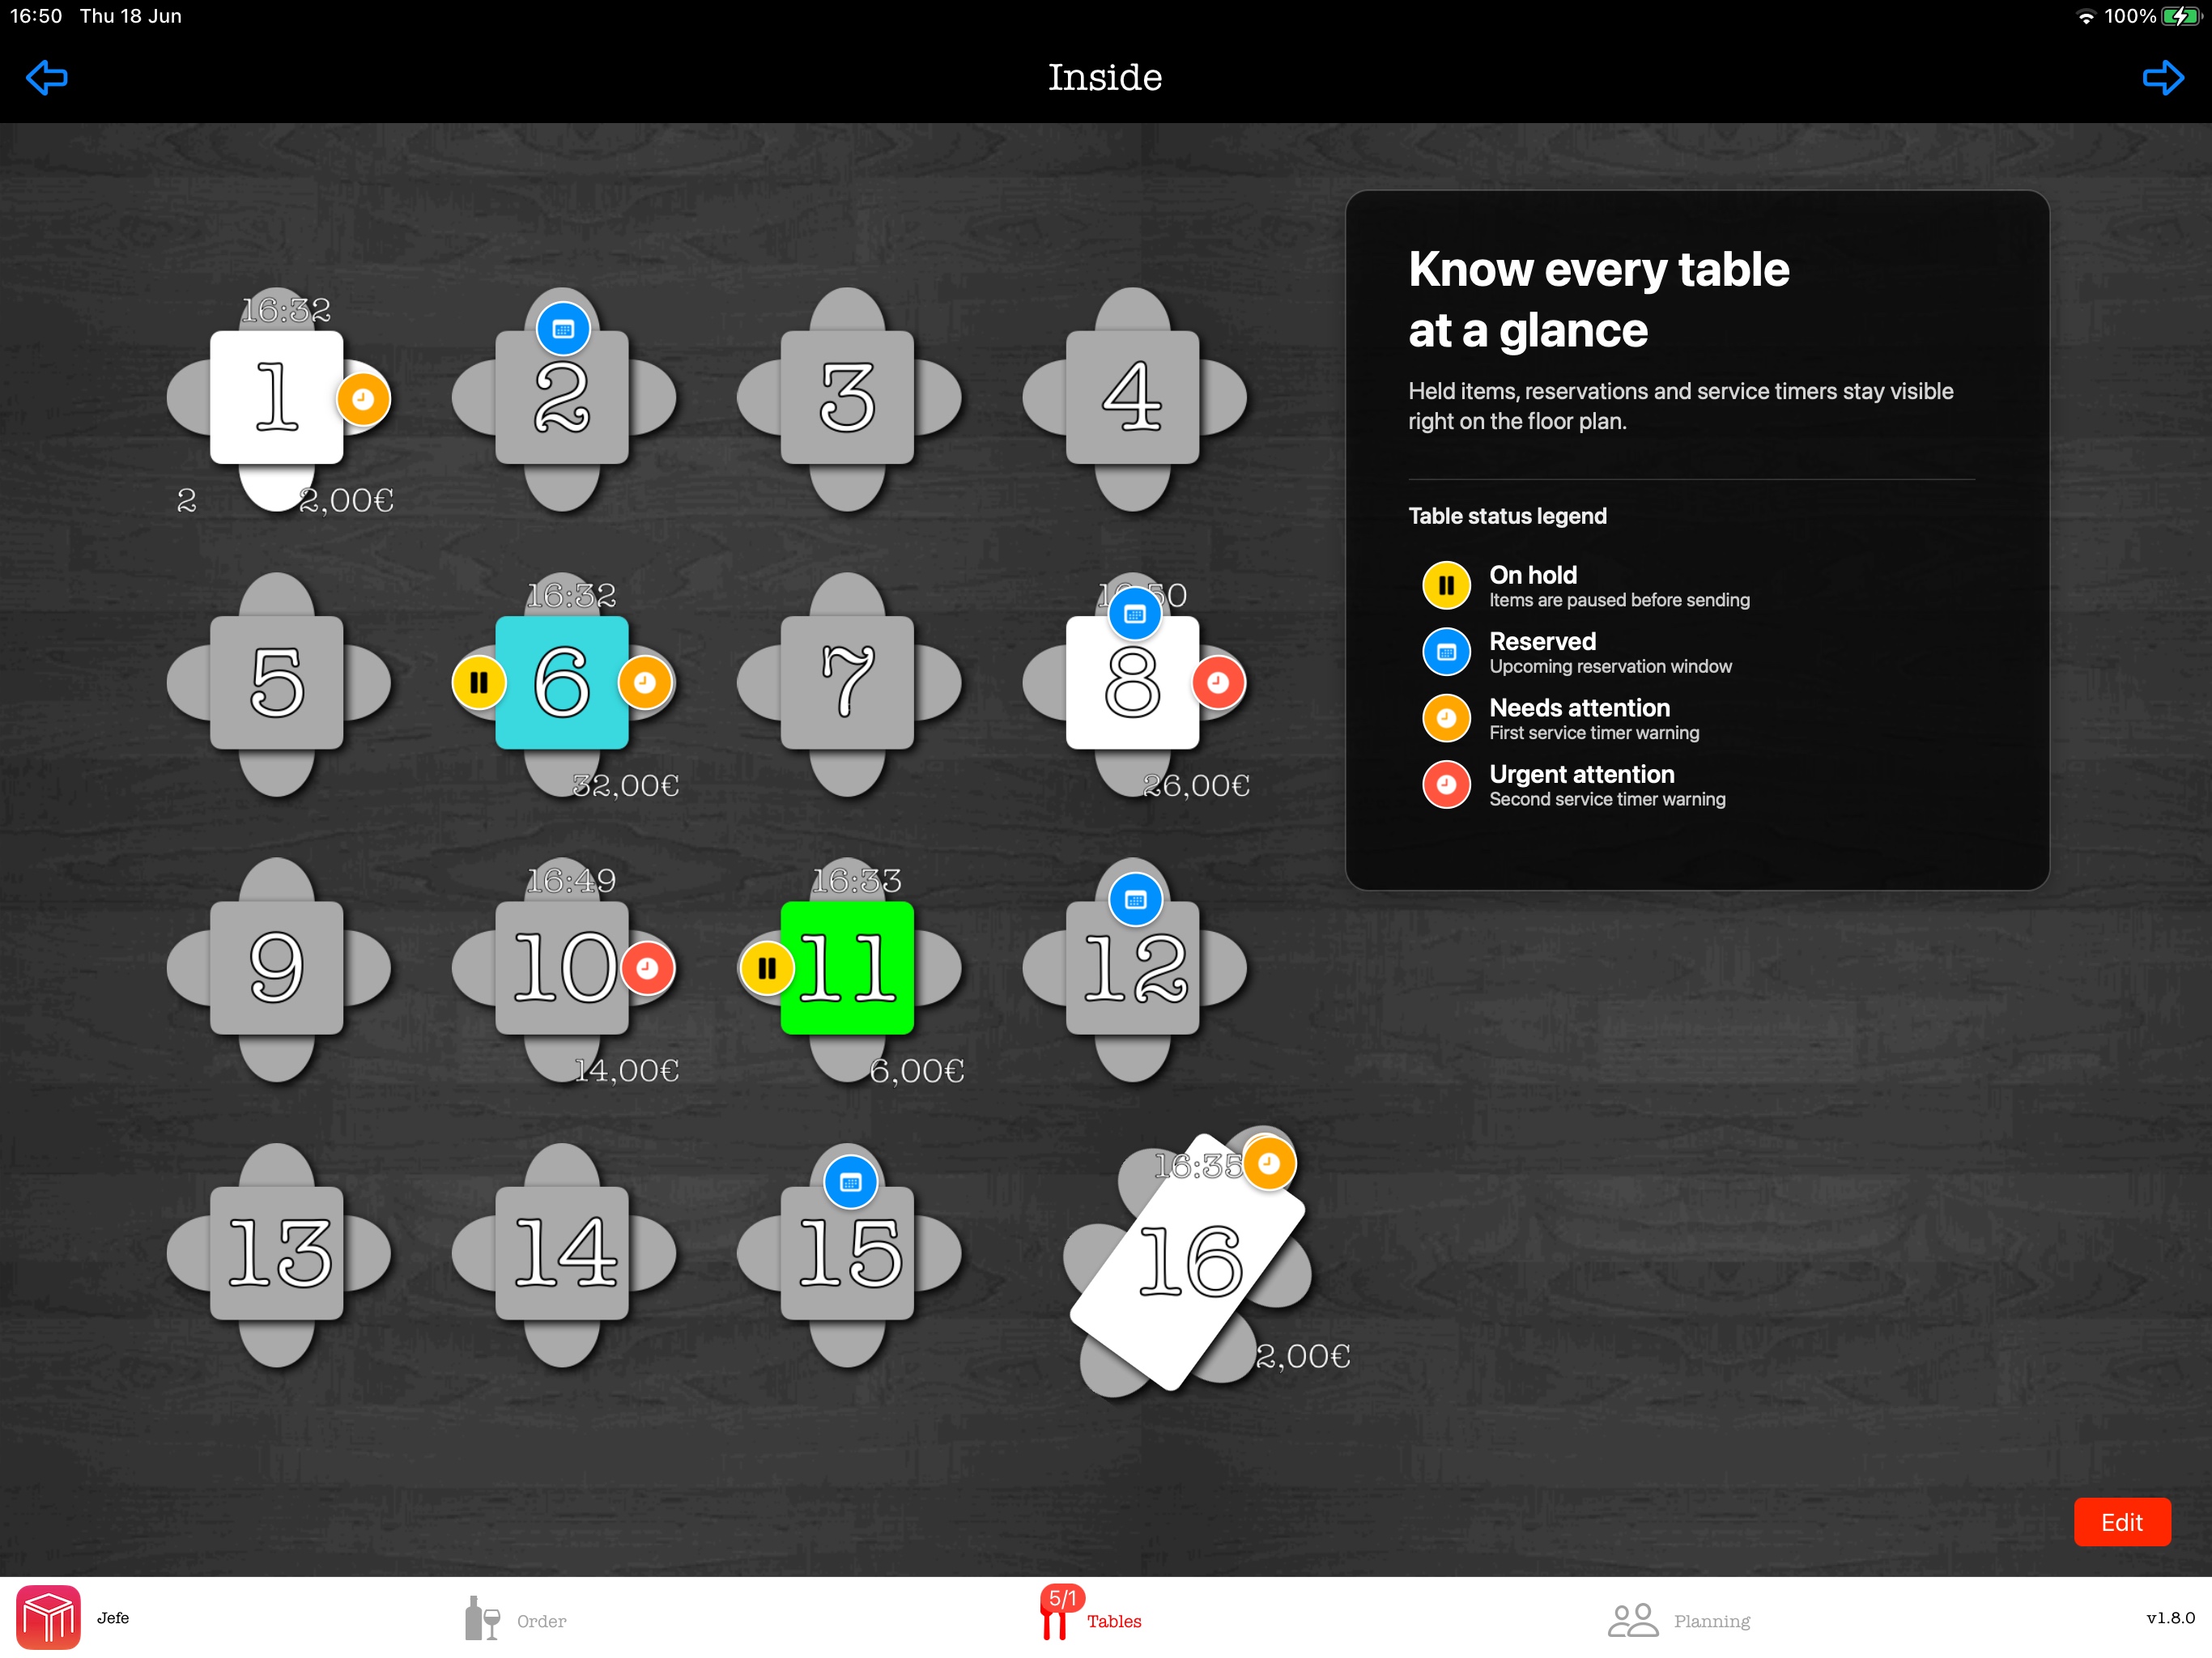
Table States
The floorplan shows the status of each table at a glance. WaiterOne can show open totals, service timers, reservations, and hold status directly on the table, so staff can see what needs attention before opening the ticket.
| State | Meaning |
|---|---|
| On hold | Items are paused before being sent, so the table can be resumed later. |
| Reserved | The table has an upcoming reservation window. |
| Needs attention | The first service timer warning is active. |
| Urgent attention | The second service timer warning is active and should be handled quickly. |
Ad-Hoc Tables & Clients
You can also create temporary ad-hoc tables or clients on the fly (for example, for a walk-in or a quick bar tab). These ad-hoc tables will automatically disappear from the system after the order is closed out and paid.
Table-Specific Settings
Tables aren't just for numbering. When setting up tables, you can configure unique rules for specific areas of your venue:
| Setting | Functionality |
|---|---|
| Price Levels | Automatically apply a different price level to specific tables (e.g., assigning a premium price level to a "VIP Area"). |
| Specific Printers | If your venue has tables spread across different physical locations, you can configure particular tables to automatically send their final bills or payment receipts to the printer nearest to them. |
Reservations & Waitlist
Use the Reservations screen to plan upcoming guests by table and time. The booking form shows the expected end time while you adjust the duration, so staff can see immediately how long the table is blocked.
For walk-ins, add guests to the waitlist with their party size, phone number, quote minutes, and notes. Waitlist entries can be sorted by when they were added, quote time left, or guest count. The quote pill shows whether a guest still has time left or is overdue.
Staff can edit a waitlist entry if the guest changes their phone number, comes back later, or cancels. When a table is ready, tap Seat or drag the waitlist entry into the reservation book to create a reservation at the chosen table and time.
Reservations and waitlist entries can be linked to an existing Client record, or staff can create a new Client directly from the booking details. When a linked guest is seated and paid, the ticket is added to the Client profile so the team can see visits, total spend, average ticket, last visit, and recent tickets from the Clients screen.
Guest messaging: If the iPad is configured to send messages, WaiterOne can prepare a waitlist confirmation in the Messages composer when a phone number is available. Staff can review the text before sending; delivery uses the device's normal Messages/iMessage/SMS setup.

Planning
Use Settings > Planning to open the staff planning tools. Managers can create open shifts, assign waiters, copy schedules, use day templates, publish the visible day, and approve shift pool requests.
Staff users see their own planning view with their shifts, available open shifts, and their pending requests. They can claim open shifts, offer their own shifts to the pool, request trades, and cancel their own pending requests. Editing the schedule itself remains a manager function.
6. Daily Operations: Front of House
Navigating the POS
The navigation bar stays visible along the bottom of the POS so staff can move directly between the enabled sections. Depending on your settings and licensed features, it can show Orders, Tables, Reservations, Planning, and COS. The current section is highlighted.
- Employee and menu: The WaiterOne icon and employee name appear on the left. Tap this area to open the left menu. When nobody is logged in, it shows Log in.
- Locking: While working in Orders, the first navigation button shows Click to lock. Tap it again to lock the POS; it then shows Locked until an employee logs in.
- Table status: The red badge on Tables shows open tables followed by tables with a bill, for example 2/1. It updates as table tickets and bills change.
- Print queue: A badge on the Orders button shows pending print jobs and disappears when printing finishes.
- Version: The installed WaiterOne version appears at the right side of the bar, which is useful when contacting support.
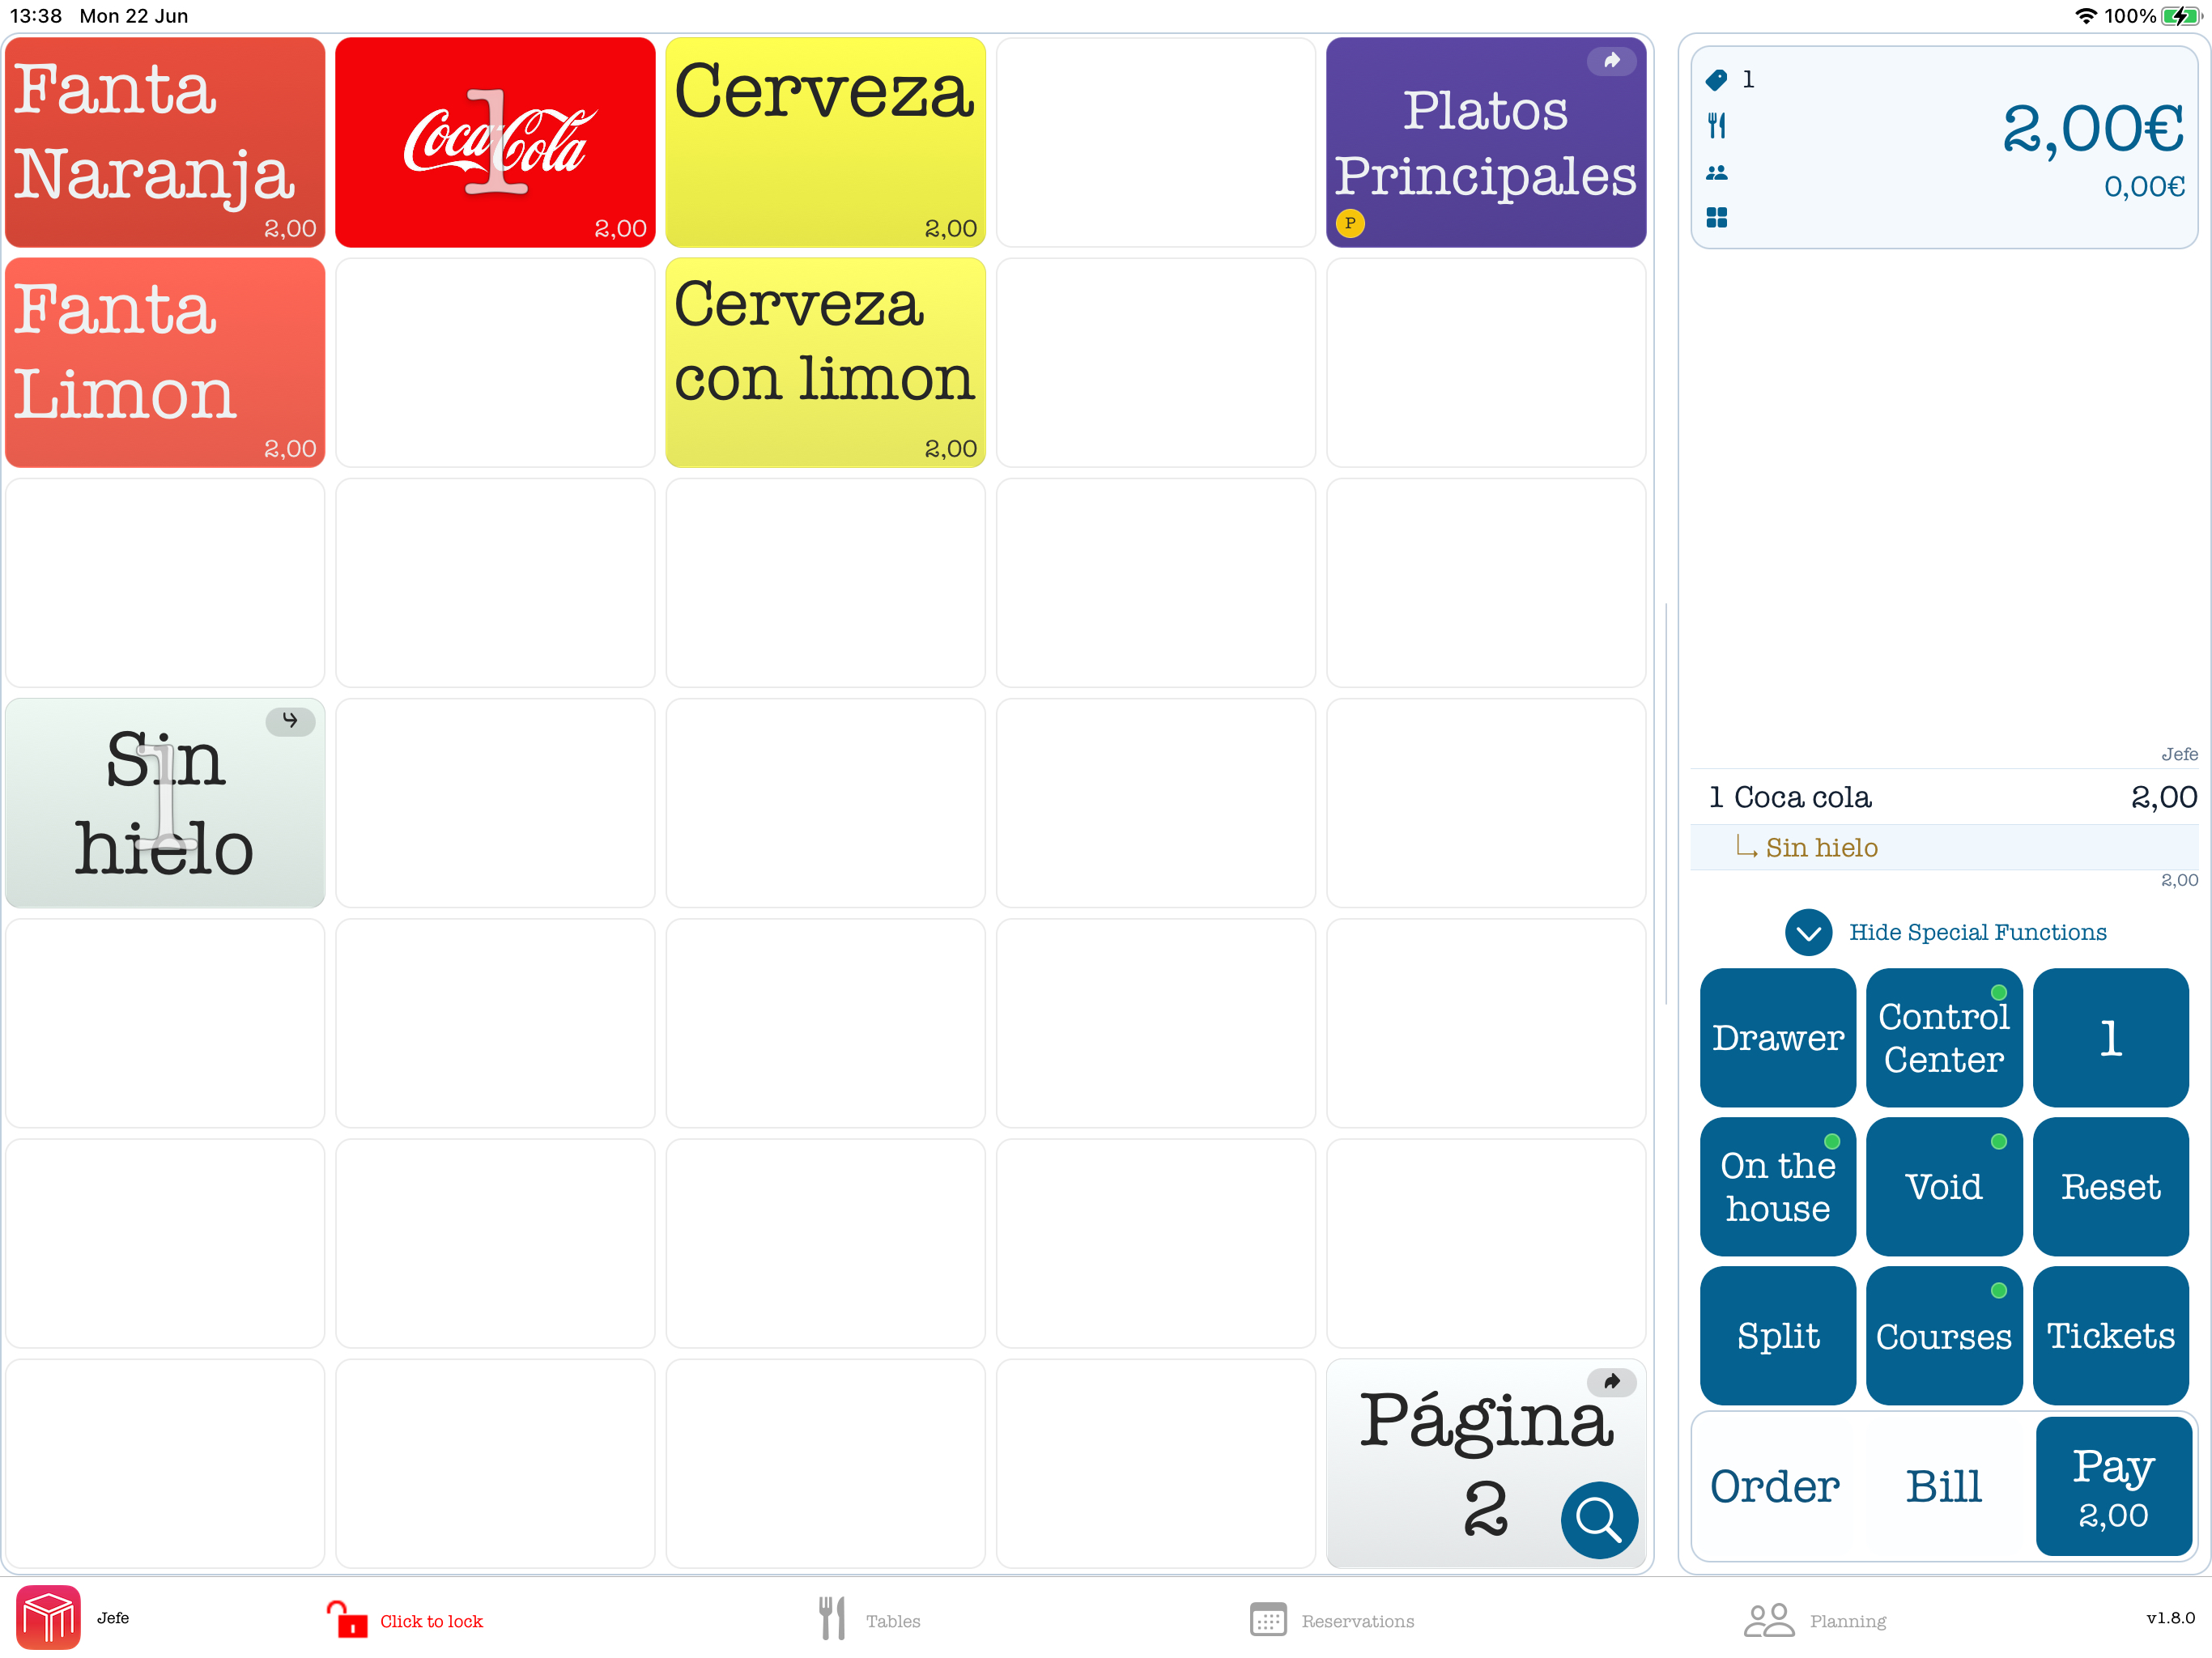
Taking an Order
- Tap the Tables or Floorplan screen.
- Select the active table.
- Tap your pages and select the ordered items.
- Select any required modifiers when prompted.
- You will use the three visible main action buttons at the bottom of the screen to process the
transaction:
- Order: Tap this to send the items to their respective preparation stations (e.g., drinks to the bar printer, food to the kitchen printer). The table remains open.
- Bill: When the guests are ready to leave, tap this to print their check/receipt. The table remains open until payment is processed.
- Pay: Tap this when you are taking payment.
Hidden Hold: The Hold button is hidden at the OBP buttons (Order, Bill and Pay). Swipe the OBP buttons to the right to reveal Hold, then tap Hold to temporarily park the current ticket, so you can return to it later or serve another table/client first.
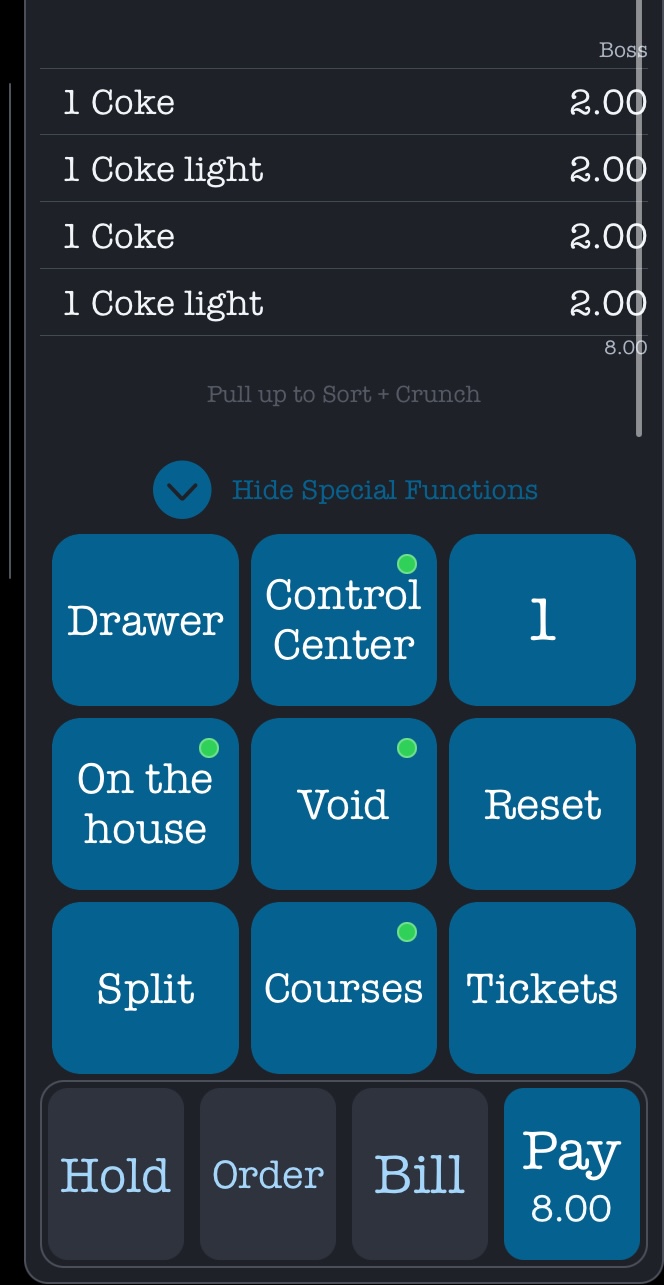
Ticket screen: Swipe up on the ticket screen to crunch the ticket and combine the same products into one line.
Special Functions: Swipe Special Functions to the right to show more special functions. Swipe it to the left to show the numeric keyboard.
Note: The Order and Bill buttons are only selectable if a table or client has been selected. If no table/client is selected (e.g., for a quick counter service order), you can omit Order and Bill entirely and skip straight to pressing Pay.
Processing Payments
- Select the table that is ready to leave.
- Tap the Pay button.
- Choose the payment method (Cash, Card, Gift Voucher).
- The cash drawer will trigger, the receipt will print, and the table will reset and close for the next guests.
Tipping
Tips are handled as a separate payment method. To create a tip button, go to Data > Payments, add a payment method for tips, set its value to 1, and activate the Tip option. During payment, staff can then select that tip method for the extra amount the guest wants to leave.
SumUp: When you work with SumUp, tipping can be fully configured from Settings > Payment Providers > SumUp.
Tendering: If you use tendering, enable it in Settings > General > Tendering and choose a normal default payment method such as Cash. Do not set Card or Tip as the default payment method.
7. End of Day & Reports
Closing out your day is just as important as opening it.
| Task / Feature | Description |
|---|---|
| X/Z Readings | Print a daily summary directly from the iPad.
|
| Cloud Dashboard | Log into your WaiterOne online dashboard via any web browser at www.waiterone.net/dashboard to view detailed analytics. The dashboard is fully responsive, so you can easily access it on your smartphone too! The dashboard is automatically synced with the iPad, but you can also force live reports to be pushed manually! You can manage your dashboard password from the iPad by going to Settings > Cloud Dashboard. |
| Automatic Backups | WaiterOne securely backs up your database. If your internet drops during the day, transactions are stored locally and instantly pushed to the cloud once you are back online. |
Tips report: In Reports, open the Payments reports and choose Tips to print a tips-only overview. It shows each user with cash, card, other, and total tips, so you can pay out staff tips without showing full sales or payment totals.
Reports overview: The overview is available to manager users. To hide it for a venue, go to Settings > General > Results and turn off Show reports overview. When it is hidden, Reports opens with no report selected until staff choose one.

8. The WaiterOne Ecosystem
WaiterOne is more than just a POS tablet; it’s a fully integrated suite of applications designed to modernize every touchpoint of your venue.
| Application | What It Does |
|---|---|
| WaiterOne Remote | The core staff handheld app for iPhones and iPads. Allows waitstaff to take tableside orders and fire them directly to the kitchen or bar. |
| KDS (Kitchen Display System) | Replaces paper tickets in the kitchen. Orders appear digitally on a screen, allowing kitchen staff to bump tickets as they are prepared. |
| WaiterOne Kiosk | A self-service ordering application. Guests can browse the menu, customize their orders, and pay directly on a full-blown 27-inch screen. |
| COS (Client Ordering System) | A web-based ordering platform (Scan-to-Order). Guests scan a QR code at their table to view the menu and order directly from their own smartphones. |
| Reservations | A built-in table management and booking system to handle upcoming guest reservations directly within the WaiterOne interface. |
| CSM (Client Service Menu) | A QR code to be scanned at the table so clients can order themselves, do reservations, and pay the bill. |
| Digital Signage | Running on screens throughout your business with data and pricing coming directly from the iPad. |